The Boondocks Blog
  • Home
  • About
    • About me
    • FEATURED
    • LEGAL
  • Project Gallery
    • My Projects
    • PHOTO GALLERY
    • Furniture
    • WREATHS
    • SEASONAL PROJECTS
  • Link Parties
    • Link Parties
    • SWEET INSPIRATION LINK PARTY
  • Keep In Touch
    • Subscribe to Photography
Mid Century China Cabinet
UP-CYCLE
Chandelier
PHOTOGRAPHY
coffee station
RE-PURPOSES

How to makeover an Old Wooden Bed Frame

10/3/2016

104 Comments

 
Disclosure: I was compensated for doing this post with product.  However, all the opinions stated here are my own. I only use products I love and would recommend to my viewers. 

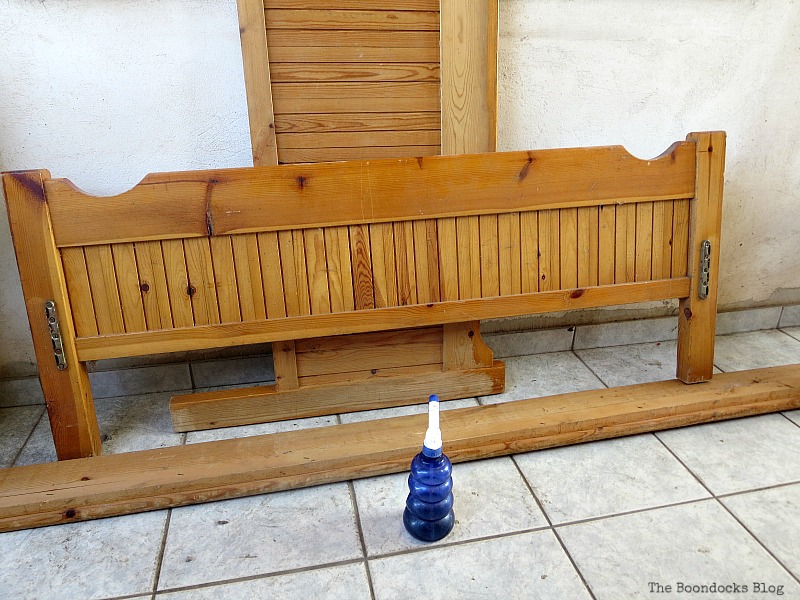
This is an old bed frame that I had sitting ... you guessed it... in my basement. It is a nice size, a little less than full but bigger than a twin.  Here you can see that nasty too-much-orange-varnish look that we all love so much. It may be fall but we don't need to see this year round. 

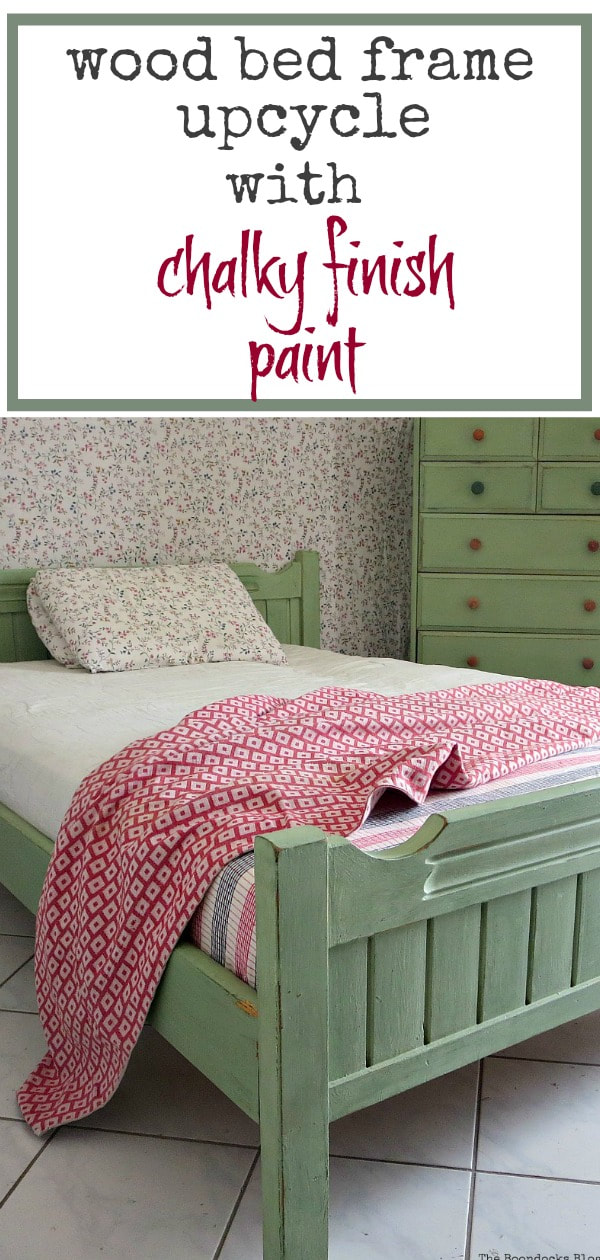
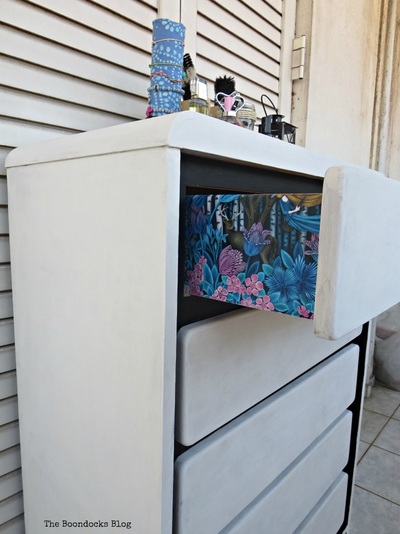
A few months ago I shared a dresser makeover with you.  It was an old Ikea dresser that was about 25 years old and I painted it a soft green. Well, it turned out so nice that I decided to redo the bed to go with the dresser. Today, I am going to show you how to makeover an old wooden bed frame. 
​
Bedframe before, How to Makeover an Old Wooden Bed Frame theboondocksblog.com
I started out painting it with  Enchanted by Americana Decor Chalky Finish Paint  from DecoArt. I make sure to shake the can really well so that the mixture comes out nice and smooth. With two coats it covered that lovely-not orange. (If you'd like to purchase this paint, I have added links to the product through Amazon at the end of the post.) 

First coat of paint Enchanted, How to Makeover an Old Wooden Bed Frame theboondocksblog.com
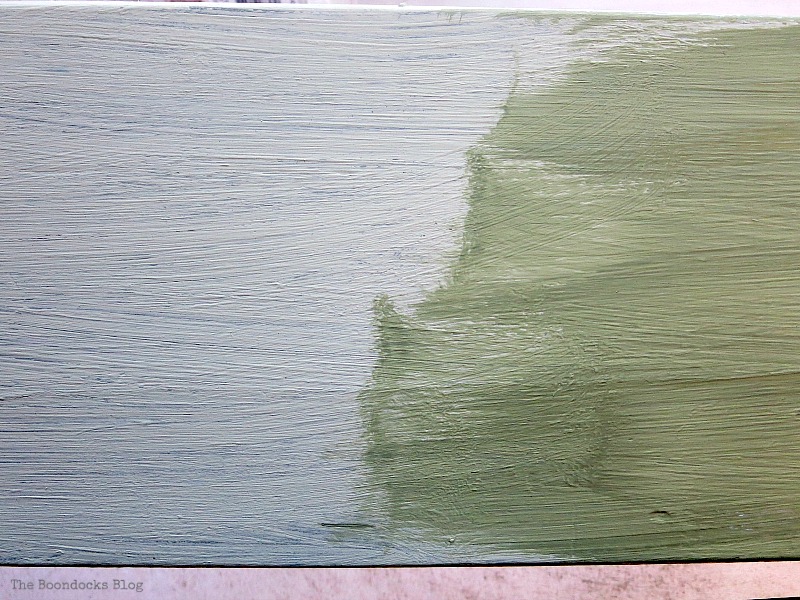
At this point I started to worry because I was running out of my beloved paint. I added some white acrylic paint to the mix, in the hope that it would last me longer. 
​

 Third coat of paint enchanted with white, How to Makeover an Old Wooden Bed Frame theboondocksblog.com
This is the third coat of paint...and no sanding at all beforehand.  That is the beauty of this paint. 
Detail of paints, How to Makeover an Old Wooden Bed Frame theboondocksblog.com
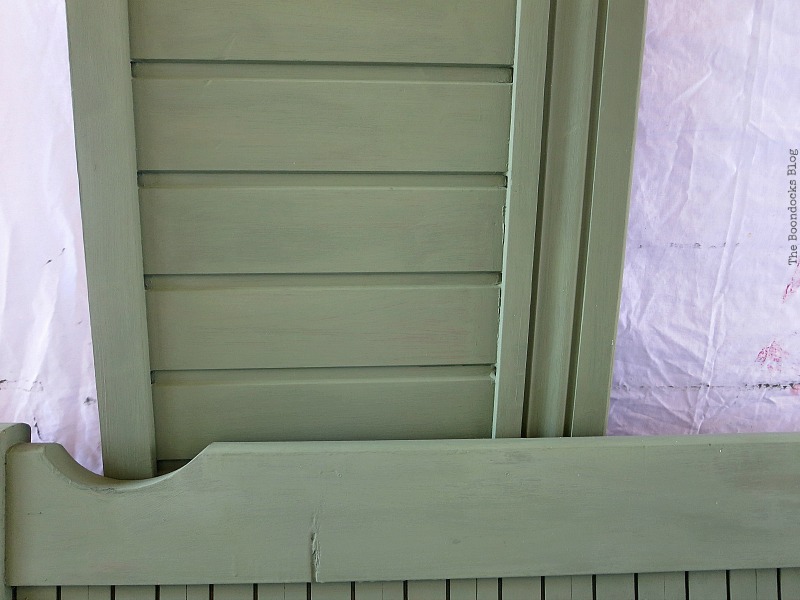
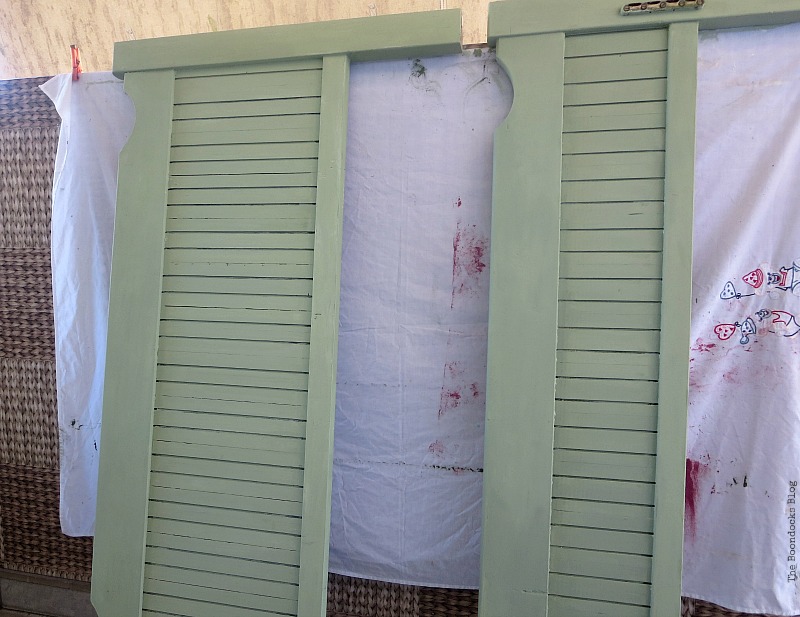
Finally I had to try and match the paint to the one from the dresser.  So I played around with it a bit and here is the last coat. 
​
Final coat of paint, How to Makeover an Old Wooden Bed Frame theboondocksblog.com
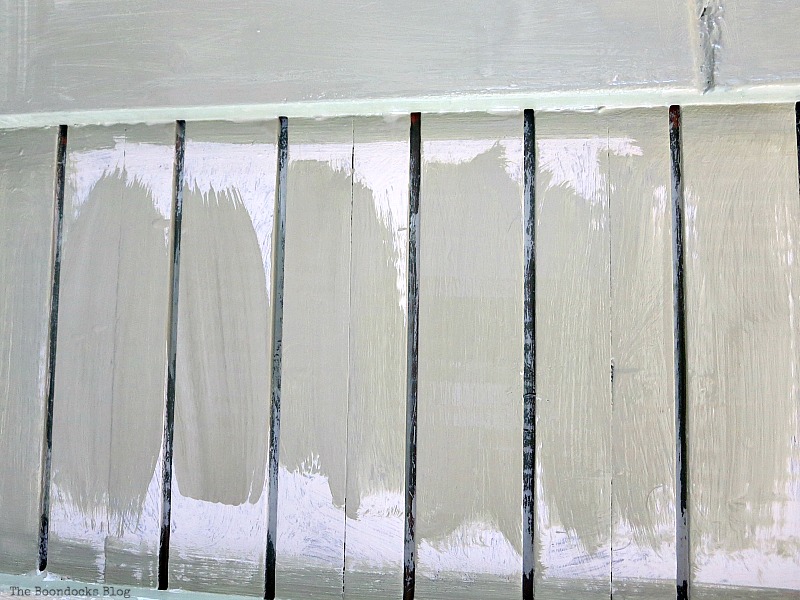
And thank goodness for that because I ran out of paint. 
​

Paintef bed frame, How to Makeover an Old Wooden Bed Frame theboondocksblog.com
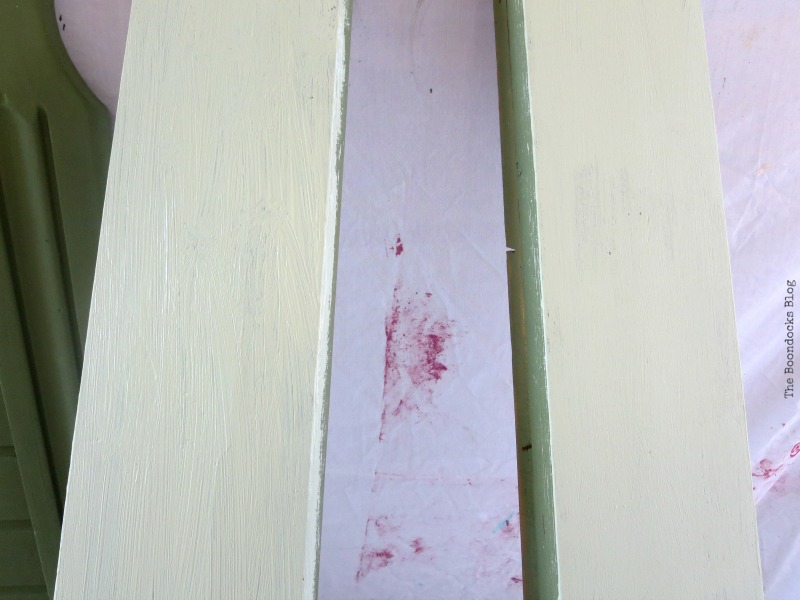
Of course I wanted to mimic the results I had gotten on the dresser and that meant sanding it to get the distressed look.  So whatever sanding I had avoided at the start ... well, I was paying for it now.  In fact, my right hand is still feeling it!
​
Distressing the bed frame, How to Makeover an Old Wooden Bed Frame theboondocksblog.com
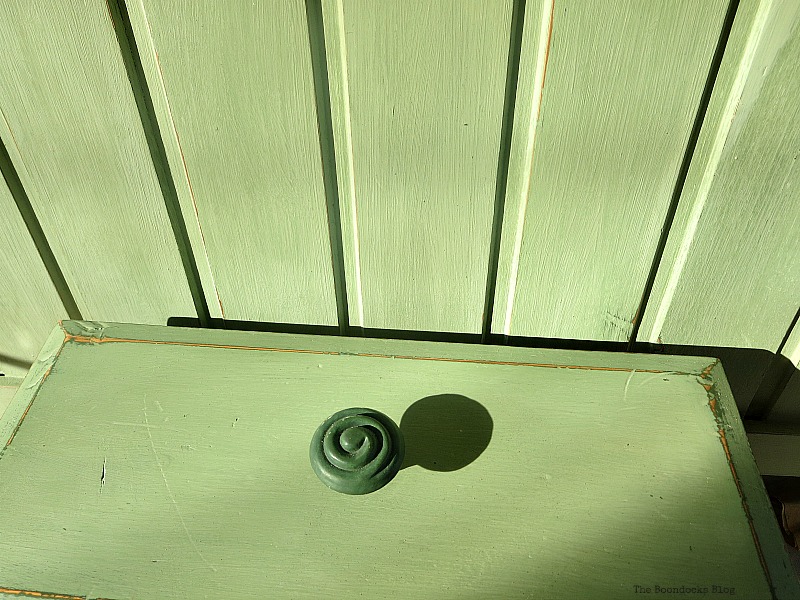
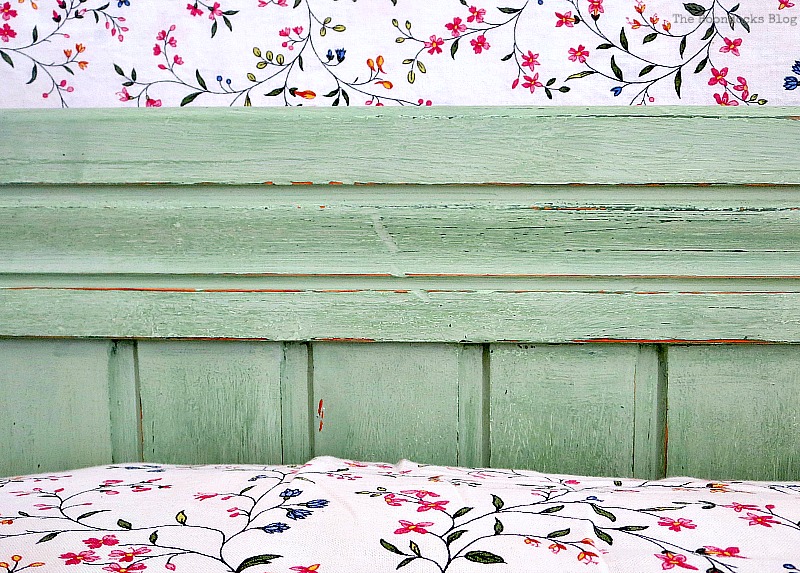
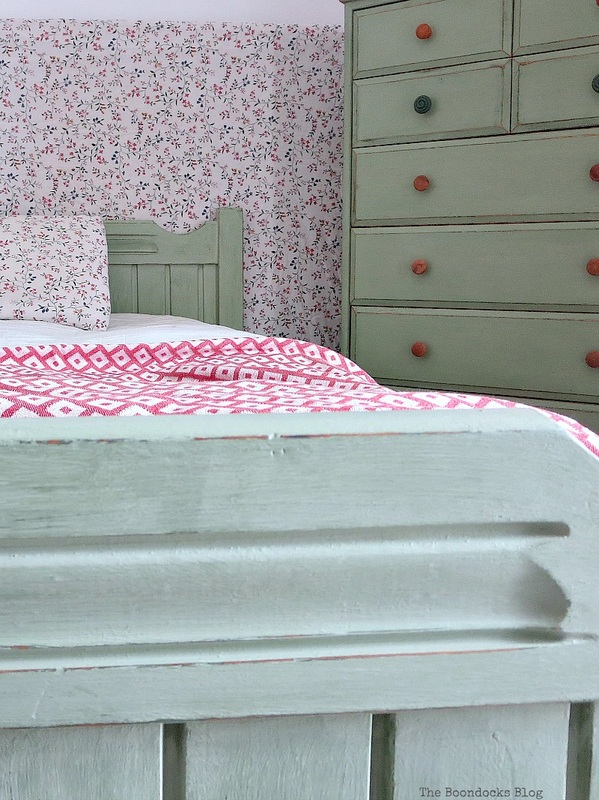
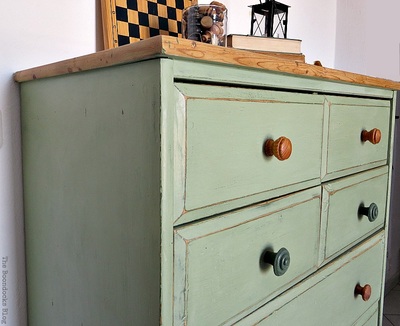
The beauty of this bed is that I was revealing a lighter green under the final coat. 

Detail of distressing, How to Makeover an Old Wooden Bed Frame theboondocksblog.com
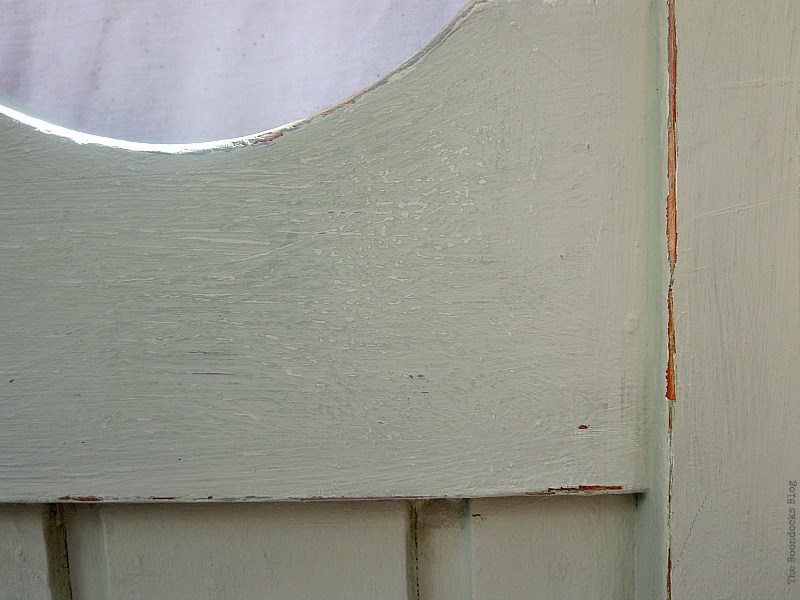
A bit of wax with Americana Decor Cream Wax and I was done. When the wax is added it makes the color just a bit darker.  You can see in the photo below that I have managed to match the color pretty well.  It looks intense here because the sun is hitting it. (If youwould like to purchase this product I have added Amazon links at the end of the post).
​
Adding the cream wax, How to Makeover an Old Wooden Bed Frame theboondocksblog.com
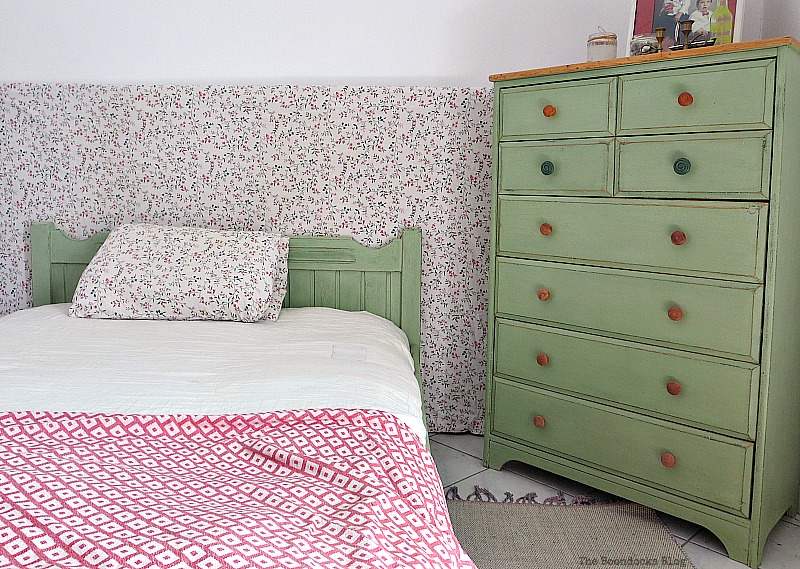
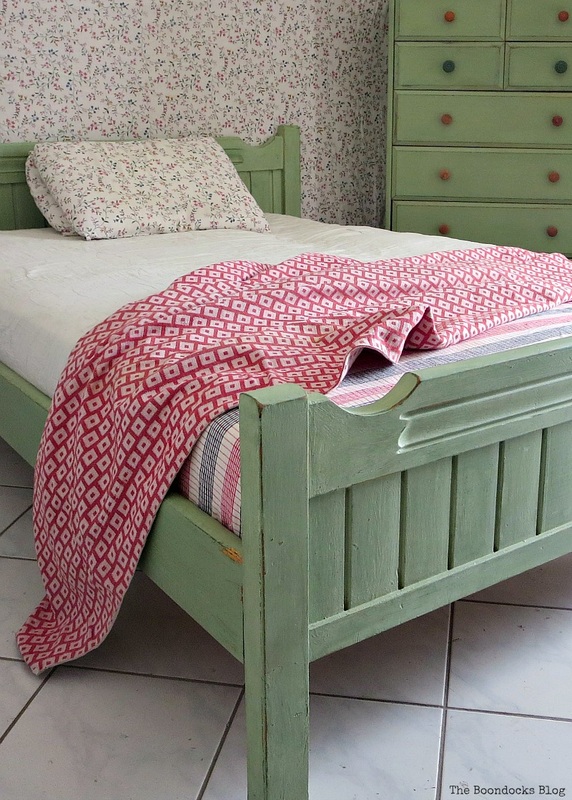
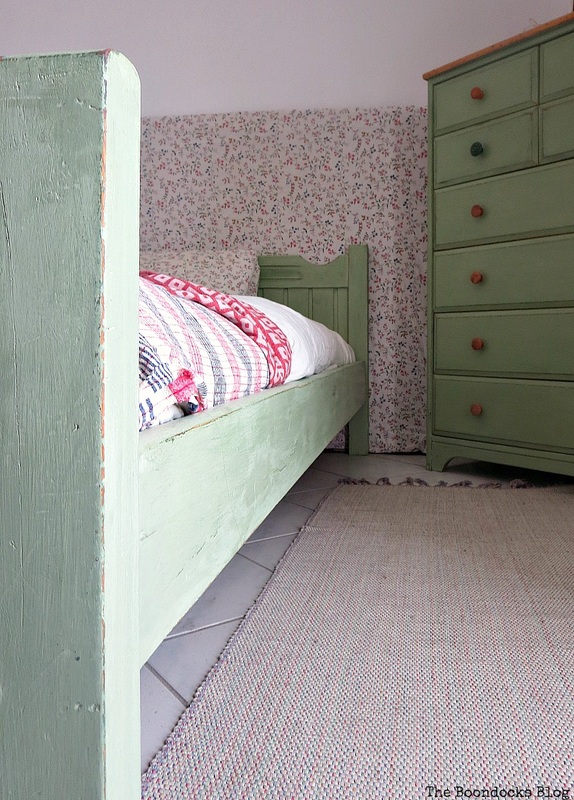
And here it is next to the aforementioned dresser. 
​

The finished bed next to the dresser, How to Makeover an Old Wooden Bed Frame theboondocksblog.com
Disclosure: The items below are affiliate links and link to Amazon.com. If you purchase any of these products through the links, I receive a small commission, that way I can continue to provide you with lovely content.  There is no extra charge to you for purchasing through my affiliate links.

​
Detail of headboard, How to Makeover an Old Wooden Bed Frame theboondocksblog.com
Headboard next to dresser, How to Makeover an Old Wooden Bed Frame theboondocksblog.com
Left side of headboard, How to Makeover an Old Wooden Bed Frame theboondocksblog.com
Headboard and dresser in the background, How to Makeover an Old Wooden Bed Frame theboondocksblog.com
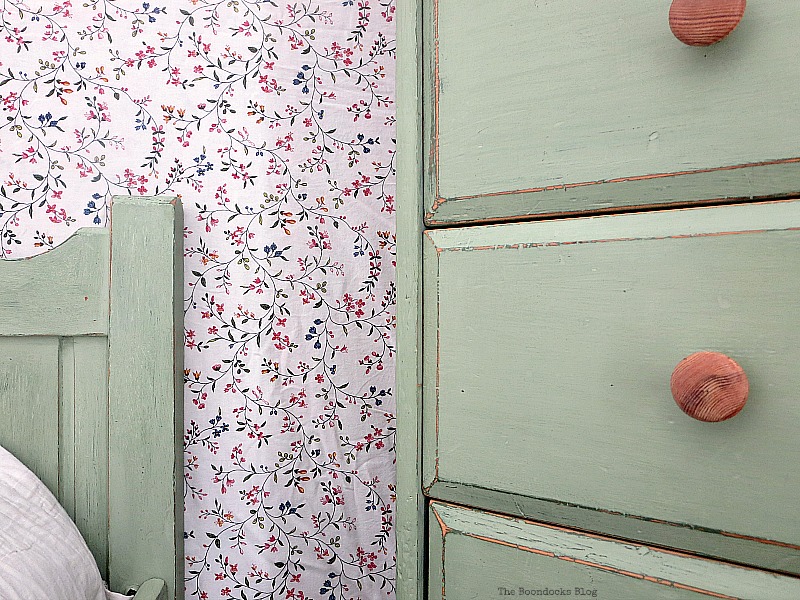
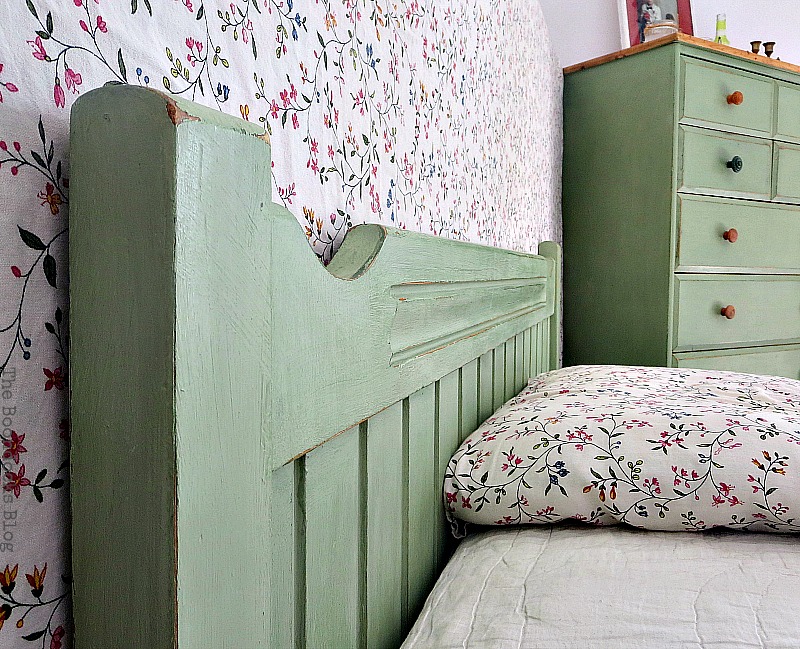
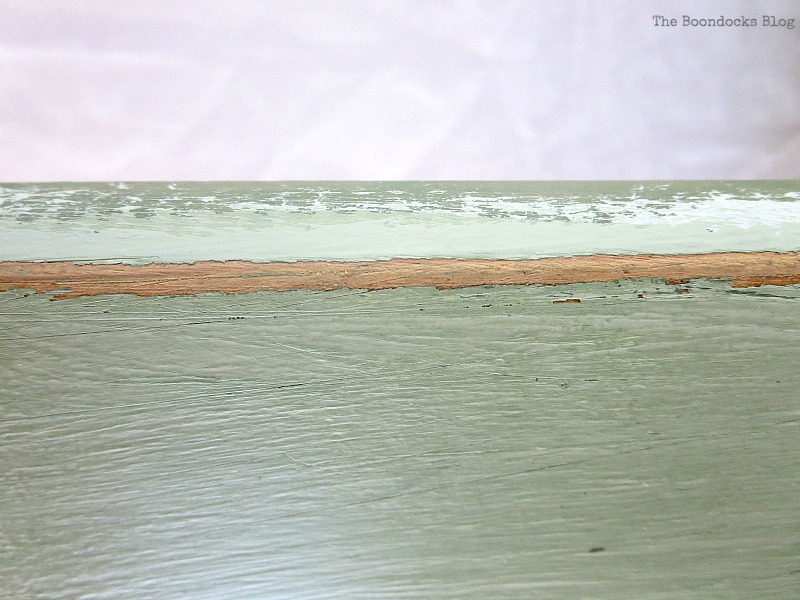
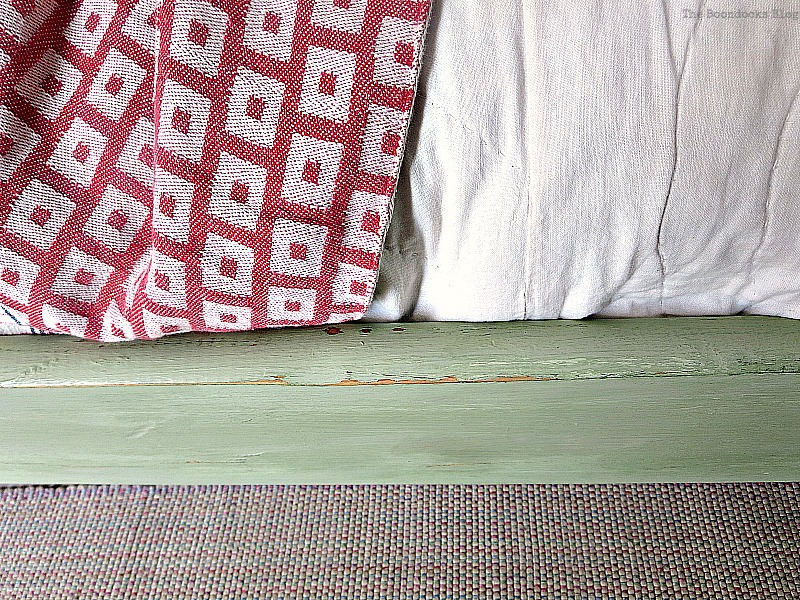
Here you can really see the aging and the scratches. There are four colors on the bed and that is what gives it so much depth.  Otherwise it would just be a boring green bed. 
​
Detail of headboard center, How to Makeover an Old Wooden Bed Frame theboondocksblog.com
Distressed detail of side of bed frame, How to Makeover an Old Wooden Bed Frame theboondocksblog.com
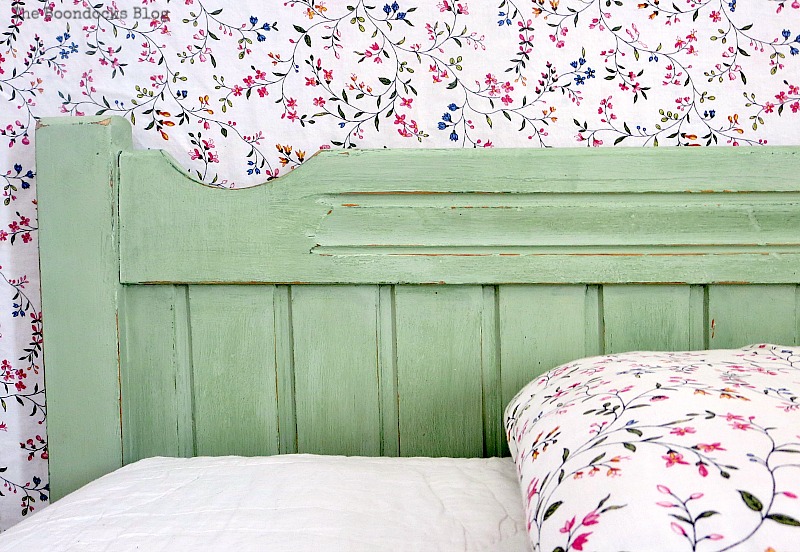
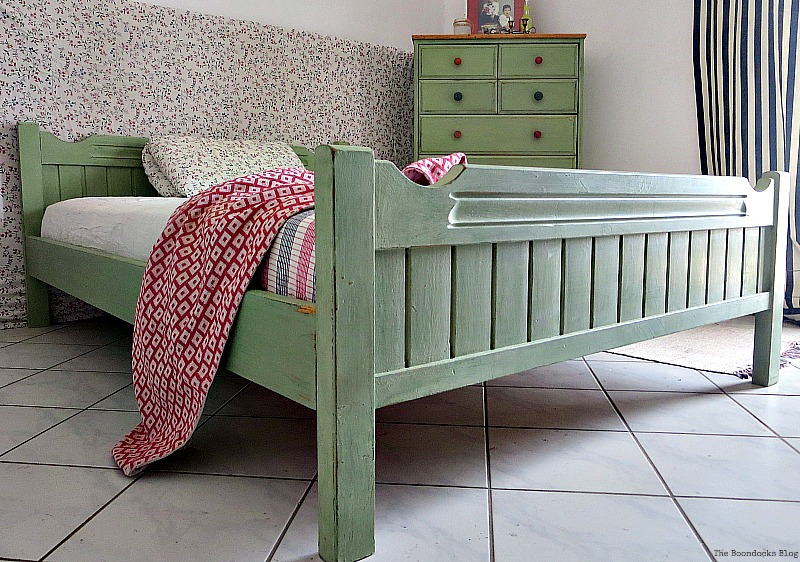
A shot of the whole bed.  The color looks a little different here from the dresser because the light is hitting the bed. 

The whole bed in soft green color, How to Makeover an Old Wooden Bed Frame theboondocksblog.com
 The foot board of the bed, How to Makeover an Old Wooden Bed Frame theboondocksblog.com
Detail of foot board, How to Makeover an Old Wooden Bed Frame theboondocksblog.com
Footboard, How to Makeover an Old Wooden Bed Frame theboondocksblog.com
It was a close call there for a while, between the paint running out and getting a good match. My hand hurts but I think it was well worth the temporary discomfort. 

I've just shown you how to Makeover an Old Wooden Bed Frame.  And now I have a "brand new" bedroom set!  All courtesy of my basement!  What do you think I'll find in my basement next? Maybe a new mattress?


A bed frame painted with DecoArt chalky finish paint to match the Ikea dresser, How to Makeover an Old Wooden Bed Frame theboondocksblog.com

​I
f you like what you see, s
hare it with your friends, or save it on Pinterest. If you really like what you see subscribe to my blog and get my adventures twice a week in your mailbox.
Picture
Related:
The Story of a Dresser
Side Table Refinished
How to Save an Ikea Pine Dresser
The Doily Top Side Table
 <<Sweet Inspiration Link Party #26     HOME     Facebook Photos for September  >>


This blog is for entertainment purposes only; my DIY tutorials are not professional advice. Read my full disclaimer here.​  
​ 

I love it when I get your comments and I will reply to each and every one of them. ​
Μ 'αρέσει όταν παίρνω τα σχόλιά σας και θα απαντήσω σε καθένα από αυτά.
104 Comments
Christina Makri link
10/2/2016 03:47:29 pm

Oh Mary!!! This is a gorgeous transformation! Both dresser and bed look fantastic. Have a wonderful creative week and month :)

Reply
Mary
10/3/2016 08:27:31 am

Now that the weather is cooling down I feel invigorated and ready to do more projects. Have a great month Christina.

Reply
Linda @ Itsy Bits And Pieces link
10/2/2016 05:20:58 pm

That turned out so pretty, Mary...a real transformation! I haven't tried that color yet...lovely!

Reply
Mary
10/3/2016 08:28:59 am

It is a tricky color and one that you will love if you apply it to the right piece.

Reply
Lynn Spencer link
10/2/2016 07:35:19 pm

Mary...this is such a lovely bedroom set! So soothing, crisp and clean. And I love it with that sheet/pillow pattern. Next time in your neighborhood, can I stay there? I know I could just really settle in to that space!

Thanks for sharing your painting and paint matching tips.

As always!

Hugs, Lynn

Reply
Mary
10/3/2016 08:36:29 am

You are always welcome to stay over Lynn. And now I'm getting the bedroom ready. I was so done with all of that orange. ugh!

Reply
Katrin link
10/3/2016 01:06:59 am

Yay, now I know where to stay when I come visit you, lol!!! This bedframe turned out so so beautiful, the whole bedroom looks really great with the matching dresser! Such a great tone and it really looks so inviting, so don't mind me if I end up in there ;) You did a fantastic job Mary! Love the flower sheets and wallpaper too!

Reply
Mary
10/3/2016 08:38:00 am

Thank you Katrin. I was really worried about being able to match it, but a little tri al and error and it came out great. I am so happy to have been able to pull it all together like that. And you don't even need an invitation, just come on over! :)

Reply
Michelle link
10/3/2016 05:10:03 am

Your basement scares me Mary. I would get lost in there with all the beautiful pieces you keep on finding, lol. Great thinking adding a bit of white to make the paint go further and the color is lovely. The whole bedroom looks so relaxing and peaceful.

Reply
Mary
10/3/2016 08:39:22 am

Thank goodness the white and green worked together to create the right color otherwise I would have been in trouble.

My basement is not scary at all Michelle, it just needs someone to go down there... haha.

Reply
Katerina Konstantinou link
10/3/2016 07:07:54 am

This is a complete bedroom set now! Really beautiful and unique! Great job Mary!

Reply
Mary
10/3/2016 08:40:11 am

Much better than having all those random orange pieces before. And now even the imperfections and scratches look charming. Lol!

Reply
Baba link
10/3/2016 07:09:41 am

WOW! What a fantastic job you did. Isn't it fun seeing the transformation of a piece of furniture. I just love painting furniture. I'll bet you can get a lot of beautiful pieces in Greece. How would you go about in finding them there? I'd love to go garage sailing there.
Baba

Reply
Mary
10/3/2016 08:48:26 am

Baba, maybe you can find pieces here in Greece. But in my town you will have to look really hard. All of the things you see here are old pieces that I had from a long time ago that had fallen into disuse hence the basement storage solution.

There are no garage sales here nor yard sales, none of that. The only thing that we have, and again not in my town, is some stores selling old things, but they are way overpriced. I would not set my foot in them.

Reply
Marie from The Interior Frugalista link
10/3/2016 07:31:15 am

I'd like a tour of your basement if these are the kind of treasures you're unearthing. Very nice makeover, Mary! They look perfect together.

Reply
Mary
10/3/2016 08:49:46 am

I was really happy with how I matched the color just right... before running out of paint. haha! And all that paint hides the imperfections and makes them look, dare I say, charming.

Reply
Sandy
10/3/2016 08:17:50 am

The entire bedroom looks great! Lovely job Mary! I was wondering about the wall that matches the pillow case...is it a sheet? If do, how did you hang it with a crisp line on the edge? Thanks!

Reply
Mary
10/3/2016 08:53:08 am

About that wall. A few years ago I placed a big piece of particleboard against the wall and covered it with an old quilt. It served as a makeshift headboard and added much needed warmth to the room. For the staging, I just added a duvet cover that matched the pillowcase to make it look presentable. It was a set I had bought from Ikea years ago.

I hope that answers your question. So if I whip the duvet cover off you will see the quilt underneath that is covering the particleboard. Actually I stapled it on there.

Reply
Doreen@foxdenrd link
10/3/2016 09:37:25 am

Your basement must be huge Mary! I love how this turned out, and thank goodness you had enough paint. I know that feeling all too well. ;).

xxx

Reply
Mary
10/3/2016 02:06:59 pm

I cannot overstate the fear that crept in when I realized I was running out of paint and I don't have chalky paint in my town.. In fact I have no idea where to get it unless the angels from DecoArt send me more. haha.

Reply
Keri Roberts link
10/3/2016 10:04:46 am

Mary, this bed frame is so beautiful!! Love the green color you mixed and the distressed look is perfect. The bedroom is beautiful!!! I love green and pink together! Thanks for sharing my side table! ;)

Reply
Mary
10/3/2016 02:09:11 pm

I am really happy with that green too Keri. It is nice and soft and I am finally embracing my green side. I think the blog color must br rubbing off on me. ;)

Reply
Marjan Hoebeke-Pfaff link
10/3/2016 10:28:47 am

Hello Mary,
I definitely MUST show this post to my husband - I must make him READ it and have a close look at the pictures so that maybe - MAYBE - I'll finally be allowed to do something about our (good old) bedroom... I'm absolutely charmed by your "new" bedroom. It's soooo lovely (and I'm soooooo envious).
WOW!
Marjan

Reply
Mary
10/3/2016 02:15:46 pm

That would be a great idea Marjan. There is nothing like seeing real people do this to help make up your mind. It was not hard at all, It took me a total of 2 days to finish it. I waited about an hour between coats of paint and like I said there was no sanding beforehand. The sanding was when I wanted to distress the piece. That was the hardest because it builds muscles lol!

Adding the wax is a must. It will seal in the paint and keep it from running. Let me know what happens.

Reply
Pili link
10/3/2016 05:40:07 pm

Your bed frame is gorgeous, Mary. It was a solid piece of wood and now that green color makes it pop and show all the details it has. It matches the dresser perfectly, no one would ever guess you added white to make it last longer.
I'm sure your husband is proud of you, you did a wonderful job with both of them.

Reply
Mary
10/4/2016 05:54:15 am

Pili, it was so tired looking before. Now with the green and the distressing I was able to bring out so much depth to it and really make it an interesting piece. Even the hubs likes it!

Reply
Florence link
10/3/2016 07:42:07 pm

That looks great Mary!! I love the soft green and the distressing. Hmm, I need to come visit your basement! Such treasures to be found in it!

Reply
Mary
10/4/2016 06:08:36 am

Florence I am working hard on emptying that thing out. But it seems to be a bottomless pit! Come on over!!

Reply
Tania link
10/3/2016 09:04:53 pm

Wow, that looks so beautiful, love the color! It reminds me of my patio door I just posted about! :o)

Tania

Reply
Mary
10/4/2016 05:59:43 am

Tania if only mine had been as easy as yours. Very nice color on your door. I had to mix and remix to get the right color. And in the process I was able to get lots of cool layers to it. I guess all that word had an upside to it.

Reply
Debrashoppeno5 link
10/3/2016 10:16:24 pm

Mary, What a pretty bedroom set you created. With the lovely wall behind the bed and bedding it looks like a springtime garden.

Reply
Mary
10/4/2016 06:02:25 am

Aww, Debra that is such a great description of it. I used an old piece of wood and covered it with a quilt. This was my makeshift headboard for years but now it has really made an impact with the bed and the new fabric.

Reply
Julia - Vintage with Laces link
10/4/2016 01:57:27 am

Your bed turned out fantastic, Mary! I love that shade of green and the distressed look. Great job!
xo Julia

Reply
Mary
10/4/2016 06:07:31 am

I too think this was the right decision. The distressing makes it so much more interesting than just a plain paint job. I really like how it turned out. Thank you Julia.

Reply
Cynthia Chilson Finger link
10/4/2016 08:32:20 am

Wish I had a magic basement! :D Seriously, great job on making over the bed frame, Mary. Love the color you chose. Thanks for sharing, Cynthia

Reply
Mary
10/10/2016 05:32:52 pm

Cynthia till I finished I was so anxious that I would run out of paint. Thank goodness it all turned out well.

Reply
Monroe link
10/4/2016 03:25:43 pm

Oh my! I love this bed! I need you to ship the bed and the dresser to my house! What a wonderful makeover, and I love that shade of green! So pretty!

Reply
Mary
10/10/2016 05:53:30 pm

Monroe, as soon as I find a box big enough, it'll be on its way!

Reply
Linda at Mixed Kreations link
10/4/2016 03:25:57 pm

Mary your bed frame turned out beautiful! I love the color and you did a great job matching it up with the dresser. Love the distressing so that some of the previous color shows through.

Reply
Mary
10/10/2016 05:54:54 pm

I too really love the distressing Linda. It makes it so much more interesting than just the green.

Reply
Carol link
10/5/2016 07:01:09 am

Mary I love the new look not only for the bed but also the dresser. Has a designer look!

Reply
Mary
10/10/2016 05:57:46 pm

Thanks Carol. I was really tired of looking at that garish wood color before. This is so much softer for the bedroom.

Reply
JoAnn @ SweetPepperRose link
10/5/2016 02:01:22 pm

Great color, love the bed style

Reply
Mary
10/10/2016 06:06:07 pm

Thanks JoAnne, althought it was an old style the wood color was hiding all the pretty details. I think now with the green you can actually see some of those.

Reply
Michele link
10/5/2016 03:46:36 pm

This bedroom set is now really cute- very cottage inspired and updated for the next 25 years or so! I love the green- it goes with so much!

Reply
Mary
10/10/2016 06:11:41 pm

So much better than that eyesore orange. And now it has interest whereas before it was just a piece of wood. Now we can see the details much more easily because of a little bit of paint.

Reply
handmade by amalia link
10/5/2016 11:59:12 pm

What a great project. I just love the color scheme, both the green on the bed and all the pretty fabrics.
Amalia
xo

Reply
Mary
10/10/2016 06:22:07 pm

Thanks Amalia. The fabric is actually an old duvet cover from Ikea.

Reply
Jann Olson
10/6/2016 12:48:24 am

Mary, I love the color and you did a great job of matching the dresser! I painted my old wooden bead white with chalk paint a couple years ago and I still love it! Thanks for sharing with SYC.
hugs,
Jann

Reply
Mary
10/10/2016 06:22:57 pm

Jann a little bit of paint can make a huge difference to the furniture and especially to our mood.

Reply
Larissa ~ Prodigal Pieces link
10/6/2016 06:18:42 am

You rocked it, Mary!! The color is gorgeous and your work is fantastic. Bravo!

Reply
Mary
10/10/2016 06:23:36 pm

Larissa, I've been taking lessons from the best! ;)

Reply
Mary link
10/6/2016 11:37:45 am

I love green. It seems I always gravitate to it. Having a set is so nice. Love it

Reply
Mary
10/10/2016 06:24:57 pm

It is such a peaceful and calming color. And a natural for the bedroom.

Reply
Debbie link
10/7/2016 12:16:13 am

Hi Mary, your distressed green bed looks so much than the not-so-quite orange it was originally. It looks a perfect match for your chest of drawers too. The bedroom now has a cottage like feel, don't you think?

xx

Reply
Mary
10/10/2016 06:26:29 pm

Yes Debbie that orange had to go. It was just awful. I love the calm feel of the green now.

Reply
jodie filogomo link
10/7/2016 09:45:19 am

Wow, Mary...that really turned out great.
Can you tell me about how long it ended up taking you to do this project?
jodie
www.jtouchofstyle.com

Reply
Mary
10/10/2016 06:35:28 pm

Jodie, because I had previously done the dresser I knew what to expect. It took me about 2 days. I painted the wood with chalk paint the first day. The paint dries very quickly. So although there were five coats involved it was not a problem. And on the second day I sanded it and distressed it and applied the wax.

Reply
Carla aka Mrs R link
10/7/2016 12:08:04 pm

Mary, what a sweet bedroom set. You did such a lovely job on these. You never cease to amaze me with your talent! xo

Reply
Mary
10/10/2016 06:36:40 pm

Thank you Carla. In this case I was lucky to be able to juggle the paint and mix and match it so that I finished the job just as I ran out of the paint.

Reply
Theresa @ Shoestring Elegance link
10/7/2016 01:18:32 pm

Mary, I absolutely love this bedroom! You did a fantastic job on the paint and waxing of these pieces! Thanks so much for sharing at Shoestring Elegance and the What to do Weekends party! Pinned and shared!
Happy Weekend!
Theresa.

Reply
Mary
10/10/2016 06:37:47 pm

Thank you Theresa. I am really happy with the results here. It was time to take that old bed out of storage and get some use out of it.

Reply
Kelley link
10/7/2016 09:38:44 pm

I love the paint job, and the fact that it is upcycling at its finest. The bed and the dresser look beautiful. Nice job. I wish I had a basement full of such surprises.

Reply
Mary
10/10/2016 06:40:25 pm

Thank you Kelley. A little bit of paint can go a long way to transform what was once tired into something new and fresh. Anyway who wants a bedroom that looks like the inside of a pumpkin?

Reply
Poppy link
10/9/2016 09:34:35 am

Kudos to you for creating not only a new bed frame, but a cheery and charming atmosphere, a warm and welcoming place for anyone who desires a soothing slumber!

Happy weekend, Mary!

Poppy

Reply
Mary
10/10/2016 06:45:59 pm

Thank you Poppy. Paint really does make a huge difference and it is such an each way to change out our things without having to spend a fortune.

Reply
Nikki Frank-Hamilton link
10/9/2016 11:39:31 am

Mary, Even though this project was a big one, you did a fantastic job! I love the different hues of green showing through on the bed-frame, it really gives it depth and character! The orange was a bit overwhelming, now it's pretty and it fits so well into your bedroom.

I love the covers and sheets you have chosen, in the Greece heat this room looks cool and comfortable. And so pretty. What a great room to retire to at the end of a long day. Green is a restorative color and it's perfect for your bedroom.

Great job, I need to get some of this paint!!!

Reply
Mary
10/10/2016 06:07:51 pm

Nikki what you say is so true. It is very relaxing to come into this room now. Before the orange was just plain irritating. And all those layers help to give interest and depth to the bed.

Reply
Holly link
10/10/2016 07:44:59 am

The color is very interesting. Lovely set.

Reply
Mary
10/10/2016 06:48:10 pm

Thank you Holly, the green is so much more soothing than that garrish orange.

Reply
Snap link
10/10/2016 11:21:05 am

Wonderful makeover. I'm looking forward to seeing what else is your basement!

Reply
Mary
10/10/2016 06:51:23 pm

I think the more I work on this blog the more I discover. If I had gone to the basement a year ago and had seen this bed, I wouldn't have been able to do the project because I had no idea what I was doing back then. But a year later and I have acquired some skills from reading so many great blogs and so it was doable.

So I may not see anything in the basment now, but a few months from now, well, you never know...

Reply
Kayla link
10/12/2016 11:42:43 am

I looovvve this! You're so talented and have such great visions for these unloved pieces. Thank you for sharing!

Reply
Mary
10/12/2016 01:19:41 pm

Thank you so much Kayla. I could not let an old piece just sit there, I have to try and do something to it.

Reply
Diana Petrillo link
10/12/2016 03:23:12 pm

Love this makeover, Mary and will be featuring it tomorrow on Vintage Charm :)

Reply
Mary
10/21/2016 07:08:23 pm

Thank you so much Diana! It i always an honor.

Reply
Kerryanne link
10/12/2016 11:48:53 pm

What a fabulous make-over Mary. I love the variations in the layers that show through from the distressing. I've pinned and look forward to featuring this project on Shabbilicious Friday tomorrow.

Reply
Mary
10/21/2016 07:09:17 pm

Thank you Kerryanne, it is an honor to be featured on your great blog.

Reply
julie at icanlivewithoutsugar link
10/13/2016 06:28:41 am

Hi Mary,
Wow! Love the bed and the drawers.
Makes me want to lie down and take a snooze.
Would also make a great place to read bedtime stories to children/grandchildren.
Simply stunning!

Reply
Theresa @ Shoestring Elegance link
10/13/2016 09:18:13 pm

Hi Mary, I LOVE this room! I'm just popping by to let you know I'll be Featuring your beautiful makeover tonight on Shoestring Elegance's What to do Weekends Party! Congrats! Thanks for sharing with us!
I hope you have a wonderful weekend!
Theresa

Reply
Mary
10/21/2016 07:12:21 pm

Thank you so much Theresa. I am so happy to be featured on your great blog.

Reply
Kim link
10/13/2016 10:03:30 pm

Gorgeous!! Green is one of my favorite colors, especially for a bedroom. Crafty and furniture refinisher? Is there anything you can't do?

Reply
Nicki Parrish link
10/14/2016 09:08:48 am

Love it, and pinned it to furniture!

Reply
Carol link
10/14/2016 07:38:54 pm

Mary, You need to gather up beds and dressers, refinish by painting, and go into business selling. What a beautiful bedroom set you now have!

Reply
Mary
10/21/2016 07:00:47 pm

Thank you so much Carol, that means a lot coming from you.

Reply
Nette
10/27/2016 02:44:10 pm

Mary, you have a great eye, as evidenced by your beautiful photographs and decor ideas. The slightly different hues of the bed and dresser - possibly due to the light hitting them differently - add to the deliciousness.

Reply
Mary
10/27/2016 06:20:24 pm

Thank you so much Nette. I tried to match them as much as possible, but the lighting can trick the eye. And of course each piece has it's own story to tell with the distressing.

Reply
Mary Coakley link
10/30/2016 06:35:31 pm

These are really lovely and look so fresh,it is a lovely green,they match so well together.Great job Mary

Reply
Jean | DelightfulRepast.com link
11/13/2016 08:59:46 am

Mary, I just love the way you give new life to old pieces! When I get ready to take on a project, I'll look here for inspiration.

Reply
Mary
11/18/2016 01:17:22 pm

Thank you Jean. I am new to all of this but have lots of blogger friends who are experts and I take my cue from them.

Reply
ΙΩΑΝΝΑ link
2/13/2017 04:42:19 am

Kαμία σχέση το πριν και το μετά!!!Τέλειο!!!

Reply
Mary
2/13/2017 02:41:38 pm

Ευχαριστω Ιωαννα μου! Και δεν πηρε και τοσο χρονο.

Reply
McKenna
4/20/2017 01:17:35 am

I stumbled upon your post, pulled in by the beautiful photo on pintrest! Lovely work. I'm so inspired to follow your instructions and paint our own yucky orangey colored bed. I'm pregnant and probably nesting to the extreme, so looking forward to painting!

**In your post you wrote the color you used was Enchanted by Americana Decor Chalky Finish Paint, but the link to the green paint you have on amazon is a "vintage" color, it's a lighter green. I'm confused on which one to use, the "enchanted" or "vintage"? Thank you!

Reply
Mary
4/20/2017 03:54:40 am

Hi McKenna, I'm so glad you reached out to me. I used Enchanted which is an Olive Green but I also added a bit of white or Everlasting in there to lighten it up a bit.

I originally used the Olive Enchanted as a base coat. Then I added White Everlasting into the Olive Enchanted to get a lighter color. Because the Olive is really too dark. I added two coats of the lighter green. By layering you get a more nuanced look.

Play around with the colors and don't be afraid. And I wish you all the best on your pregnancy and a safe delivery!

(I'll be sure to correct the link.)

Reply
McKenna
4/20/2017 12:27:20 pm

Got it, great thank you! Beautiful! I'll purchase through your links, thank YOU! All the best.

Alice Massey
4/21/2017 12:52:44 pm

Hi Mary. I love your redo want to do this, in blue, with my bedroom furniture. I think you said you used 4 colors on yours? Do you know approximately how many ounces of paint you used?

Reply
Mary
4/21/2017 01:25:14 pm

Hi Alice.

I think that for the bed and the dresser I must have used 3 containers. Each container was 16 fl. oz. I used 2 of the base color, in my case it was the green, and as I applied each additional coat I would lighten it a bit using the white.

This was for the bed frame and the dresser. And I had plenty left over. Also I was thinning it down with water as I went along because it thickens up so you want to be able to apply it smoothly.

So you see it was actually 2 colors, I just lightened them up as I went. If you are interested, I have an Amazon link near the top of this post with the white color. If you need any more help feel free to ask.

Reply
Neelam link
6/25/2017 12:09:23 pm

What a gorgeous transformation! I love the choice of green, so unexpected, but beautiful.
xx
Neelam

Reply
Mary Coakley link
10/3/2017 05:12:59 pm

Mary both turned out fabulous it would chase away any blues your room is so restful now green is my favourite colour

Reply
Mary
10/3/2017 10:47:19 pm

I agree Mary, both of the rooms have a very calm and restful feeling.

Reply
Linda J Johnson link
10/3/2017 06:53:20 pm

Beautiful! Great job! Your room looks cozy and inviting. I love the colors you painted your furniture. I hope you can buy more of your favorite paint!

Reply
Mary
10/3/2017 10:50:23 pm

Thanks Linda. Luckily I was able to get more and all turned out well in the end.

Reply
Michele link
10/7/2017 02:04:13 pm

This bed looks so much better. It was just begging for a cottage style makeover. I hope the new mattress magically appears!

Reply
Mary
10/8/2017 08:06:59 am

Thank you Michele. The room is done and I will have it on the blog in a few weeks.

Reply

Your comment will be posted after it is approved.


Leave a Reply.

    Welcome
    Picture

     I'm Mary and I recently  moved to New York from beautiful Greece.  I like to re-purpose and up-cycle  anything that is old or looks like junk.  Join me as we use our creativity to spark some life into old things.  And do it frugally!  You will also see lots of photography of my Greece and New York.

    Follow me
    Follow

    Join our FB group

    Picture

    Top Posts for 2017

    Picture

    Spring Decorating  Ideas

    Picture

    Behind the Scenes

    Picture

    Popular Projects

    Picture
    Picture
    Picture
    Picture
    Picture
    Picture

    Categories

    All
    Art
    Blog
    Chalk Paint
    DecoArt Paints
    Decoupage
    Fabric
    Fun
    Furniture
    Gift
    Greece
    Int'l Bloggers Club
    Jewelry
    Lamp Shade
    New York
    Old Fashioned Milk Paint
    Organize
    Photos
    Picture Frames
    Projects
    Repair
    Re Purpose
    Seasonal
    Storage
    Sweet Inspiration Link Party
    Twine
    Up Cycle
    Wall
    Wood
    Wreaths

    Archives

    April 2018
    March 2018
    February 2018
    January 2018
    December 2017
    November 2017
    October 2017
    September 2017
    August 2017
    July 2017
    June 2017
    May 2017
    April 2017
    March 2017
    February 2017
    January 2017
    December 2016
    November 2016
    October 2016
    September 2016
    August 2016
    July 2016
    June 2016
    May 2016
    April 2016
    March 2016
    February 2016
    January 2016
    December 2015
    November 2015
    October 2015
    September 2015
    August 2015
    July 2015
    June 2015
    May 2015
    April 2015
    March 2015
    February 2015

    Social Media

    RSS Feed

    Picture
    Picture

    My Buttons

    Picture
    Picture

    Featured

    Picture
    Picture
    Featured on Hometalk.com
    Picture
    Picture
    Picture
    Picture
    AMAZON ASSOCIATES DISCLOSURE: The Boondocks Blog is a participant in the Amazon Services LLC Associates Program, an affiliate advertising program designed to provide a means for sites to earn advertising fees by advertising and linking to Amazon.com
Home
About

Contact
This blog is for entertainment purposes only; my DIY tutorials are not professional advice.
Read my full disclaimer here
.
  • Home
  • About
    • About me
    • FEATURED
    • LEGAL
  • Project Gallery
    • My Projects
    • PHOTO GALLERY
    • Furniture
    • WREATHS
    • SEASONAL PROJECTS
  • Link Parties
    • Link Parties
    • SWEET INSPIRATION LINK PARTY
  • Keep In Touch
    • Subscribe to Photography
✕