• Skip to primary navigation
  • Skip to main content
  • Skip to primary sidebar
  • Skip to footer

The Boondocks Blog

  • Home
  • Re Purpose
  • Furniture
  • Seasonal
  • About Us
    • Privacy Policy

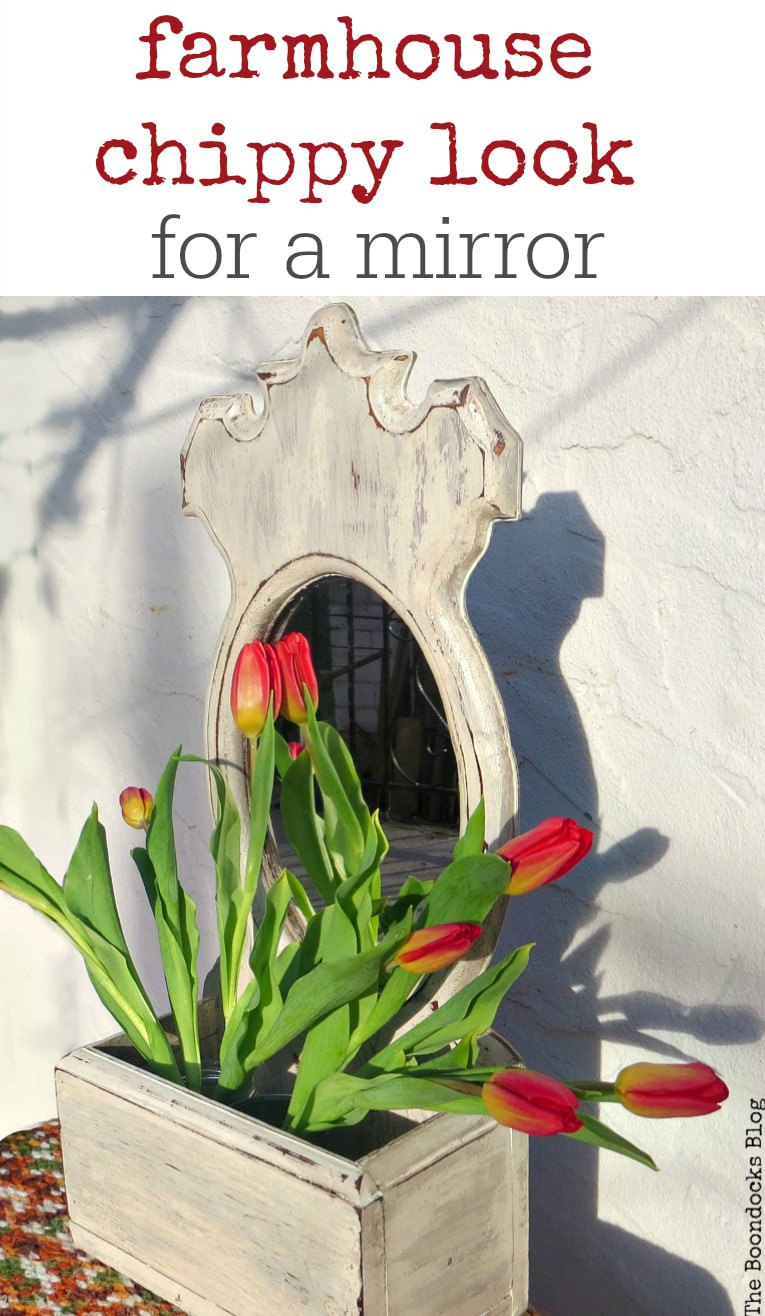
How to Give a Farmhouse Chippy look to a Mirror

February 19, 2018 by boondocks 24 Comments

Sharing is caring!

0 shares
  • Share
  • Tweet
  • Email
This is the post where I get to revisit one of my previous projects and mess with it because sometimes I’m just not happy with the first time around.  I wanted to add a Farmhouse Chippy look to this mirror. So here we are with the mirror makeover project: Take Two!

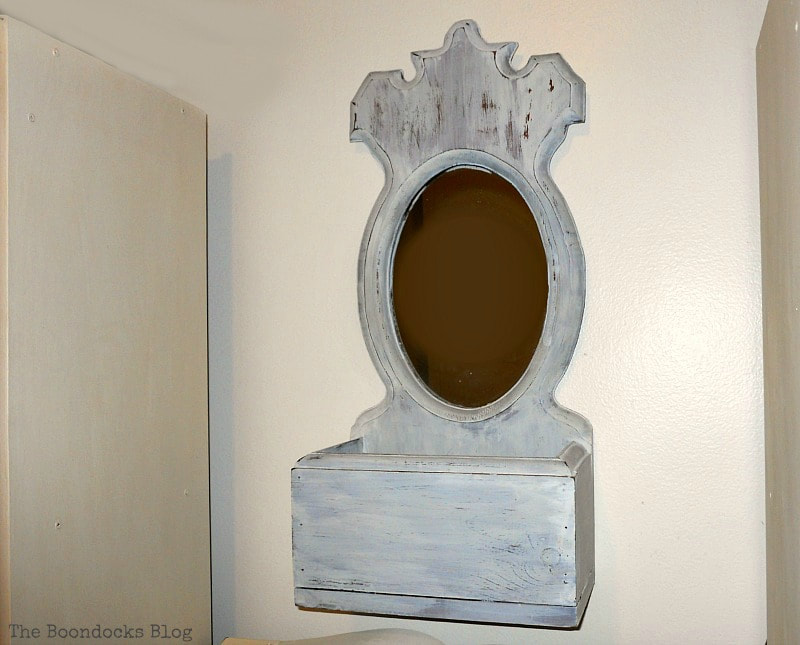
In all fairness I should say that this project which you see below was my first time using milk paint.  I knew nothing about how to use milk paint or how it would react. Of course that didn’t stop me from trying it out.  
​


​
The mirror before after my first try with Old Fashioned Milk Paint, How to Give a Farmhouse Chippy Look to a Mirror www.theboondocksblog.com
Below you can see how it looked originally.  My husband had found it curbside and knew I’d love it.  Well he was absolutely right!  I painted it with Old Fashioned Milk Paint, the Safepaint version. 
The Mirror before it had been painted, How to Give a Farmhouse Chippy Look to a Mirror www.theboondocksblog.com
One year later and the mirror looks like this. But now my knowledge of milk paint had improved.  After all I had done quite a number of projects using it such as the bookcases, the Ikea shelving unit and the chalkboard stand.  I have come to love how beautiful it looks and really appreciate the how smooth it is when treated with care. 

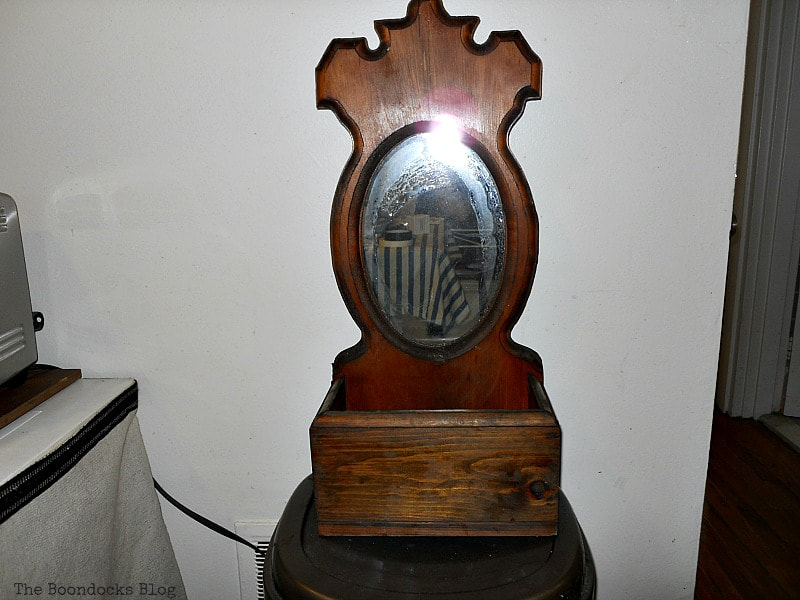
I wanted to revisit the mirror and redo it with my newfound skills.  But not being one to leave things alone, this time I decided to use the original Old Fashioned Milk Paint – the one that gives us the chippy look.  You see in the other projects I mention I had used the SafePaint version which does not chip.  

​And what is the difference you ask? 

The original milk paint was designed for use on porous surfaces such as wood or masonry.  The one that I had used up till now the Safepaint version, was for non-porous surfaces. It can also be used on metal, like when I painted a metal trunk, two of them!  The bonding agent is what makes this paint stick to the non-porous surfaces.  


​
The Mirror before I tried to use Old Fashioned Milk Paint to achieve a chippy look, How to Give a Farmhouse Chippy Look to a Mirror www.theboondocksblog.com

What I Used:

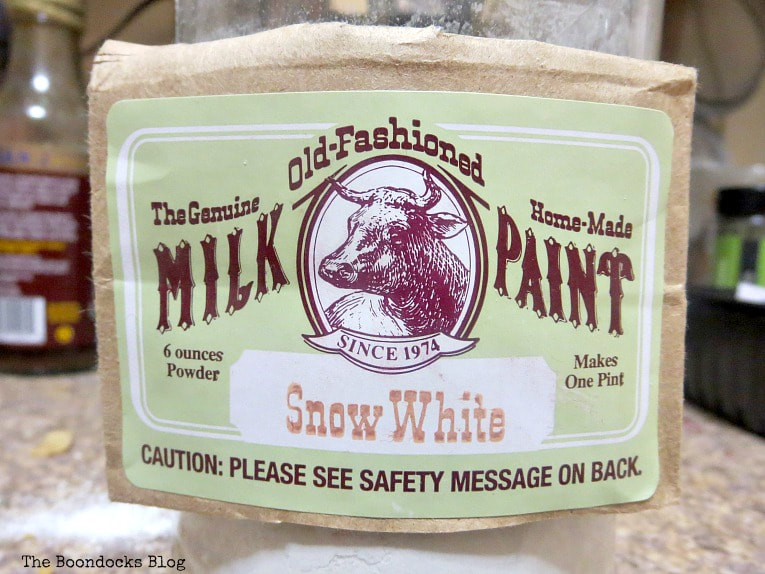
  • Old Fashioned Milk Paint in Snow White the original formula without any bonding agent
  • Extra Bond
  • Daddy Van’s All Natural Decorative Wax in Dark Nior
  • Brushes
  • Clean Cloth

​And so I was feeling rebellious now and used the original formula of Old Fashioned Milk Paint without the bonding agent. I wanted to go for some chippy goodness. 
I also used another color.  This is snow white which is a bit warmer from the oyster white I had used originally. 
Old Fashioned Milk Paint in Snow White, How to Give a Farmhouse Chippy Look to a Mirror www.theboondocksblog.com

The How To:


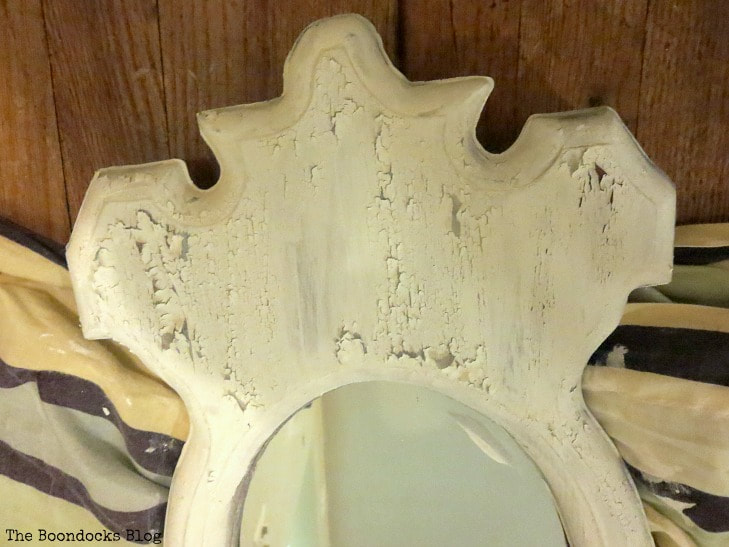
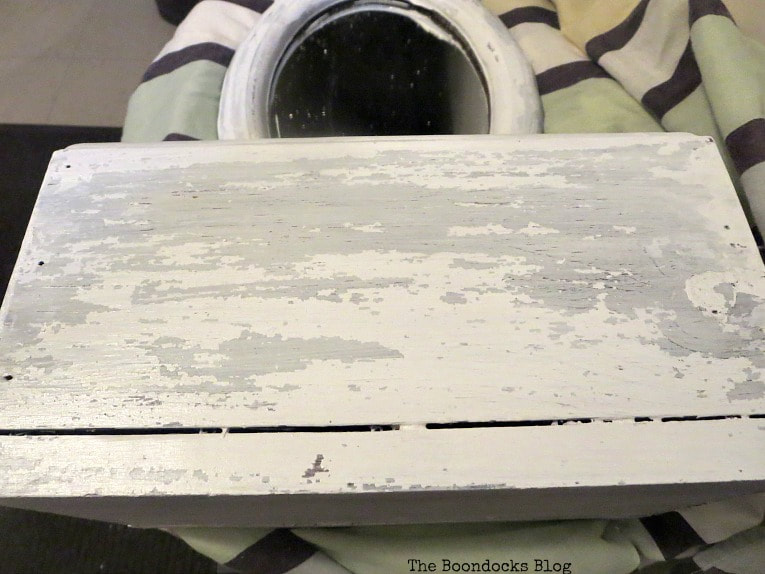
​I mixed up my snow white with equal parts luckwarm water and painted the mirror.  I added about three coats of the milk paint. 

And then I waited…

​…and waited. 

​

Adding the paint to the mirror, How to Give a Farmhouse Chippy Look to a Mirror www.theboondocksblog.com
​Disclosure: The items below are affiliate links. If you purchase any of these products through the links, I receive a small commission, that way I can continue to provide you with lovely content.  There is no extra charge to you for purchasing through my affiliate links.
AntiqueFarmHouse

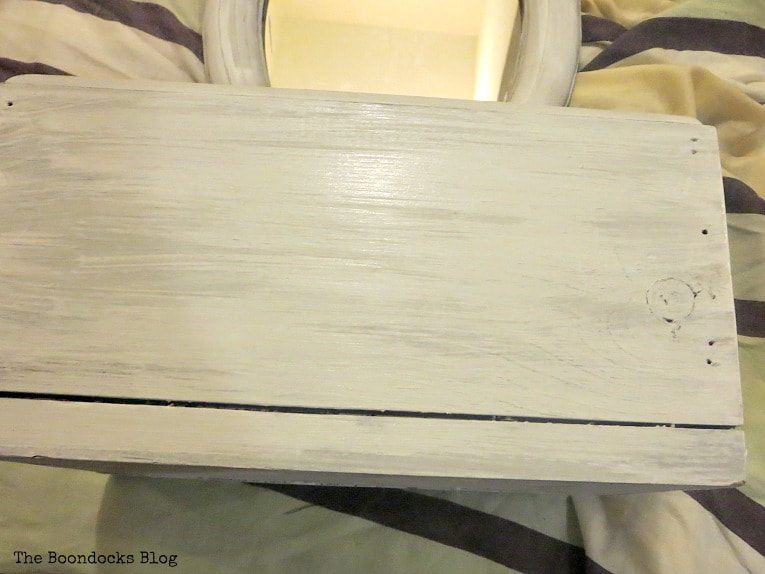
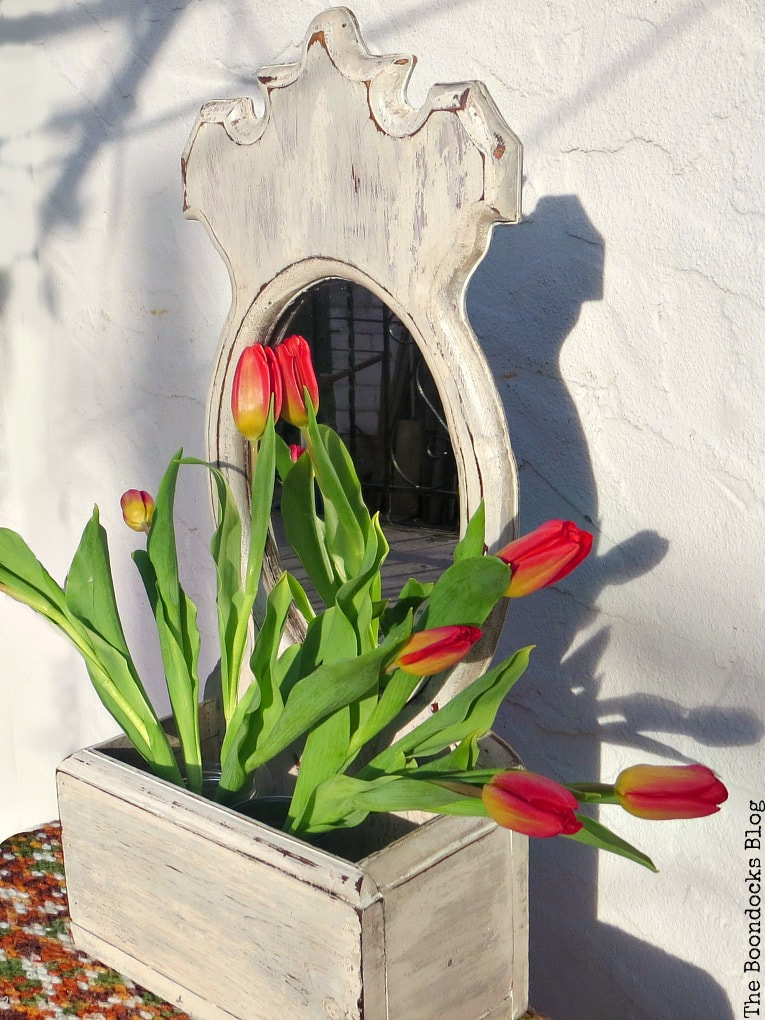
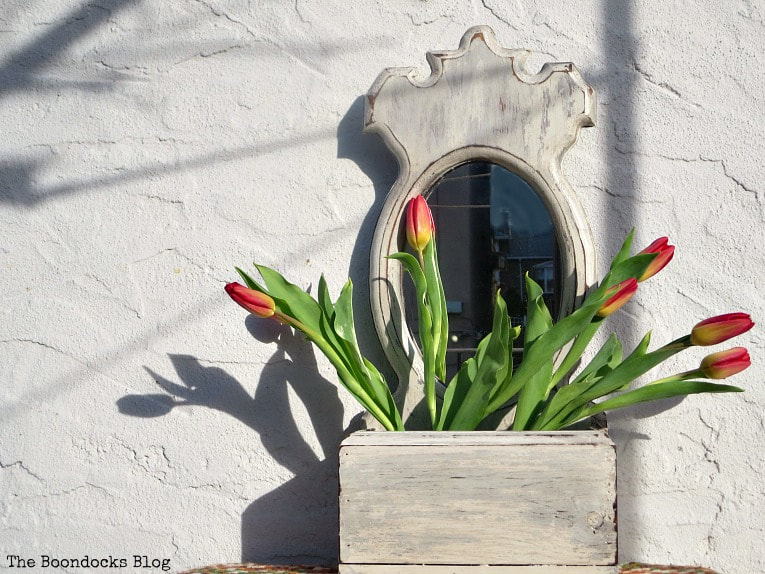
​After an hour it dried into this chippy goodness you see below…

At first I was excited but then I realized that if I blew on it the paint would all come off and I’d be left with … a mess. 
​

Chipping on the mirror, How to Give a Farmhouse Chippy Look to a Mirror www.theboondocksblog.com
You can see how quickly things got out of hand with this photo below.  Half of the paint was chipping off. It was right here that I went into panic mode and reached out to the experts in the Old Fashioned Milk Paint Q & A Group. You can also join us on Facebook with any questions you have. 

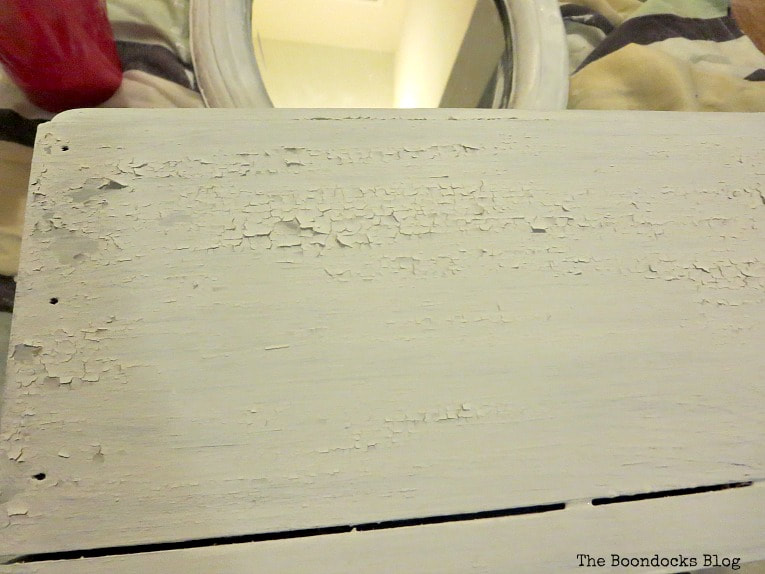
​It turns out I was getting excessive chipping because I had applied a wax to this mirror a year ago and the wax was not allowing the paint to stick. 
​

Too much chipping on the mirror, How to Give a Farmhouse Chippy Look to a Mirror www.theboondocksblog.com
Persian Rugs on Sale

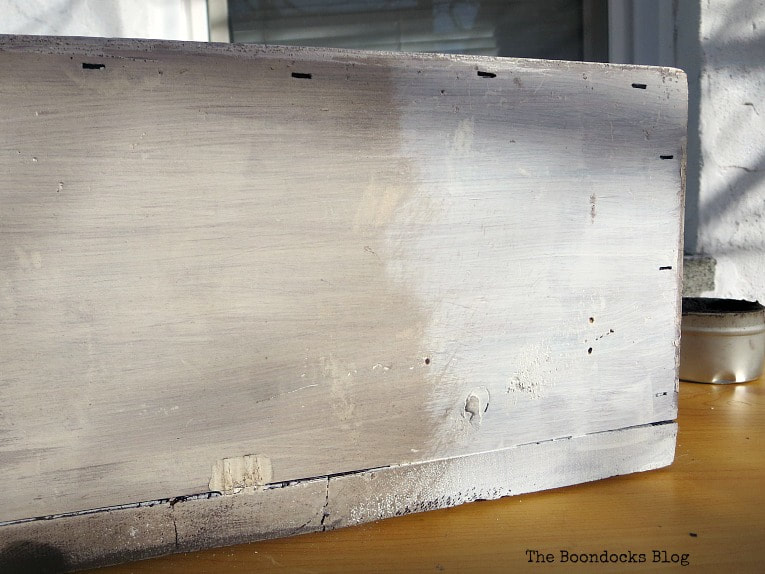
​Some suggested I strip the old paint and start fresh.  But I was not about to go outside in the cold and try to sand anything down.  So I did what any lazy, sane person would do!  I added Extra Bond to the original milk paint. Yes you can buy the bonding agent separately. (You can see my affiliate links for all these products below)

Whew!  Lucky for me I had a bottle.  I had no idea when I had bought it a year ago that I’d be needing it but you see sometimes the old noodle thinks ahead. 

After adding milk paint with extra bond, How to Give a Farmhouse Chippy Look to a Mirror www.theboondocksblog.com
I painted about two coats of the milk paint with the bonding agent, on top of the mess after I had wiped it down and removed the chipping paint. 
​
The original layers of milk paint and the new layers with the extra bond, How to Give a Farmhouse Chippy Look to a Mirror www.theboondocksblog.com
Today's Story...

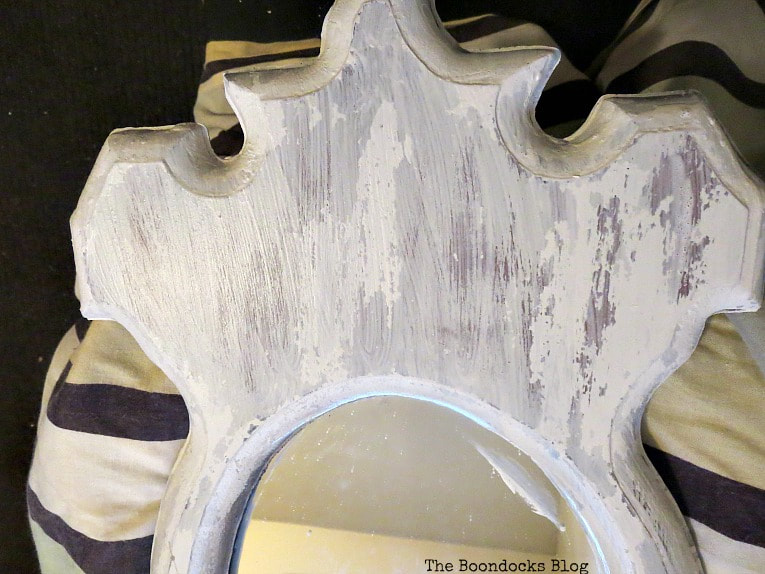
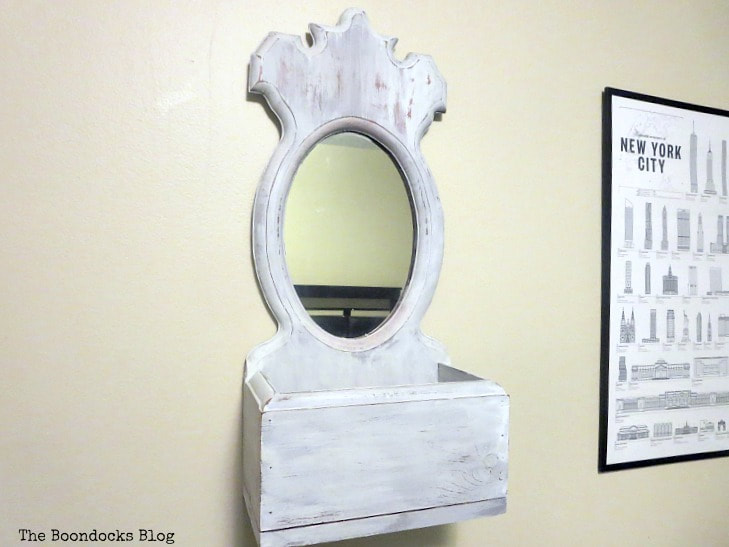
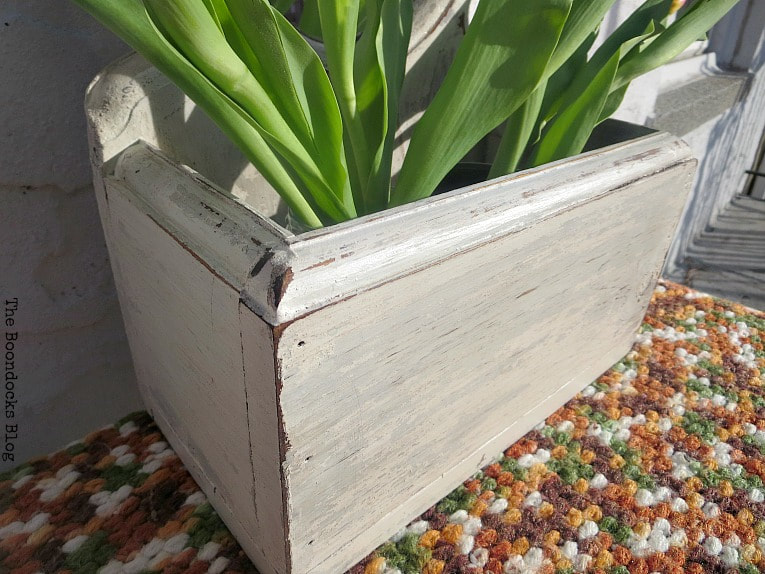
​After letting it dry overnight, I sanded it down and added a bit of distressing on the edges.
​
Adding a bit of distressing with sandpaper, How to Give a Farmhouse Chippy Look to a Mirror www.theboondocksblog.com
And the last step … to give it even more layers.  I added my trusty Daddy Vans All Natural decorative wax, this time in Cafe Nior.  You can see the difference below. 
Sealing the chippiness with Decorative Wax, How to Give a Farmhouse Chippy Look to a Mirror www.theboondocksblog.com

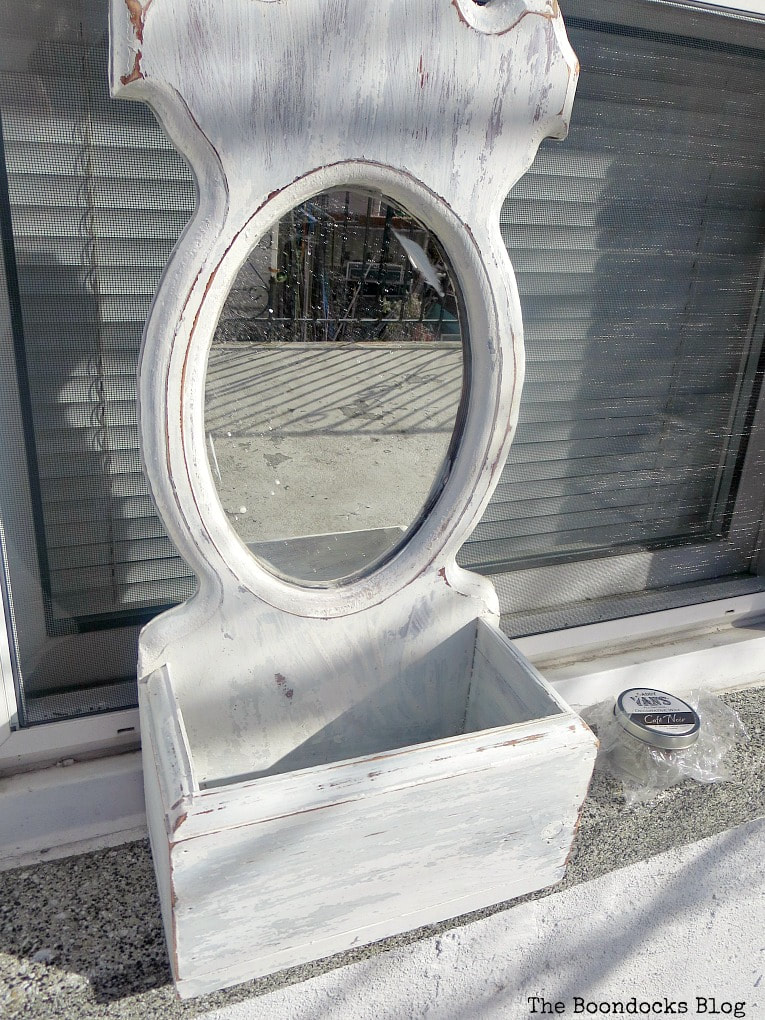
​After a good buffing with a clean piece of cloth it was all done.  See the pretty shine? 
​
After it has been buffed, How to Give a Farmhouse Chippy Look to a Mirror www.theboondocksblog.com
Just look at all that aging and those layers of paint and distress.  Why it looks like it’s been around forever…

…but in a good way!

Lots of layers on the top of the mirror, How to Give a Farmhouse Chippy Look to a Mirror www.theboondocksblog.com

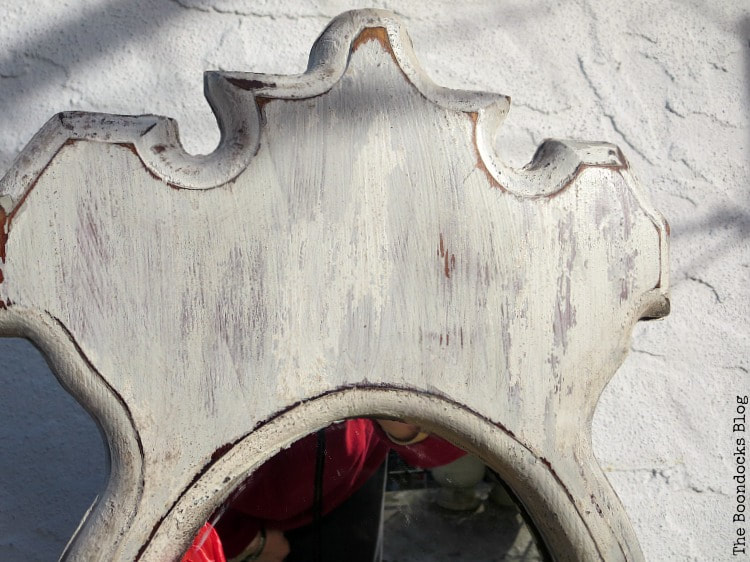
​See the layers and the peeling?  I tell you, I hated this look when I first started blogging but now I think that the mirror is speaking to me!

​

Detail of the side of the mirror, How to Give a Farmhouse Chippy Look to a Mirror www.theboondocksblog.com
And what’s it saying?

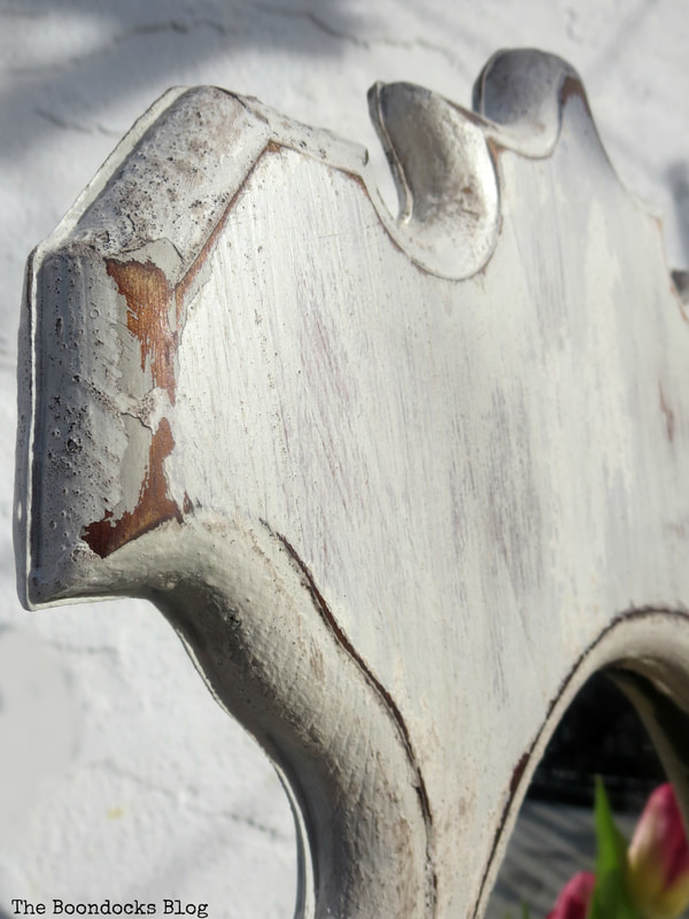
“Thank you for letting my personality shine through.”  Of course!
​

Distressed details on the mirror frame, How to Give a Farmhouse Chippy Look to a Mirror www.theboondocksblog.com

​It is so much better than it was with the brown wood. 
​
A deeper color with the wax, How to Give a Farmhouse Chippy Look to a Mirror www.theboondocksblog.com
Let’s have a quick look at the before so we can truly appreciate the difference.  My first attempt when I knew not what I was doing…
​
Before the makeover, How to Give a Farmhouse Chippy Look to a Mirror www.theboondocksblog.com

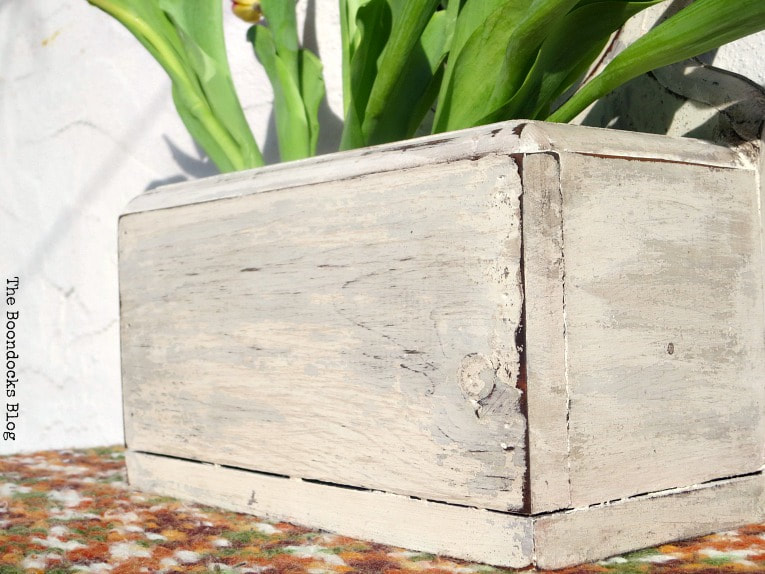
​And now a warmer look, more layers and much more depth. 
A mirror makeover using Old Fashioned Milk Paint and decorative Wax, How to Give a Farmhouse Chippy Look to a Mirror www.theboondocksblog.com
This look is not for everyone but the bonding agent did save the day for me.  And it is a piece that is unique in and of itself so it deserves special treatment. 
​
Giving character and farmhouse chippiness to a mirror, How to Give a Farmhouse Chippy Look to a Mirror www.theboondocksblog.com
The lesson here is that even thought I had no idea what the heck I was doing a year ago I still went ahead and tackled this project to the best of my limited abilities.  And now that I’ve become more familiar with Old Fashioned Milk Paint, I came back to the mirror makeover project, because I knew I could do better, especially with a little help from my friends!

So don’t be afraid to try new things.  Even if you mess up, like I did, you are only one chat away from help.  🙂
​

Picture
Giving character and farmhouse chippiness to a mirror upcycle with old fashioned Milk Paint and Extra Bond agent and Decorative Wax, #Farmhouse #Chippylook #Shabbychic #OldFashionedMilkPaint #MirrorUpcycle How to Give a Farmhouse Chippy Look to a Mirror www.theboondocksblog.com
​If you really like what you see subscribe to my blog and get my adventures in your mailbox. The form is on the sidebar and your e-mail will never be shared with a third party.
Picture
More Milk Paint Projects
Two bookcases painted grey with milk paint
Bookcase Makeover with Milk Paint

Ikea Hejne Shelf Unit painted with milk paint
Hejne Shelf Unit Upcycle

<<  Sweet Inspiration Link Party #94       HOME

Linking up to these Link Parties

This blog is for entertainment purposes only; my DIY tutorials are not professional advice. Read my full disclaimer here.​

I love it when I get your comments and I will try to reply to every one of them. ​Please do not add a hyperlink to your comment, otherwise it cannot be published.

Filed Under: Furniture, Old Fashioned Milk Paint, Projects, Uncategorized, Up Cycle, Wood

Previous Post: « Sweet Inspiration Link Party #94
Next Post: SWEET INSPIRATION LINK PARTY #95 »

Reader Interactions

Comments

  1. Katrin

    February 19, 2018 at 3:35 pm

    Mary I have not yet tried out Milk Paint, but you are making me want to go and buy some. The mirror looks stunning, I love the chippy look. I also love the endless decor possibilities you got with this!

    Reply
  2. Jeannee Taylor

    February 20, 2018 at 12:23 pm

    It’s beautiful and you could not have chosen more beautiful flowers for it!
    Jeannee

    Reply
  3. Leanna

    February 20, 2018 at 12:27 pm

    I love this old mirror Mary. I expect that New York is a treasure box of thrift stores and vintage architectural stores. This piece is gorgeous. Thank goodness you had extra bonding available to fix the paint.
    I have never worked with milk paint, I tried chalk paint a few times but don’t like the final finish at all. I may try milk paint someday so this was a lesson learned for me. Thanks.

    Reply
  4. Patti Estep

    February 20, 2018 at 2:13 pm

    Hi Mary,
    Great job. I haven’t worked with milk paint in years. There’s something so nice and organic about it and I love that you chose to put spring tulips in the base. So pretty.

    Reply
  5. Josephine

    February 20, 2018 at 5:00 pm

    Nice! My husband does not like the chippy look, so I have to sneak bits in and hope he doesn’t notice.

    Reply
  6. Linda at Mixed Kreations

    February 20, 2018 at 5:08 pm

    It turned out beautiful Mary! Love the rustic chippy look! I haven’t tried the milk paint yet, but I’m going to have to buy me some.

    Reply
  7. Kristin's Peppermints and Cherries

    February 21, 2018 at 7:49 am

    I have never used milk paint, so I pinned this in case I ever try it out. Your mirror turned out beautifully, and the tulips are gorgeous.

    Reply
  8. Debrashoppeno5

    February 21, 2018 at 10:17 am

    I love the new look. I really think it is a learning process. Yeah we make mistakes but in the end you saved this mirror. It looks fantastic.

    Reply
  9. FLORENCE

    February 22, 2018 at 7:19 pm

    I think it would be speaking to m too. I like the final look. What a cool piece your hubby found in the first place. I really like the chippy look you created Mary!

    Reply
  10. Leslie

    February 23, 2018 at 10:28 pm

    I’m so glad you kept moving forward, even with the original over-chipping issue. The mirror looks great! Thanks so much for sharing at the #happynowlinkup!

    Reply
  11. Ivory

    February 23, 2018 at 11:08 pm

    I love this, what a nice find. I also love what you did to it

    Reply
  12. Cathy Lawdanski

    February 24, 2018 at 6:00 am

    Mary – I received an education. I see all you DIY’ers talk about milk paint and now I know what it’s for. Love the final version of this and the cheery flowers!

    Reply
  13. Jeannee Taylor

    February 24, 2018 at 2:00 pm

    Mary, this is so pretty! I can see it hanging at the end of a long hallway! So lovely and feminine!
    Jeannee

    Reply
  14. Marjan Hoebeke-Pfaff

    February 26, 2018 at 1:31 am

    I love it! Truthe be told: I’d have put a lid on the box (making it a secret’s chest) and a really oldfashioned candle or oillamp in front of the mirror (of course on a crochet doily). A few days ago I found the most lovely little oillamp (doesn’t work anymore) hidden in my husband’s cellar (the one with the heating installation in – I usually never go in there, but…) and that idea popped up as soon as I saw your work.
    Have a lovely week,
    Marjan

    Reply
  15. fiona

    February 26, 2018 at 3:47 pm

    Great makeover and so much better than the brown!
    It looks really pretty filled with tulips.

    Reply
  16. Kathy A

    February 27, 2018 at 9:22 am

    Thank you for your great tutorial and showing us that all up-cycles aren’t super successful the first time around. I have had some FLOPS! I love how the flowers are reflected in the mirror-making the bouquet look twice as big!

    Reply
  17. Jann Olson

    February 27, 2018 at 10:40 pm

    Don’t you just love the magic that milk paint does? Thanks for sharing with SYC.
    hugs,
    Jann

    Reply
  18. [email protected] Freshman Cook

    February 28, 2018 at 9:25 pm

    What a beautiful job you did on this! I love that you redid the mirror. I have several projects that I haven’t finished because I wasn’t happy with the end result. Your beautiful mirror has inspired me to finish some of my projects. Welcome and Thank you for sharing at Celebrate It!

    Reply
  19. Amber Ferguson

    February 28, 2018 at 9:49 pm

    Beautiful! I love how it turned out even if you had to go through some extra stressful steps! I will be featuring this post tomorrow at Thursday Favorite Things. Hope you will stop by and link up again this week!

    Reply
  20. Brenda Young @ Unique Junktique

    March 1, 2018 at 9:06 am

    Love it the second time around! The extra steps added such depth with the long lived layered look, came out great Mary! Thanks for sharing it at #FridaysFurnitureFix!

    Reply
  21. Michelle @ The Painted Hinge

    March 1, 2018 at 2:57 pm

    Hi Mary! I’ve never used milk paint and I didn’t even know that a bonding agent that you can add to paint was a thing, so I really learned a lot from this post! It turned out beautifully, and the tulips have me dreaming of spring.
    Thanks so much for sharing this at The Farmhouse Friday Link Party – I’m featuring it at tomorrow’s party! 🙂

    Reply
  22. Marie

    March 10, 2018 at 8:39 am

    Love how you share your learning curve with us, Mary. Loads of vintage charm second time around – pinned.

    Reply
  23. Keri

    April 16, 2018 at 12:01 pm

    Mary, the mirror looks wonderful! I love that chippy farmhouse look you gave it.

    Reply
  24. Leanna

    February 22, 2019 at 12:49 am

    Mary you did such a great job on this mirror, the tulips are a perfect addition. So pretty and almost regal looking, love it.

    Reply

Leave a Reply Cancel reply

Your email address will not be published. Required fields are marked *

Recipe Rating


This site uses Akismet to reduce spam. Learn how your comment data is processed.

Primary Sidebar

Let’s Connect!

  • Email
  • Facebook
  • Instagram
  • Pinterest
  • Twitter

Recent Posts

  • DIY Pallet Table with Reclaimed Wood Legs
  • 20 Creative DIY Pallet Projects to Make!
  • Shabby Chic Wicker Basket Upcycle
  • 20 Household Items Re-Purposed For Halloween Decor

Explore Our Top Posts

IKEA Malm Dresser Makeover
How to Stain a Laminate Table

DIY Pallet Couch

Footer

Disclosure

We are a participant in the Amazon Services LLC Associates Program, an affiliate advertising program designed to provide a means for us to earn fees by linking to Amazon.com and affiliated sites.

Disclaimer

While every effort has been made to ensure the accuracy & effectiveness of the information displayed on this website, The Boondocks Blog makes no guarantee as to the procedures & information contained here. The publisher will not be liable for direct, indirect, incidental, or consequential damages in connection with or arising from the use of the information displayed on TheBoondocksBlog.com. This website is not intended to substitute the advice of a professional. Find our Privacy Policy here.

Copyright

©The Boondocks Blog, 2015-2021. Unauthorized use and/or duplication of this material without express and written permission from this blog’s owners is strictly prohibited. One photo, excerpts and links may be used, provided that full and clear credit is given to TheBoondocksBlog.com with appropriate and specific direction to the original content.

Copyright © 2022 The Boondocks Blog on the Foodie Pro Theme

0 shares