How to Save a Laminate Table with Gel Stain and Paint
Using gel stain and chalky finish type paint I show you how to save an old laminate table and up-cycle it into a farmhouse table with charm.


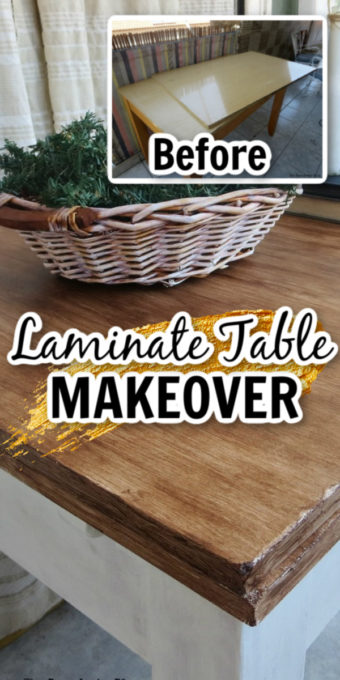
Have an old laminate table that has seen better days? Save money by giving it a makeover with paint and gel stain.
Upcycling a Beat Up Laminate Table
Once upon a time there was an old laminate table. It folded out into a bigger table. But the table, nice as it was had seen better days. It was old and chipped and the sides were worn. It was time to throw it out! Oh wait, I’m a DIY blogger! I can do this!! Or at least I can try!! Cause I really don’t know much more than you do.
If you have an old piece of furniture don’t despair! I try to make lots of mistakes on my blog so you won’t have to… gotta love that! Today I managed to make very few mistakes! “wink”
But enough with the exclamation points, it’s time to roll up our sleeves and show you how to save this old laminate table with gel stain!
What I Used:
Disclosure: This post contains affiliate links for your shopping convenience. If you purchase any of these products through the links, we receive a small commission at no extra charge to you. You can find our full disclosure here.
- sand paper
- DecoArt Americana Decor chalky finish paint in Everlasting
- putty for filling in table
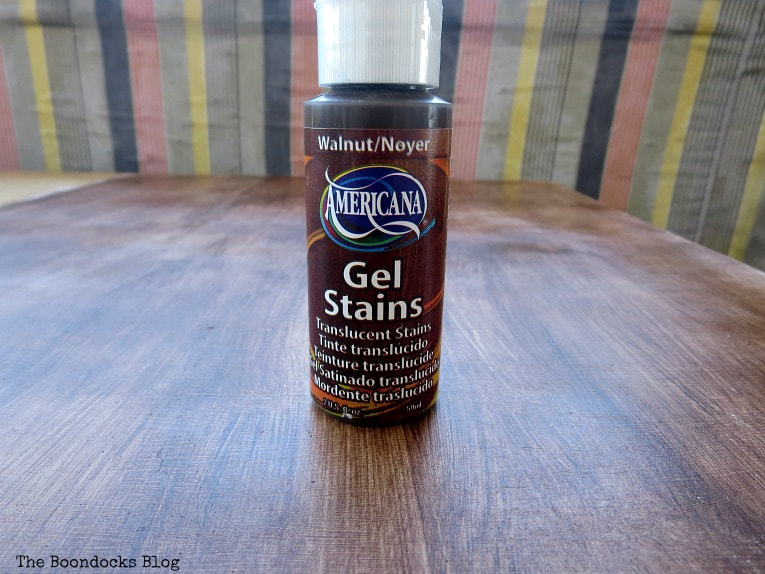
- DecoArt Americana Gel Stain in Walnut
- Varnish in spray form
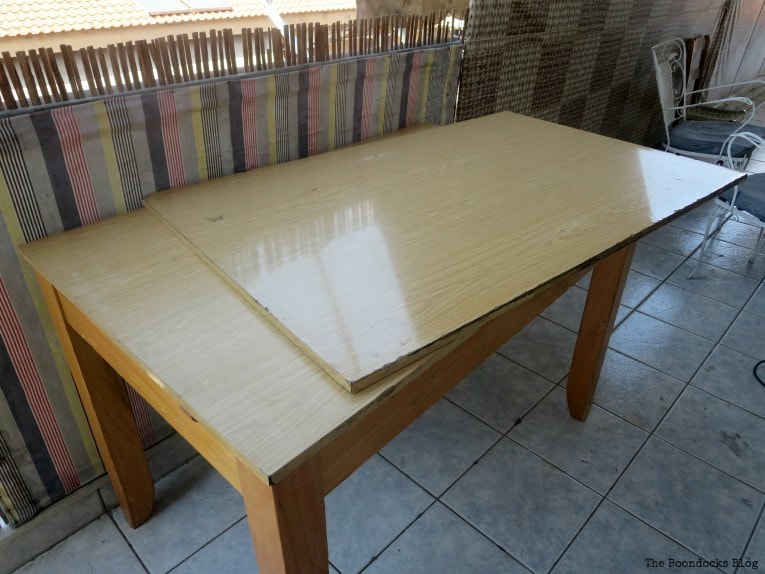
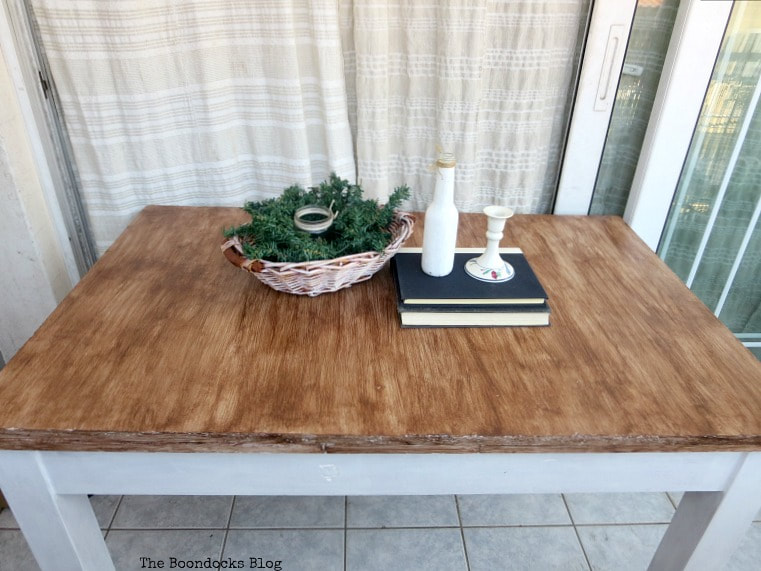
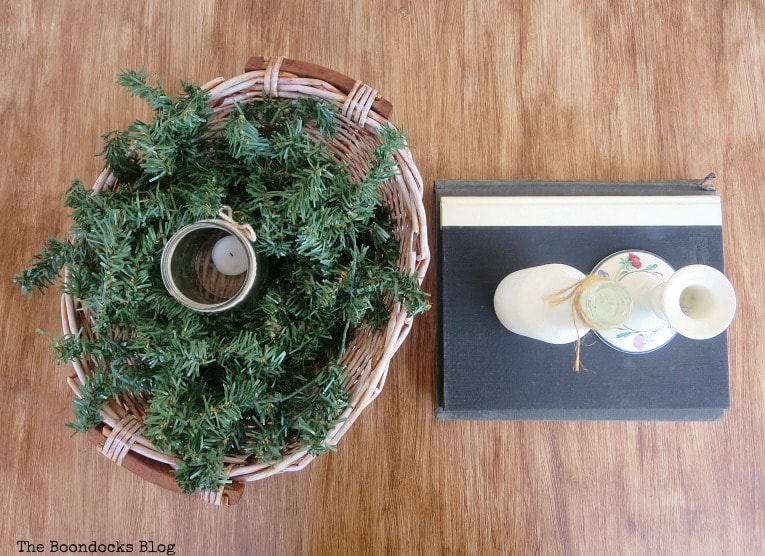
As you can see by the above photo, the table has a top piece and underneath there are two leaves which open up to make it even bigger. It was in pitiful shape when I decided to tackle it.

The How To:
Before I started the first thing I did was to give it a soft sanding. Nothing too harsh to wear myself out, just here and there where the old varnish was hanging out in clumps and drips.
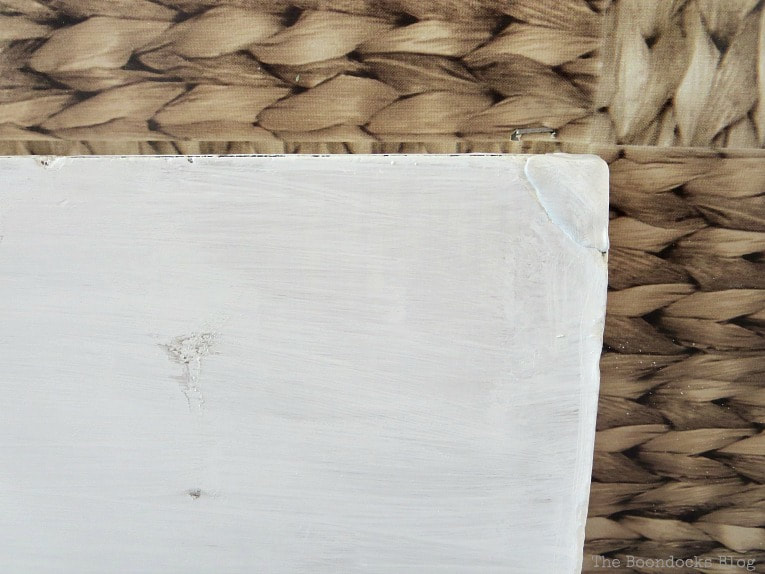
I took out my trusty Americana Chalky Finish Paint and applied 3 coats to the bottom half of the table and the legs, and one for the tops.

I did not worry too much about the top because I used the chalky finish paint more as a primer. You see that here I have painted the top against the grain.

The top part of the table was painted in the other direction. Meaning along the width. And I also had a repair to deal with.

I used some putty and stuck it to the end and then painted over it. So far it seems to be fine. I’m sure there must be a better way of fixing it but I was in a big rush.
See, you can hardly tell.

Next I took a round brush and quickly worked the gel stain across the leaves of the table. Because the undercoat of the chalky finish paint was done in the opposite direction I ended up with lots of texture. This was done intentionally… awww, who am I kidding! I had no idea what I was doing, but the truth is I loved this happy accident of mine.
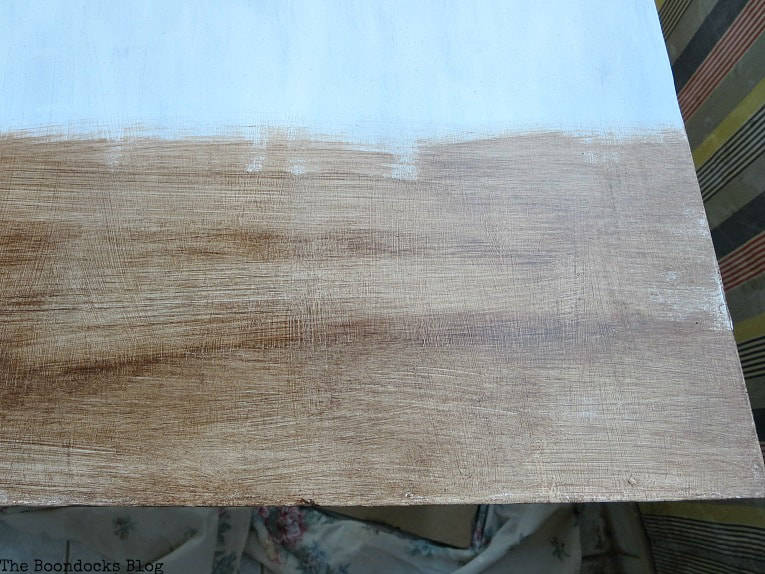
This little bottle went a long way! It’s from DecoArt Americana line. This is a Gel Stain in Walnut and it is thicker than regular stain and also dries super fast. I just worked it back and forth as quickly as I could and did not worry about the overlap of the stained areas. It’s supposed to be an old table and it should look uneven.
Here are the two leaves. Now remember, the bottom brushstroke is opposite to the top brushstroke. That’s why I got all that variation and depth of the stain.

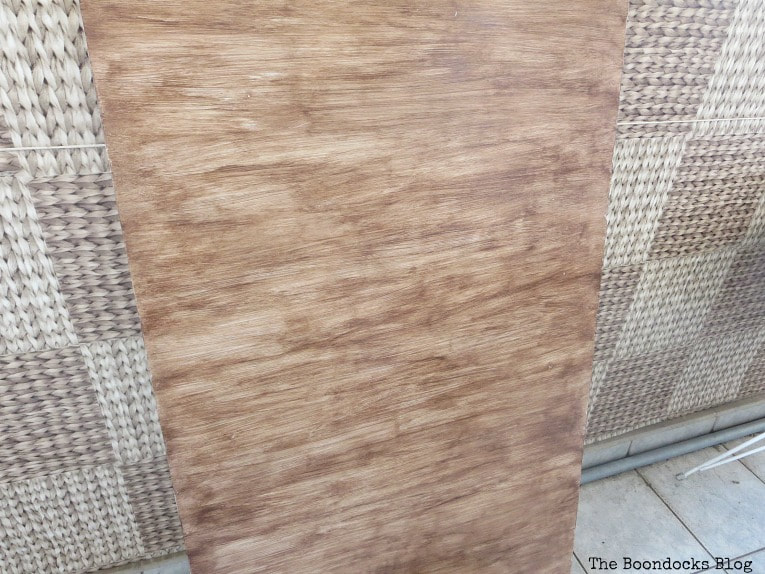
The top of the table was done in the opposite way. The chalky finish was painted width wise, and the gel stain was also painted in the same direction, across. So I did not get as much of a heavy stain look.
I painted the edges with the stain to match. Nothing fancy here, just dabbled the stain on.
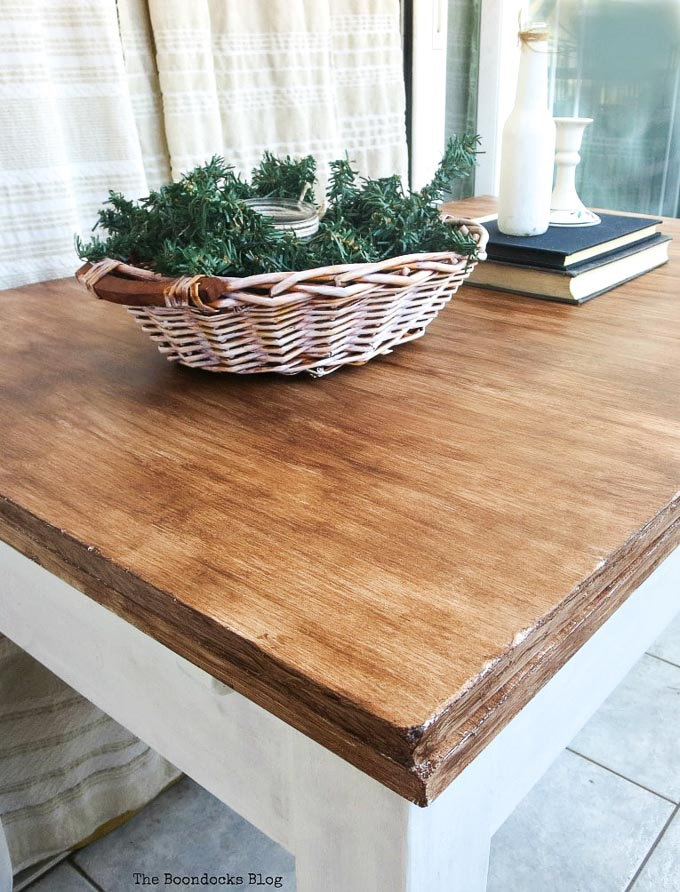
And I finished it off with a can of spray varnish. I used a brand from the Lidl Supermarket. I actually sprayed it for two days taking my time to make sure that I had lots of thin even layers because this table is a work horse. It needed to stand up.

After letting it cure for a week, it was done and I was able to use it.

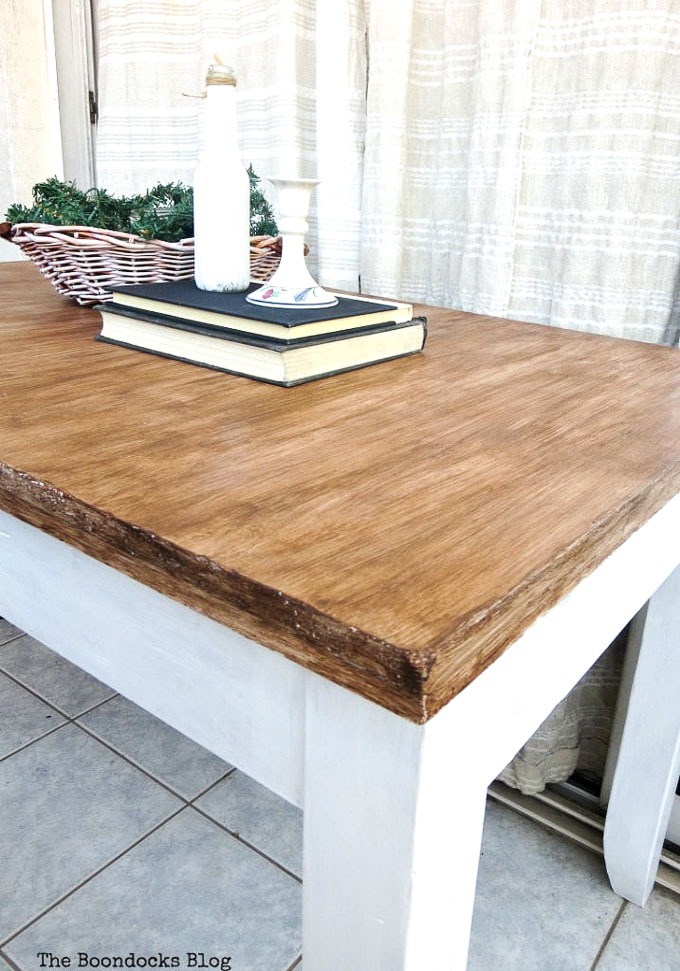
It has a rough, worn look to it which I love.

And that walnut against the crispy white is such a great combination.
Do you remember what it looked like before?

Now you see why even if you are not sure of your talents it is always a good idea to go ahead and try. After all, as in my case, the finished table is so much better than the before. I never would have known what I’m capable of unless I tried.
This table was eventually put in the small bedroom, where I also updated an old bed frame. It is part of the small apartment series. I’ll be sharing the completed room soon.
I hope that after reading my post you will not hesitate to try your hand at an old piece of furniture. In my case it was already pretty messed up so I couldn’t mess it up any further. But I’m prone to experimenting a bit so you never know which direction my projects will go in.
This is an easy way to save an old laminate table with stain gel and give it a second life in the process. Have you ever used stain gel? What did you think?


Mary the wonders you work with your chalky paint are unreal! This table is such a gem now and looks so so beautiful. I love how it is not perfect but so rustic with all it´s edges and the stain is amazing! It looks fantastic, great job!
Katrin I now look at life as BCP (beforwe chalk paint) and ACP (after chalk paint). It has really transformed how I think and what I do.
You did an awesome job on the table Mary! It looks Great! I didn’t know that you could paint, and stain over a laminated table like that. I love the white with the dark top, and the top even looks like wood grain. Nice job!
Thanks Linda. Chalk paint really made the difference here acting as a primer.
Such a gorgeous makeover.
Thanks Debra I just couldn’t see throwing it out.
Thanks for all of your tips and instructions as well as encouragement. The table looks so much better and has lots of character, too. I like the new look. Thanks for sharing.
Thank you Jolene. I think with a little persistence anyone can save their furniture.
Mary really liked your formica table makeover I have been looking for this project as I too have a formica table which I dislike thanks for sharing
Thank you Mary. I’m sure that there are lots of old tables like this that need not be thrown away.
I love it, and it’s so on trend!
xxx
In the end Farmhouse seduces all of us. 😉
Looks amazing, I can’t get over how similar your new place looks like Greece, especially the outside porch or balcony! Must be in my head, I keep thinking your in Greece.
Maria
Maria this project was done in Greece before we moved. I am simply wrapping up the projects from there. Just a few more left to show.
Stunning! One – at least I – cannot see the old laminate table in that beautiful table any more! It looks absolutely perfect, real sophisticated!
Thanks Marjan, anything would have been an improvement after that hot mess it was before.
Wow, I never would have believed that old laminate table could look so good! You did a remarkable job on it! Using putty to fix that edge is the right thing to do. I assume when you say “putty,” you’re talking about wood filler. I’ve never used gel stain, but I like the look of it. Great job Mary!
Thanks so much Florence. Yes it was wood filler. I was just experimenting. Thank goodness it turned out well.
The finished table looks really good, Mary! I love the combination look of a rustic table top with white legs! It’s amazing how you make cast-offs look fabulous!
Thanks Gail. It is alway worth a try before sending it to the garbage dump.
I’ve never used stain gel but I’m seriously impressed with the end results. OMW Mary the table looks so gorgeous. I had to do a double take and go back to the before photo to make sure that my eye’s weren’t decieving me.
I was pretty impressed with it too Michelle. All this because I started blogging. I never would have attempted a project like this before blogging.
You got a great woodgrain look with the gel stain, Mary! Great before and after!
Thank you Linda. It turned out much better then I had expected.
Mary, you are one ambitious lady! I am super impressed. I also am going to give that gel stain a try. Looks interesting…
Kim it was actually much easier than it looked. I hope you like it.
This is somewhat timely for me. I’ve been staring at a wooden table in my garage with some veneer on it — chipped. Certainly different from this but it is a reminder that paint and stain are good things and maybe before I haul it to the curb (which I would have done a long time ago if I could life it!) I should rethink things a little!
As long as you make sure to give it a good sanding the chalk paint will stick. I love chalk paint. But the stain gel was a revelation for me Jeanie. I am so glad I found it and it gave so much depth to the table.
I have refinished a lot of furniture and my day. I thought the only way to deal with laminate was to rip it off, it is a pain. I would not have thought to try to refinish laminate. It looks great. I’m glad you can find a nice used for something that was old and ugly.
Michele I have also done a bookcase that was laminate and it has held up beautifully after a year. In this case with the table, it is nice because of the added stain wood look.
Is this THE table, Mary? If so, the finish turned out great! You’d never know that was laminate underneath.
Yes Marie, the one I was agonizing over. Haha. I also did a dresser with a similar look… .coming soon.
I’d never have believed that this table had a laminate top – it looks so rustic now – gorgeous!
A little bit of paint can work wonders Sarah!
That turned out great, Mary! What a beauty!
Jas, I think in the end we all have a little farmhouse in us.
Beautiful! What a transformation this is — would never know it was laminate!
Thank you so much Lauren, it would have been a shame to get rid of it just because it was laminate.
Mary! This turned out so well. I am so glad to know you can stain laminate. Great work!
Much love,
Erica
It turned out to be much easier than I had expected Erica. And I love the new look.
Good for you Mary. Laminate furniture rarely gets a makeover and yours looks fantastic now. I love how you have a wood grain look now. Its very very well done.
I have to agree with you Leanna. It does serve a purpose and if it can be pretty then it is worth saving.
This turned out beautiful! We just started the Whisk It Wednesday link party and I thought you might be interested in sharing there too! Thanks, Carrie
Carrie I would love to join you at the party.
It looks great, Mary! I love your honesty about making mistakes and not always being sure of what you are doing. Don’t we all feel that way sometimes?! The table sure came out well for not knowing what you were doing, though! Love it!
Amy I try to always be honest on the blog. After all I am no expert, just an average person trying to get by, and finding an adventure or two along the way. But I do love to share everything I learn with others.
It looks fantastic, Mary! Love the combination of the wood and white 🙂
Thanks Eileen, it is my jump into the farmhouse style.
Looks great!
Thanks so much Am.
OK, I had no idea that a piece of laminate furniture could be made to look this good. Thanks for the inspiration and the detailed tutorial!
Thanks so much Susan. Every bit of furniture deserves a little TLC.
I never would have thought to use gel stain on the table. It is absolutely beautiful!!
Thank you Sherry, I think you make the best projects so that is a real compliment coming from you.
Hi Mary,
What a great transformation. I love the way gel stain works and that it’s not as smelly as regular stain. I’ve used in on smaller craft projects but nothing this big. Good to know!
Yes that is what I liked about it too. Not as smelly and easy to work with. It just took a bit longer to do the table surface because it was so big, but it was so worth it.
Mary, what a great makeover! Love the wood top with the white legs.
Thanks so much Linda, the white gives it a crisp look.
Per usual, I love it. Especially your “intentional” brushing technique. The top is gorgeous!
Cathy I went for it and it turned out actually better then I had expected.
You know, as our kitchen renovation winds down, I’m noticing how awful our kitchen table and chairs really look. (Honestly, I knew they were bad before, but they look absolutely hideous now!) I’ve been hesitant to do much with the table since it is laminate, but I might just have to give this a try! Thanks so much for sharing at the #happynowlinkup!
Leslie you are so good at anything you do. You should definitely go for it. As long as you sand at the start to give the chalk paint extra grip I think it will be fine. I’ve also done other laminate projects and they have held up very well.
Wow, what an amazing job!! It came out beautiful.
Thanks so much Lory, and it was easier than it looked.
Great makeover, Mary. You can’t go wrong with a white table and dark stained top! I really love how you just throw yourself into a project. Thanks for sharing! Cynthia
Cynthia that white crispy color against the farmhouse top is too pretty to pass up. I had to try it.
Just a little love, and refinishing can make such a dramatic difference from what you start out with. Love following along your room makeovers Mary, thanks for sharing at #fridaysfurniturefix
I’m so glad I found this! I have a table with an extension just like yours, now I know what I’m going to do with it! You did a great job
I am so glad to hear this Linda. That is such a practical table it would have been a shame to get rid of it.
Brenda I think I need a vacation from all the makeovers. A nice simple project is in order after all that.
This is incredible, Mary! You would never know this was a laminate table top. What an awesome technique using the gel stain. Pinned
It’s comments like yours that make doing these projects a pleasure Angie.
Hi Mary, I can’t believe that was a laminate table now! I have been thinking about tackling a laminate table that I have in my house but I was worried about chipping paint since it is a table my kids use most of the time for their crafts. You will have to tell me how you think it would hold up to active (careless..hehe) kids. Great makeover! I love the transformation! Thank you so much for the tutorial! Saw your post at the Fridays furniture fix party:)
Kathleen I would suggest you add a few coats of polyurethane on the top so it will hold up. I have another table that I did the same way and added varnish on top but you need the toughest you can get.
wow, what a transformation! Thanks for sharing with SYC.
hugs,
Jann
Thank you Jann. I love my new table.
The table looks fabulous Mary – love the chalk paint legs with the stained top
Amber before I started this project I was hesitant that it would not work but once I took out those paint brushes it was easier than I thought.
Mary, you worked miracles with this old table! You managed to conceal the formica nicely, and I like how the top brown, and the bottom white look together. Great job!
Thanks so much Florence. I wanted a neutral look for the table and this farmhouse look is just that.
Mary, the table turned out beautifully!! The different strokes and variances give it interest and I love that! You really did a great job transforming this table into a wow piece!
Thanks so much Keri. It reminds me of your curbside table where you also had a wooden top and a cream bottom. But my top is fake. 😉
Laminate scares a lot of DIYers away from a great upcycle. Thanks for the inspiration and sharing on Sunday’s Best.
Rhoda I think that you cannot ruin it any more than it is already. So why not give it a shot. 😉
This looks amazing! What a great idea! I’m saving it for later!
Virginia | More to Mrs. E
Great job! Thanks for sharing at Vintage Charm!
The table looks amazing! I really like the gel stain that you used. Thanks for sharing at Merry Monday
This turns out so awesome! I did not know you could do anything to transform laminate. I am looking forward to trying this! Thank you for sharing at Celebrate It!
Hi! Just found your blog post, as we are trying to do the same technique on a laminate tabletop. Great job! Question – how long should we leave the gel stain before spraying the varnish? Our patch test of chalk paint and gel stain is still sticky after 12 hours.
Hi Matt. I would suggest waiting till it is no longer sticky because each location is different. You might live in a humid area. When I did this I was living in Greece and the weather was dry and hot.
Wait till it is no longer sticky. And then when you apply the varnish wait between coats till it is fully dry. I think I may have given some coats an overnight time. Hope that answers your question. And thanks for visiting.
Wow! You would never think that’s the same table. it looks amazing!
Thanks so much Sarah!
Great makeover.
Thank you Anita!
Love the color do beach
Hey just found your blog, you did a fantastic job! I’m wanting to do something similar to a shelving unit but a little worried about the paint/stain durability over time. Has it held up over the last few years? Chips, scrapes, peeling, anything like that? Thanks 🙂
This is fantastic. Thanks for sharing exactly how to do this.
What did the brush look like that you used I’m going to try this on a table of mine.