Easy Farmhouse Style DIY Coat Rack
Made with scrap wood and black coat hooks, this DIY coat rack is an easy way to add farmhouse style and organization to a small entryway.
It’s my favorite time of the month, time for another edition of International Bloggers Club. If you are new here, we are a group of friends from all over the world who get together every month to share our projects, compare notes and see how we do things in our corner of the world. Last month we shared flat lays photo shoots, in my case one about Greece and the month before crafts with baskets. This month we’re sharing an easy-peasy DIY coat rack project!

This month we are going to work on projects with wood. Now you all know that I had a big basement back in Greece with an endless supply of everything. So it should come as no surprise to you that I also have a basement here in my new home. This one also has quite a lot of stuff. We shall see what I dig up in the coming months. But for today we are going to work with a humble piece of wood.
As many of you know we just moved and are in the process of getting organized. It will take some time. What I wanted in the girls’ bedroom was a place for them to hang their bags and things. Something simple. But I did not want to open lots of holes on the walls. So this easy DIY coat rack idea came to life.
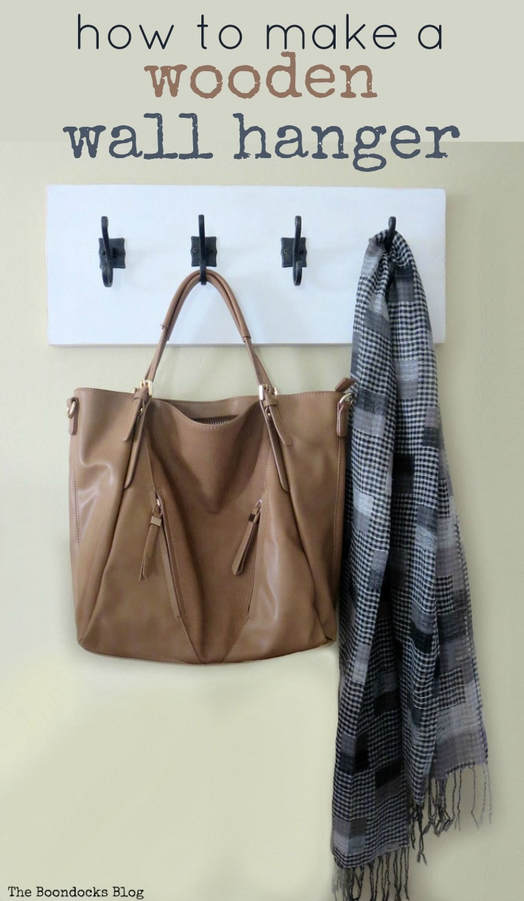
What I Used:
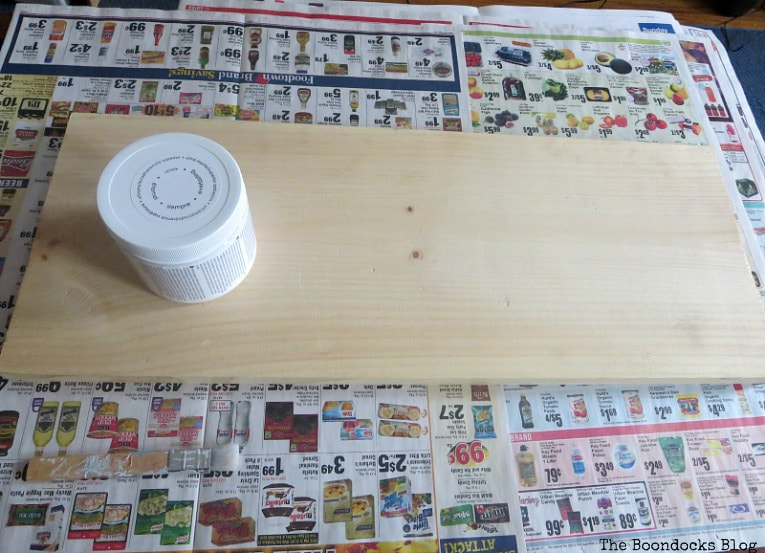
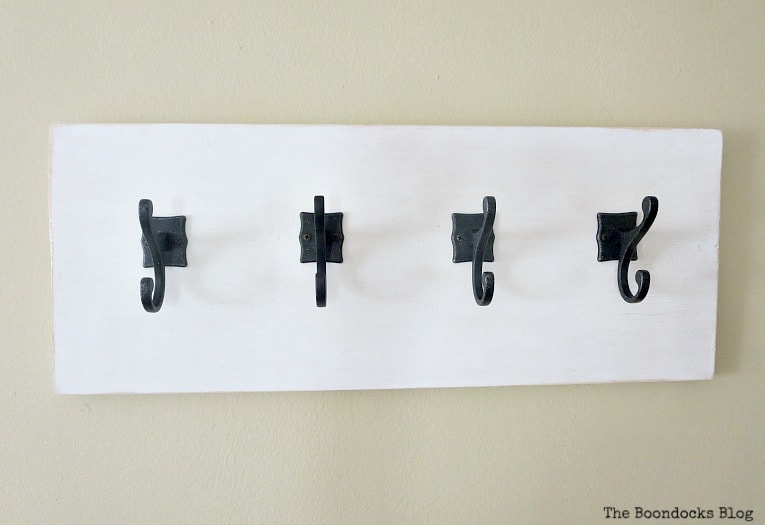
- a piece of wood, I used 10 inches by 24 inches
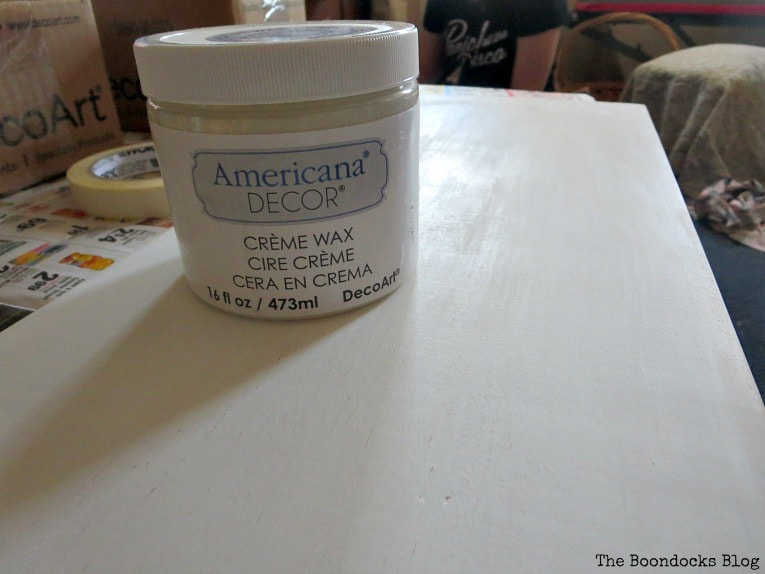
- DecoArt Americana Chalky Type Paint in Everlasting
- DecoArt Americana Clear Cream Wax
- Sand paper
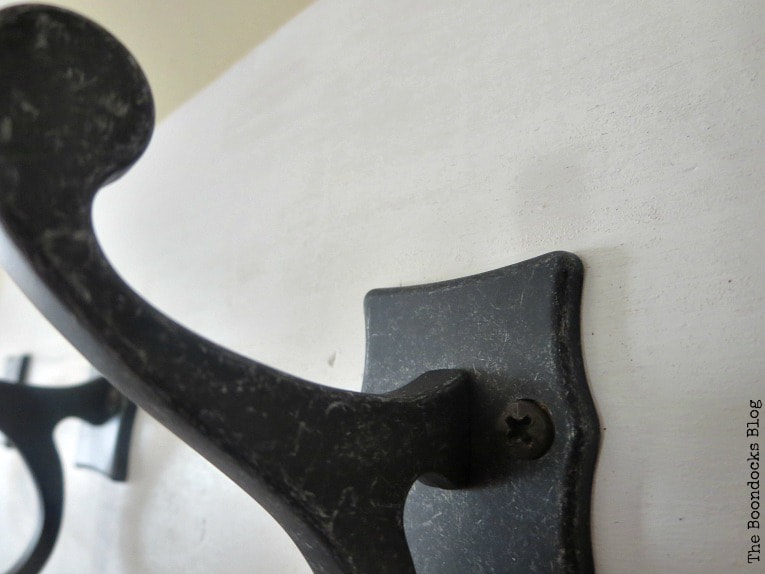
- 4 Brainerd Double Scroll Hooks, in Dark Gunmetal
- 2 sawtooth hangers
How to Make a DIY Coat Rack
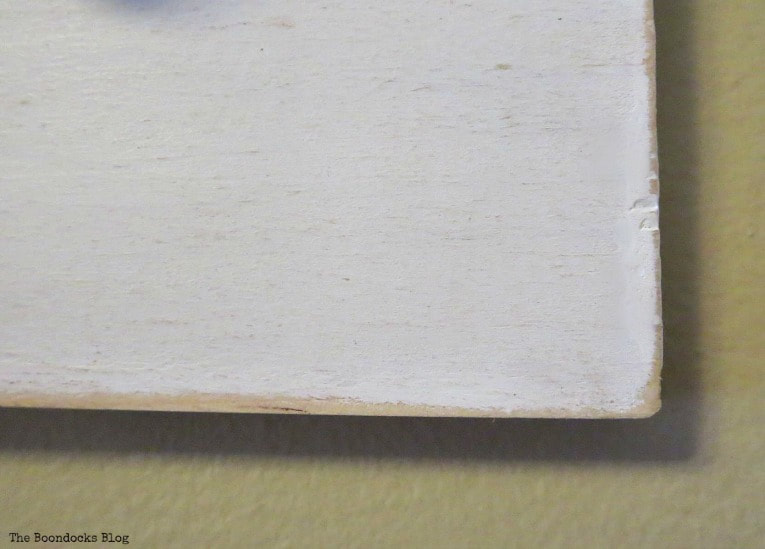
The first step was to paint the wood. I did three light coats with Everlasting which is a nice white chalky type paint. I then went over it with the clear cream wax.
I also sanded it a bit along the edges and on top to make it super smooth. This was done before applying the wax.
Now when I started this project I had a vision in my head. I wanted to add some super cool hooks to stand out against the white. Unfortunately for me the stores in my area were not in sync with me. This is what I found… not good. In order to get the look I wanted I would have to paint it.
Ain’t nobody got time for that!
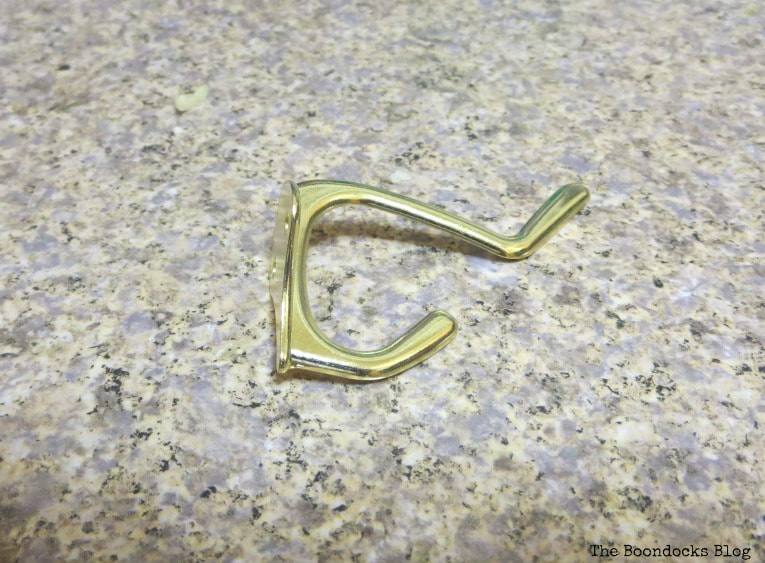
If you know anything about me it’s that I’m always on Facebook. I found this awesome hardware company on FB, D. Lawless Hardware. I’d been following them for a while but had never ordered anything because I lived overseas. But now I’m here and there was nothing to stop me!! I got in touch with the company and in 2 days I had these beauties in my possession.
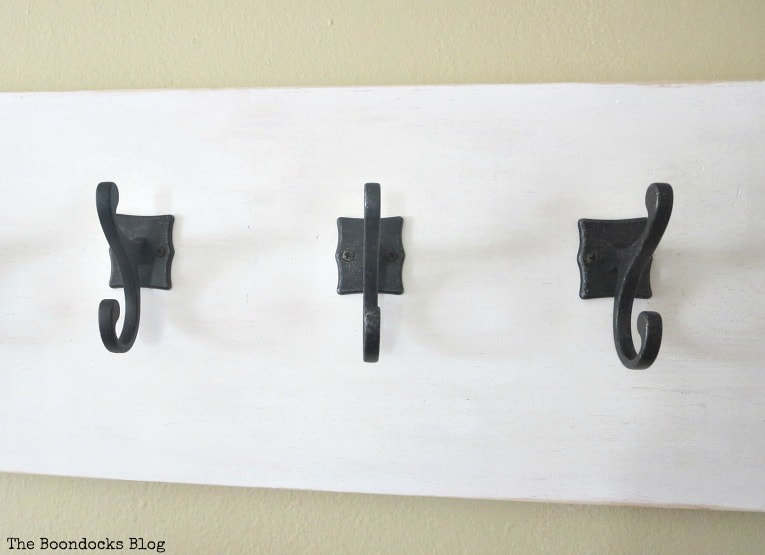
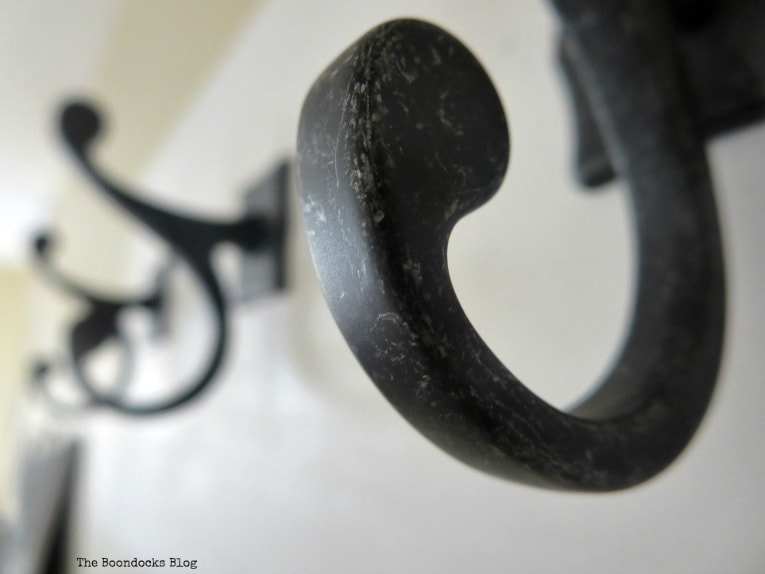
Look at that gorgeous gunmetal! I never thought I’d type a sentence like that but there you go – never say never!
Disclosure: This post contains affiliate links for your shopping convenience. If you purchase any of these products through the links, we receive a small commission at no extra charge to you. You can find our full disclosure here.
Four of these babies did the trick! And I actually put this together all by myself. I am so proud of me! “wink”.
Just look at those sexy curves!! There is no comparison to the fake gold hook I had originally bought.
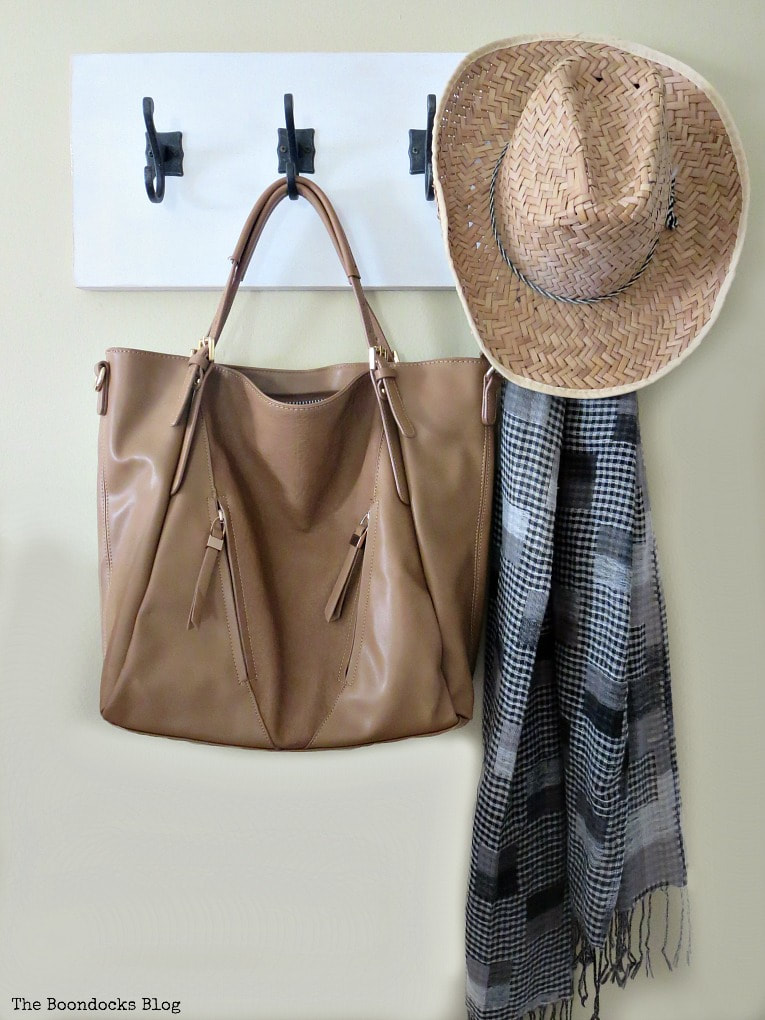
And here it is on the wall.
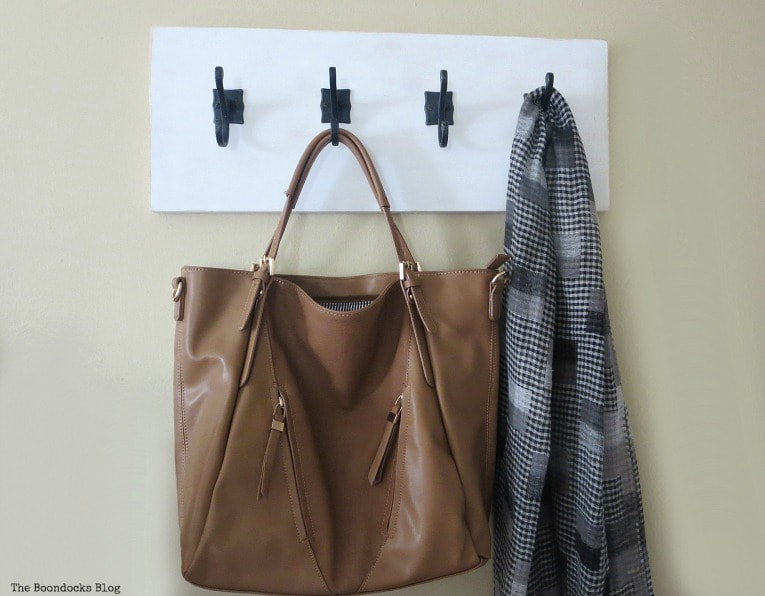
I feel super organized… at least in this little corner.
These hooks are just brimming with character and they are solid too. I know my things will stay up on that wooden wall hanger!

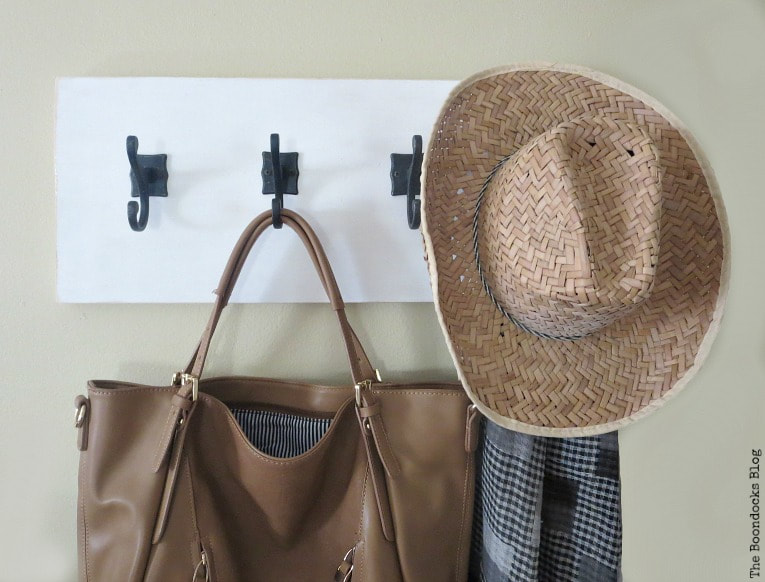
This is the reality shot. Because we like to keep things real around here.
Oh and I know what some of you may be thinking, that it’s just a plain piece of wood. But with all the crap, um, stuff I’ll be putting on it I will have a very visual wall. Besides I don’t want to take away from the beauty of those hooks!
So for now I am going with simple black and white.
And now I’ve solved my organizing problem and shown you how to make a wooden wall hanger. At least all that stuff is not on the floor or on top of dressers anymore. I have to say this was much easier than I thought it’d be. And more frugal than buying one.
I hope you all have a chance to check out the D. Lawless Hardware Company. They have a huge variety of items to choose from. And with service like that you know I’ll be ordering again! So much still needs to be organized! Do you DIY organizers or just buy them?
I invite you to hop on over to visit my four friends who are also sharing their wood projects. Simply click on the images below my name. If you’d like to see more past challenges click here.

If you really like what you see subscribe to my blog and get my adventures twice a week in your mailbox. The form is on the sidebar and your e-mail will never be shared with a third party.
This blog is for entertainment purposes only: my DIY tutorials are not professional advice. Read my full disclaimer here.

LOL Mary, I’m so glad to hear that there’s another basement filled with goodies to be discovered and repurposed in NY. Love your wooden wall hanger too, those hooks are gorgeous. Isn’t it great knowing that you have so many more online shops to chose from now. Ahhh the possibilities 😉
I was so excited to work with this company Michelle. I’ve been following them a while and was itching to try something with their items.
I love these simple type of projects. Great to use any leftover things. And hooks are so useful.
I was so happy to do this one, I really needed it and those are the best kinds of projects.
I really adore those hooks. I have been on the lookout for some hooks for our bedroom and these could just be a great option!
This company has a huge selection I’m sure you’ll find what you’re looking for.
Those hooks are fabulous, great project, love the simplicity.
Thanks Pamela, I always go for simple.
Looks awesome, Mary! We all need extra hooks everywhere!!!! Yours is a very nice, simple solution!
Thank you Gail. I’m all about simple and practical.
I guess you now my love for wood projects! This is right to the point and turned out very beautiful!
Simple and practical Katerina. Thank you.
Those hooks are fabulous and perfect for that piece!
Thank you Jeanie. I am so happy with them and for the price they are so worth it.
Mary, you had me chuckling out loud at your “reality” shot – so my house too! Great little functional wall hanger and lov’n the black & white colors too. Pinned
We have to those too from time to time Marie. Can you imagine everyone thinking I just moved and I have a perfect home? Even when I don’t move I still have a mess.
Thank you for writing this post. I dived on it as soon as I saw it because we are in the process of having our hallway decorated. I am looking for ideas for coat hooks, shoe holders etc etc. This was great. #TwinklyTuesday
Oh I am so glad to hear that Harry’s Mum! I am always looking for simple and practical ideas for my endless clutter.
Your wall hanger turned out really pretty! I love those hooks, and I can’t wait to see what else you pull out of the basement. Now I’m going to hop over and check out that hardware store.
That store has such a huge selection Linda. You will love them!
Oh how fun, I can´t wait to see what you’ll be showing us from this basement, lol! The wall hanger is a great organizer, you know I love organizing, and the hooks so cool! A fun project to make from a simple piece of wood!
Just the way I like it Katrin, simple and easy. You have to check out this company. They have so much to offer.
Such a great job and we all need places to hang things!
Thanks Janet. It was simple and easy, just the way I like it.
Love those hooks Mary! You did good! They look like they’re nice & sturdy.
They are super sturdy. And I like the way the black stands out.
Fantastic project Mary. The hooks you selected really make all of the difference. They are so stylish. I wondered about the basement you left behind. I am glad we will get to see more great transformations from the new basement. 🙂
There is always a basement out there…somewhere. And they all have my name written on them. 😉
Love those hooks!
They really make a statement!
Mary, the coat rack looks awesome! I agree with you, the gold hooks don’t even compare to the black ones. Those black hangers are fantastic and they look incredibly sturdy. Oh and awesome job on putting the hooks on!! I’m sure it must feel nice to get things organized after moving.
Those hooks are sturdy and they also make a bold statement so I am really happy with them Keri.
You were absolutely right taking those wonderful gunmetal hooks. Not only do they look much nicer, the other ones look a bit flimsy… If that wall hanger would be on the wall in our house, you’d have taken the solid ones right from the start, cause each and every hook around is (over)laden and has to carry a lot of weight… Might be a good idea to sort a few of those old jackets and coats out, but…
I know what you mean Marjan. I have too much stuff and I just got here. We really need to declutter but that is a whole other subject.
I just moved too and I could use something like this in this rental, not many closets. Looks stylish too.
Maria
That’s what I was looking for too Maria, something pretty that would be able to stand on its own. Those hooks certainly stand out.
Nice! I just started using chalk paint–i love it!
Gigi, chalk paint is the best. It comes in all the colors of the word and if it doesn’t you can make your own and it will stick to anything.
Derrick is so kind and they have amazing hardware, like the ones you used. They seem really strong as they have a big duty, hold all the bags and stuff. You must be proud of yourself, you did a wonderful job.
Thank you dear Pili for referring them to me. They were wonderful, fast service and excellent product. I am now looking around the house so that I can order more things from them.
Mary, You know that I am slightly obsessed with great hooks. And these are definitely SWOON worthy. I love the finish and the curves. And the way they look against the white wood. They are perfect.
I’ve never bought from D. Lawless, but I will definitely be checking them out!!! Thanks for sharing them.
I’m happy that you have a basement full of stuff here in the US too, can’t wait to see what you upcycle next!
I am so excited now, looking around the house and all of the possibilities there are. It is one great big adventure now. We are going to drive Grandpa crazy! 😉
I love this rack. The hardware is gorgeous! This is so pretty and practical.
That’s what it’s all about Michele. No point in having hardware if it is not practical. And these hooks really do the job!
I love the simplicity of it Mary. And the hooks are just perfect. I also love your keeping it real photo. 🙂 I have a similar hanger in my entryway, except it has doorknobs instead of hooks. My husband hung a ball cap on it the other day, which I promptly took down because I didn’t want the entryway to look cluttered. Haha! Great job!
Hah you are so funny. When the kids were young I used to try to keep a picture perfect house. And then they multiplied and became four and it was not possible. So now I have had to lower my standards. I’m happy if things are functional if not perfect.
What a neat idea! I would love to try this myself.
It was really easy. I don’t consider myself a DIYer who uses heavy machinery or anything. I did it all by hand.
Love it! I have a serious addiction for decorative hooks in my house…so much stuff to hang!
I know what you mean, better on the wall then on the floor to trip you over.
One can never have too many hooks, and if they just happen to be gun metal, all the better ;).
xxx
Haha!! With sexy curves no less! 😉
I love wall hangers! I am making one from an old board and using mismatched hooks. Thanks for sharing with SYC.
hugs,
Jann
Ohh I like that idea Jann. I may have to do one with mismatched hooks too.
Lovely hanger Mary – still can’t believe you are back in the USA and not in Greece
Yay! Amber I am so happy to be here and working on so many new projects.
The gun metal hooks is absolutely the best choice. I love the “antique” look and it will make a great photo prop:D. Thanks for sharing the idea !
You know you are absolutely right about that. I had not even considered that, thanks Elvira!
Such a nice functional wall hangar. Those little hooks look strong and solid in their gun metal finish. So much nicer than the original gold.
Leanna you have to reach out to them too. They are a great company to work with.
These hooks look great they have an old world feel, great piece for organization, I have a few in my place as well! Thanks for sharing your project at Fridays Furniture Fix, always a pleasure Mary!
Thanks Brenda. They are really solid!
Useful Content. Thanks a lot for the info!