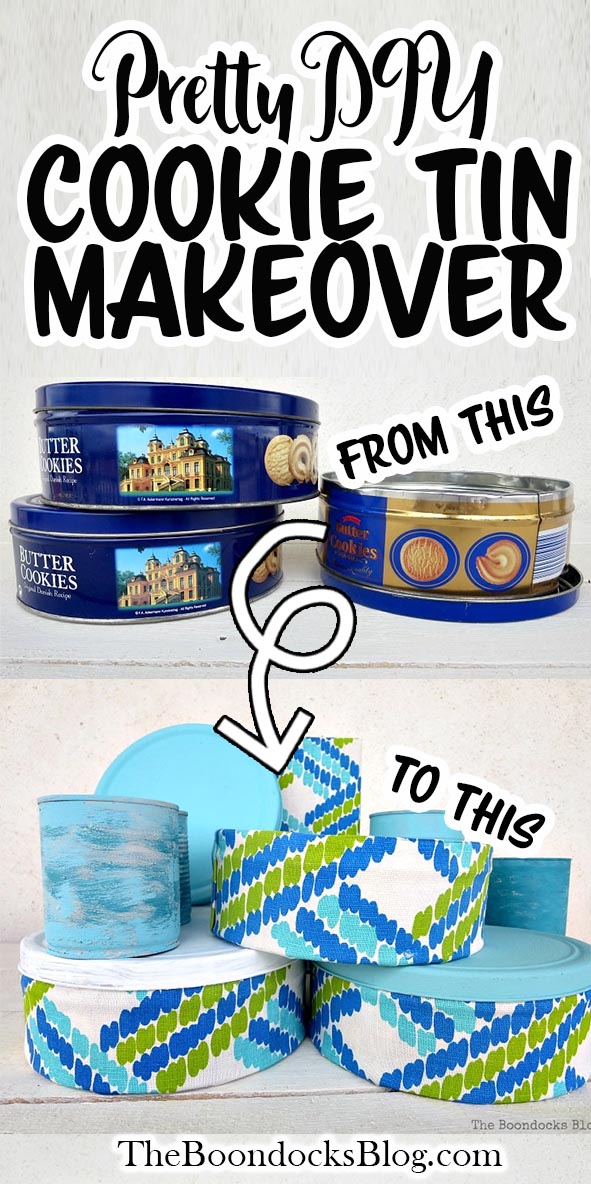
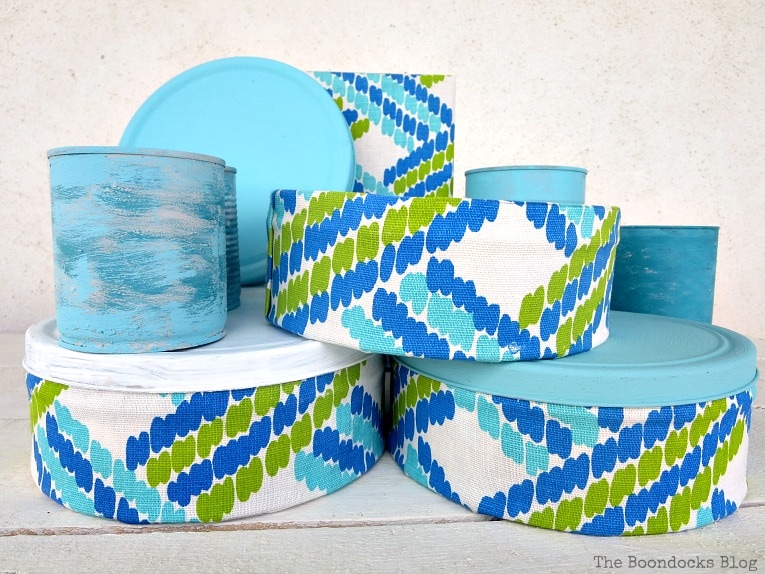
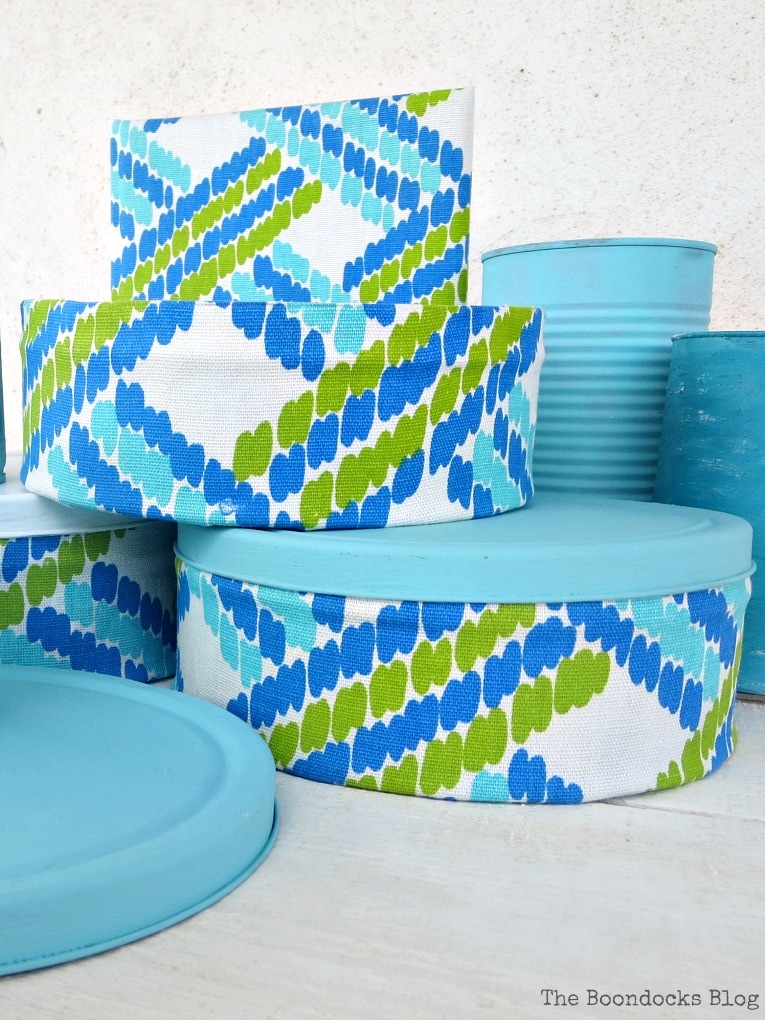
Wondering what to do with old cookie tins? This simple cookie tin craft idea is a great way to repurpose tin cans and use up scrap fabric at the same time!
Wondering what to do with old cookie tins? This simple cookie tin craft idea is a great way to repurpose tin cans and use up scrap fabric at the same time!
It’s the end of the month, and that means it’s Int’l Bloggers Club Challenge time. For those of you who are here for the first time, this is a monthly challenge that I participate in with my blogger friends who live all over the world. We meet up each month to compare notes and see how we do things in our corner of the world. Last month, I repurposed a tire rim into a wind chime, and the month before we looked at our epic hits and fails.
Upcycled Tin Can Craft Ideas
This month we’re doing crafts with tin cans – any kind of tin cans. We all have them at home – why throw them out when we can reuse them for storage? Today I’ll be showing you how to upcycle them and make pretty cookie tin cans with fabric.
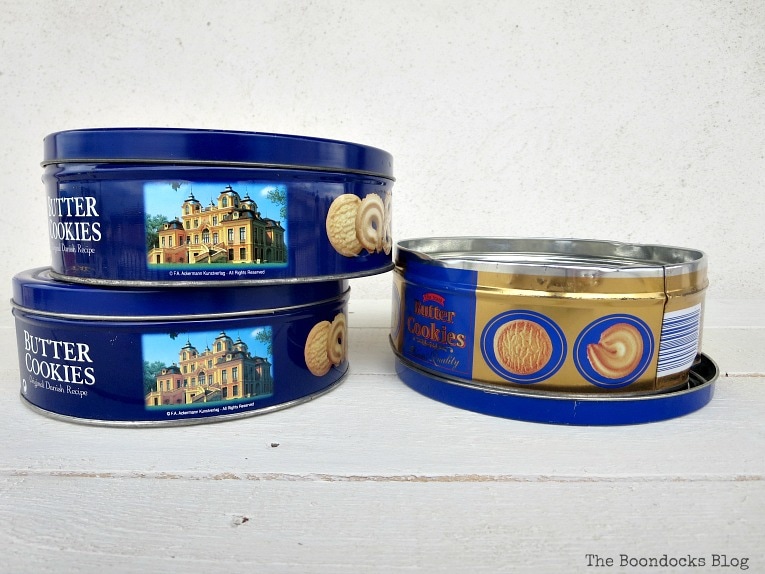
I had a collection of old cookie tins cans that I wanted to use for storing things. But they didn’t look so pretty. So I decided to upcyle them with fabric.
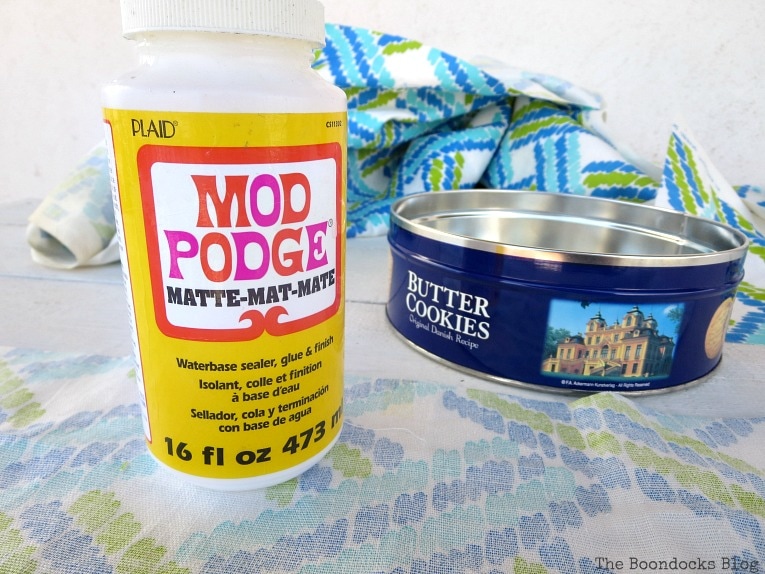
Materials Needed for this Cookie Tin Craft
Disclosure: This post contains affiliate links for your shopping convenience. If you purchase any of these products through the links, we receive a small commission at no extra charge to you. You can find our full disclosure here.
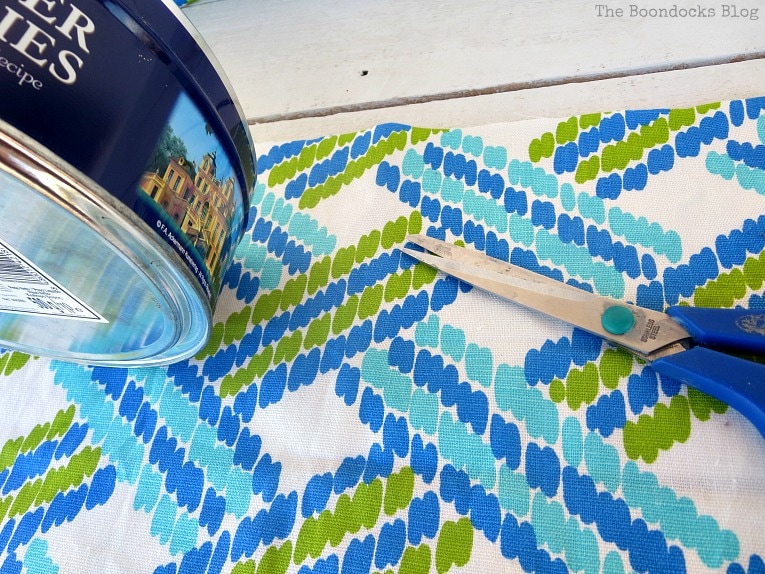
This was the fabric I chose to use for the upcycling project. It’s pretty and because I’m from Greece I like to use bright colors with some of that aqua blue in there to remind me of the sea.
I cut the fabric about three times the width of the side of the tin. For the length I wrapped the fabric around the tin, plus four fingers.
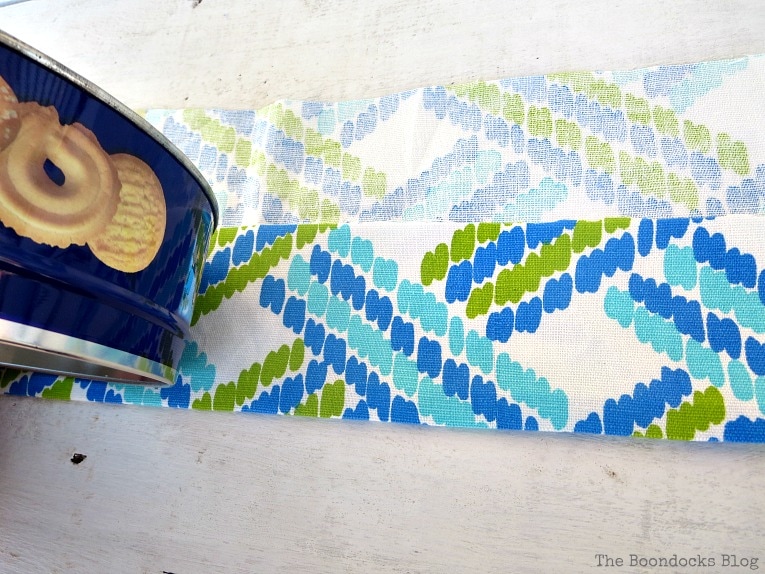
Once it was cut, I folded it over one third of the way and pressed it down. That fold would go on the top rim of the tin.
Now it was time to start gluing it on with Mod Podge.
The Exterior
I first brushed the mod podge on the outside of the cookie tin. I added a little at a time because it dries really fast. Then I pressed the fabric with the fold on the top of the opened tin. I slowly worked my way around the whole exterior of the tin in this way. I used the fold as a guide. The fold was on the top rim of the tin.
Here you can see that the fabric has been glued all around on the exterior except for the edge.
The edge was folded over but first I applied mod podge so that the fold was glued onto itself.
More mod podge was applied to the folded edge and then pressed down onto the tin side. This gives us a nice crisp look.
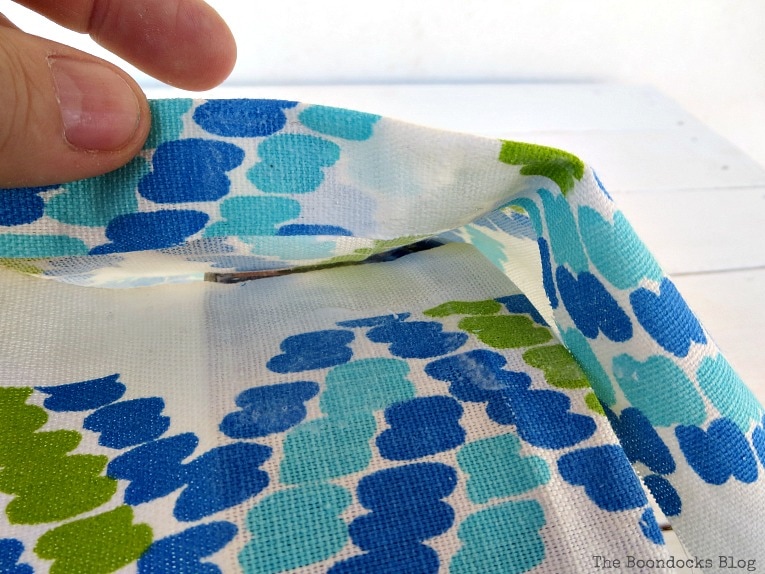
The Interior
Next it was time to tackle the interior. I applied the mod podge on the inside of the empty tin can. You can work much faster than the exterior because you don’t have to worry about the fabric since it has already been secured.
This is the second third of the fabric. I just pressed the fabric down to the insides of the tin.
I pressed the fabric all around and tucked it to the bottom of the edges leaving the excess on the bottom.
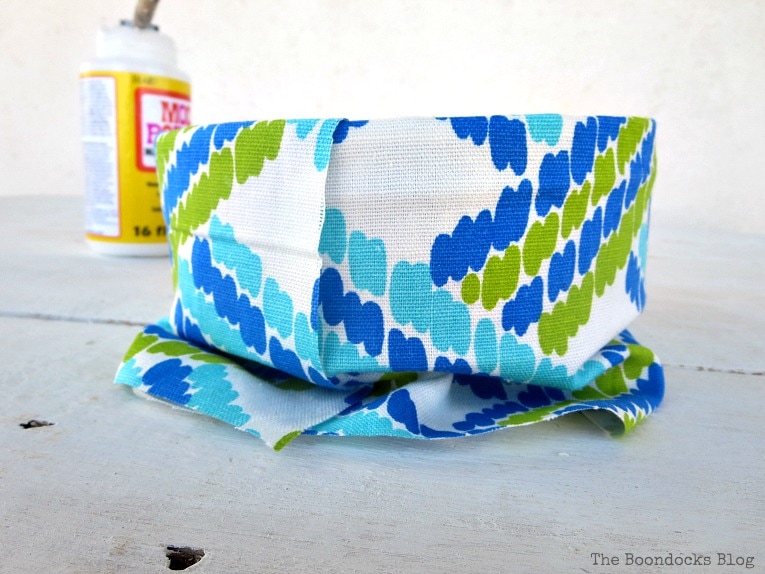
The Exterior Bottom
Now it was time to tackle the bottom of the tin. I was working with the last third of the fabric for the bottom. I cut the excess fabric into strips.
Working with one strip at a time, I would apply mod podge and press the strip down to the tin. As I went around, the fabric strips ended up being glued on top of each other.
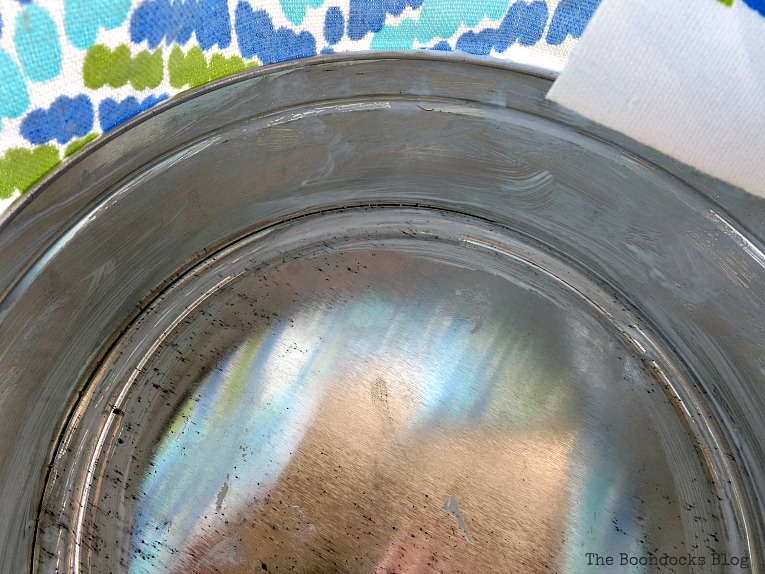
The round hole in the center was covered with a small piece of fabric that I’d cut into a circular shape.
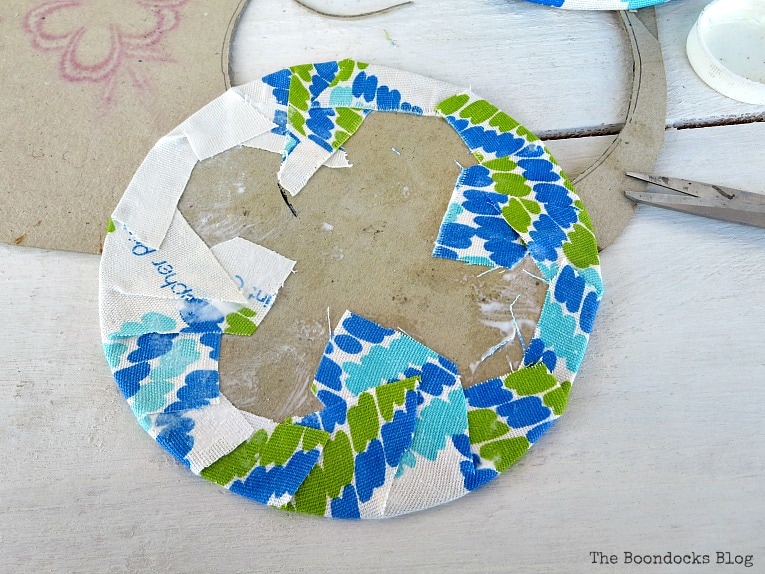
The Interior Bottom
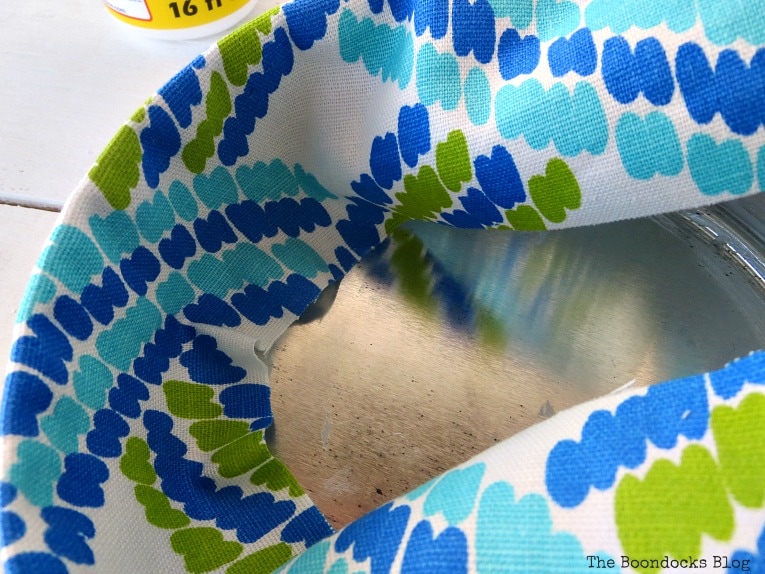
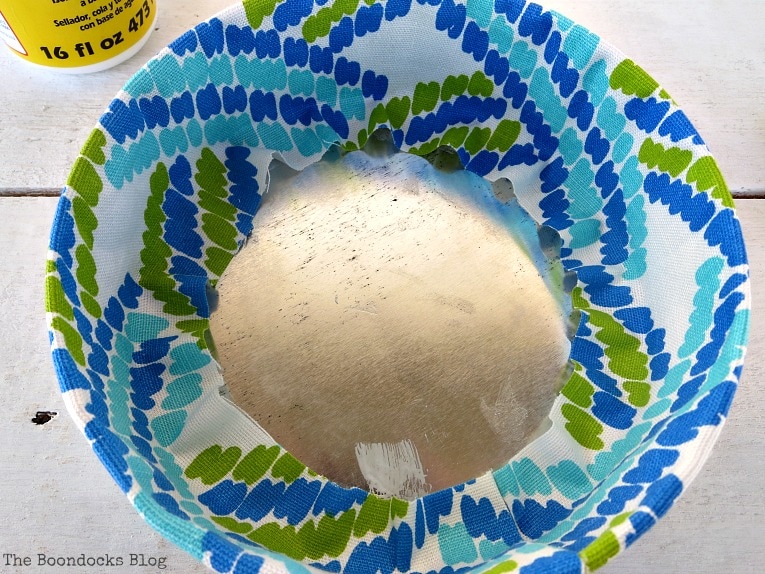
To cover the interior of the bottom I took a piece of cardboard and tracing the tin, I drew a circle. I cut the circle out and placed it inside the tin. If it was a little too big, I simply trimmed it a bit till it fit into the tin with ease.
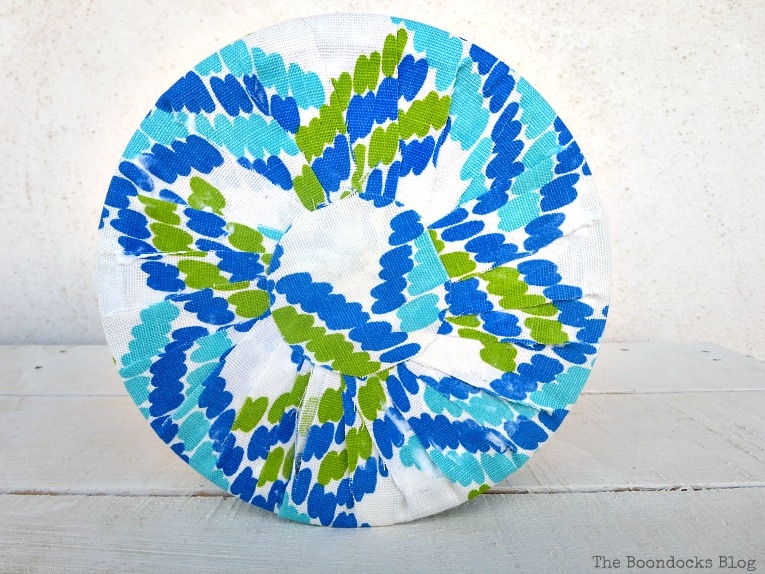
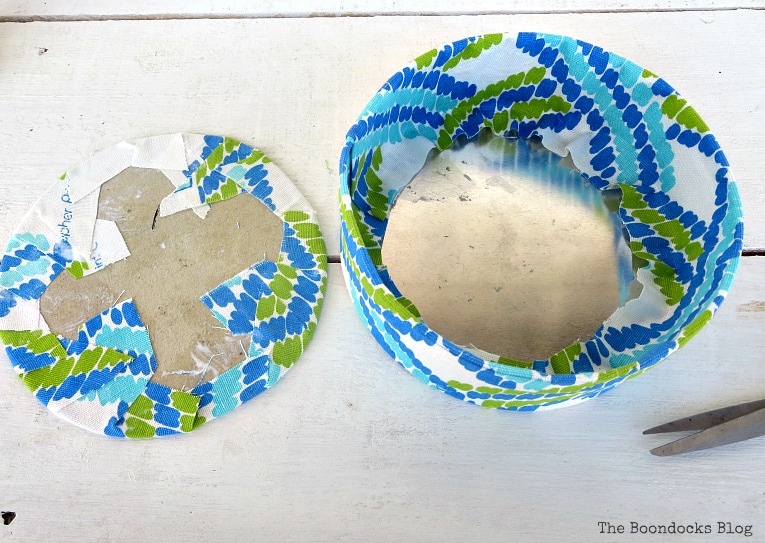
I took another piece of fabric that was square and glued it onto the cardboard circle. Then I cut the excess fabric into strips, just like I had done above on the tin bottom. And then I glued the strips all around. They don’t have to be perfect.
Once this was done, I flipped this cardboard over and placed it into the bottom of the tin.
Below you can see how the interior looks now that the fabric covered cardboard has been inserted.
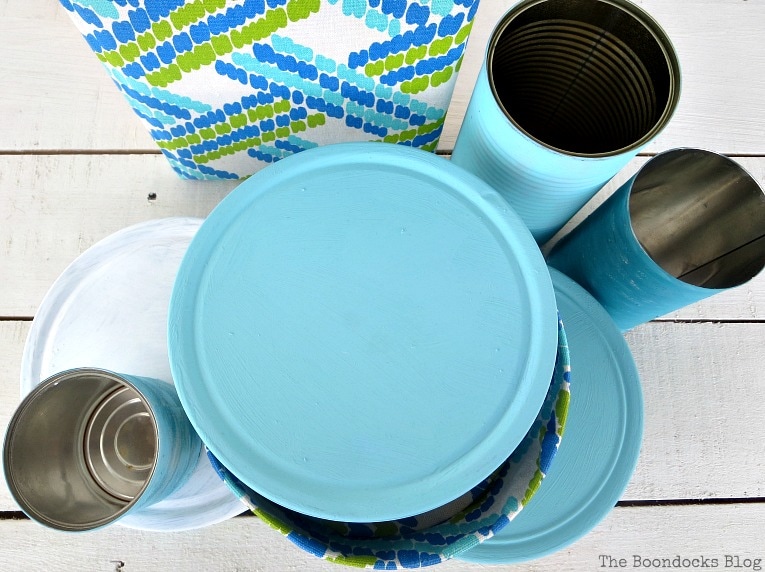
And lastly I painted the covers of the tins with chalky type paint. And since I had a few tin cans I painted them too. And because I was going overboard anyway I covered a telephone book with this fun fabric.
Well that was quite a long tutorial. It’s not as hard as it seems, I just wanted to make sure to show all the steps in detail.
I think it was so worth it to do this cute tin can craft. Now my cookie tins look like fancy decorative storage boxes. And how long did all of this take, maybe half an hour? But so worth it to achieve this pretty look.
With this cookie tin craft I was able to use some of those supplies that we all have lying around the house and transform them into something really pretty.
I hope you enjoyed my how to make pretty cookie can tins with fabric. Do you reuse and upcycle your tins or do you just recycle them?
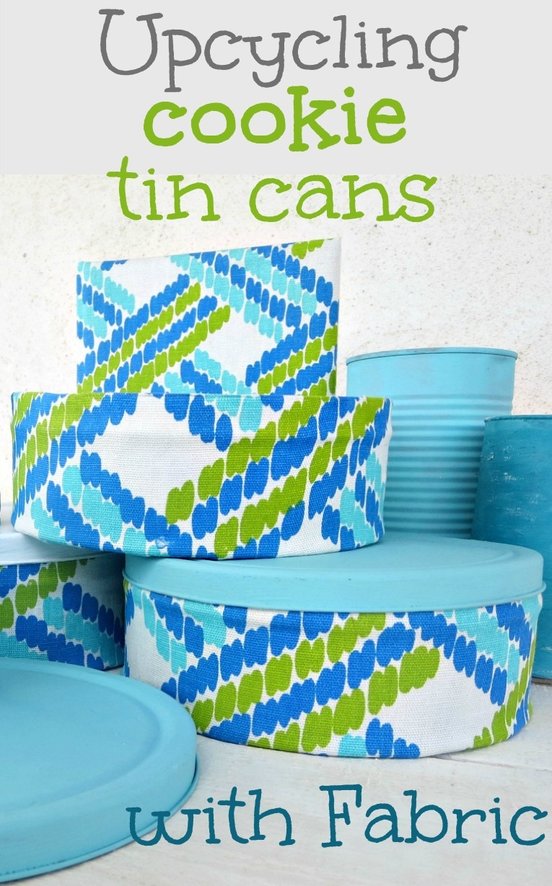
If you like what you see, share it with your friends, or save it on Pinterest. Above is a Pinterest worthy image!
If you really like what you see subscribe to my blog and get my adventures twice a week in your mailbox. The form is on the sidebar and your e-mail will never be shared with a third party.
And now hop on over to visit my four friends who are also sharing their spring and fall crafts. Simply click on the images below my name. If you’d like to see more past challenges click here.
This blog is for entertainment purposes only; my DIY tutorials are not professional advice. Read my full disclaimer here.
I love it when I get your comments and I will try reply to them or visit you on your blog. Please do not add a hyperlink to your comment, otherwise we cannot publish it.
Your cookie tins turned out so pretty Mary! I love the bright colored fabric, great choice. It does remind one of the sea with the pretty blue. I’ve upcycled jars with fabric, but haven’t tried a tin yet. I like how you covered the whole tin inside and out. Great tutorial shows each step! Adding to my list of things to try! 😊
Thanks Linda. I really enjoyed doing this. And I wanted to show that it doesn’t have to cost a fortune nor do you need fancy machinery to get a high end look. I hope you make some too.
Those cookie tins are perfect Mary! Wrapping them in fabric is a clever idea and the bottom and inside look fantastic, you’re a pro! I love that summery fabric too!! A great cookie tin recycle!
After having them for about 10 years it was time for a beauty makeover! 😉
Really pretty project, and such a great way to re-use tins – love the fabric (and they match your wonderful chairs!)
Sarah it seems that this is becoming my blue summer. Thanks.
These look great and are so practical, too! We all need more storage, right? 😉 Especially for craft supplies! -Marci @ Stone Cottage Adventures
Yes Marci, why shouldn’t our storage be pretty as well as practical!
Mary they look super cute! All this fabric and glue scares me a bit but I think it’s worth trying it!
Ntina it’s nothing to be scared of. It really was easy as long as you fold the fabric into thirds and use that as your guideline.
Wow Mary, this is such a great idea! I do have some of these cans at home, and they are full with stuff that need to be hidden. I will definitly try out your crafty idea 🙂
I’m so glad to hear that Cristina. Who says we can’t have pretty and functional.
You are so creative Mary! Those tins are a big improvement now!
Pretty and Practical, right?
What a great idea! I have a small collection of holiday tins that I’m holding onto yet don’t know how to use. You’ve given me inspiration! Visiting from Monday Funday.
Glad I can inspire. I had these for 10 years and they were holding my sewing stuff but now I use a suitcase for that. Hah. Do I have too much stuff?
Super up-cycling project! The cookie tins are so attractive, now. They provide secure storage for so many things — they are not only attractive but also functional.
That’s what I wanted to achieve. It would have been a shame to get rid of them Carol. Now they are earth friendly and pretty!
You’ve used that lovely blue paint again. I like the fabric choice too a bet they look good on your table with your blue chairs.
That color seems to be the one for me this summer! I can’t seem to get enough of it.
That’s a great idea Mary and it’s such a lovely way to color co-ordinate them with your existing decor. Those cookie tin come in so handy and we have a whole bunch in the garage somewhere. Looking at the finished product you would never guess that they were boring, empty tins after you finished them off so beautifully
They needed to be refreshed after so many years of boring. I have a master plan here! 😉
Mary, you did an outstanding job on this. I love the bright colors and how the cans can hold all the stuff you need but want to keep hidden. No one will know it isn’t just a pretty storage container.
Thank goodness for that Debra because they really looked dated before.
These are lovely, Mary. Anyone would be delighted to receive a gift of home made cookies in a tin like this! And I love the colors, too.
Thank you so much Jeanie! It was time for a new look and this was an easy project. I wonder why I haven’t done it before.
They turned out beautiful, Mary! I love the colors! Fabulous idea!
Andrea I had them sitting around for 10 years. I should have done this sooner.
Love the colors you choose Mary, and they will look extra special with your new pretty chairs too!
xxx
Yes Doreen they are going in that room with the bookcases that I made over too.
I don’t have any cooking tins! Now I have to go find some! LOL Bruce and the kids will be excited by the treat and I get to keep the tins. These look so nice and I do have a bit of leftover fabric that I can use, lol. I like the way they look and I can use them to store so many supplies and they will look great in my storage area! Perfect.
I’m partial to the colors too, blue is my favorite, and this reminds me of the sea and a sunny summer day.
Go to Aldi and get some cookies. Mine are actually old because we no longer buy cookies since I have a baker in the house. But I really liked the blue color. Of course, now I like the fabric even better. It does remind me of summer and the sea too.
I have those exact tins. Now that they are so pretty, what are you storing in them?
Nothing special, sorry to disappoint. The plan is that with three of them, we can put the keys, the cards and whatever else that normally goes on the table at the entrance. Except we don’t have a table.
How’d you know that I have some of these tins??
What a great idea, Mary! I’m going to have to go raid my mother’s fabric stash!!
Jodie http://www.jtouchofstyle.com
I want to come over too and raid your mother’s stash. I bet she must have some pretty amazing fabrics!
There’s that pretty fabric that keeps on giving! Great way to spiffy up old tins and I just happen to have a few in my storage room. These would be such a pretty way to hold a gift inside for any special occasion. Or perfect for a sewing room to hold bobbins, thread, the choices are unlimited! Pinned
Marie I used to have all sorts of sewing trinkets in them too. But I ended up with so many of them I had to transfer them all to the vintage suitcase. Now each thing has it’s place and I can actually find them. So I’ll be using the tins for something else.
This is such a clever repurposing project. The color and fabric choices are really endless.
I may have to try Mod Podge again this summer.
It is really easy Lisa. Just follow the tutorial. I wanted to do this because I remember being intimidated by this project. But once I started I realized it was not difficult, it just had lots of steps.
Mary how cute are these! Oh the possibilities:) I need to start buying cookies now! ha!!:)
Summer yay for cookies! I had these for 10 years before I decided enough was enough.
Mary, this is such a wonderful way to upcycle those tins!! I love the bright, fun fabric! The tutorial was great, each step well explained. You did great on this project Mary!!
I really wanted to share the tutorial because it is really easier than it looks. But I wanted to show all the steps. And boy there were a lot! Lol!
I love the fabric choices and your final shot of the finished tins with painted cans looks fabulous
Thanks so much Carol. I really had fun doing this project. And it turned out to be mush easier than I thought although all those steps in the tutorial would dispute that.
What a creative idea for the cookie tins! They look wonderful covered in fabric! Thanks for the great tutorial! 🙂
Many sometimes the prettiest things cost practically nothing.
Αυτό που μου αρέσει σε σένα Μαίρη είναι που παίρνεις και το πιο απλό αντικείμενο και το μεταμορφώνεις. Δεν σταματάς πουθενά και αυτό μου αρέσει πολύ σε όσους ασχολούνται με το diy.
Έτσι είναι Χριστίνα. Να μάθουμε να μην πετάμε αλλά να τα προσαρμόζουμε στις ανάγκες μας.
Your tins are so pretty Mary! I love the fabric you used.
No one will know what is hiding under all that fabric! 😉
Very colorful and fun.
And we should have fun with our projects! 😉
I think those cookie tin cans are international because hubby has the same. The fabric you chose is so colorful, perfect for them and the coordinated colors on the lids make them high-end looking. Now they are not only beautiful but practical to keep craft supplies too.
I knew you’d think of the craft supplies! I honestly don’t know what we are going to put in them. They had sewing supplies before but after a while they got to be too many! We shall see!
Those look really nice! Love the colors. 🙂
Thank you, they are a vast improvement over the bare tins.
Mary this is such a cute and clever project! I have a few of those same cookie tins and spy a makeover in their future. Have a wonderful week filled with sunshine.
Thank you so much Laura. I would love to see what fabric you chose for your makeovers.
This is such a fantastic idea! I love to bake and take some goodies over to someone’s house when I visit! I will definitely make these to make my cookies look like a gift! Thanks for sharing on the Homemade & Handcrafted Party! 🙂
That is such a great idea Sue. They would definitely look super special all wrapped up like this.
Your cookie tins look great, Mary. The fabric is so cheerful! Thanks for partying with us! Pinning to my upcycle board.
Thank you so much Beverly. I want the whole place to be cheerful!
Mary,
Your recycled tins turned out really well! I love the fabric choice. Yes, I usually reuse my tins but over the years have put some out at garage sales. One favorite I kept “as it” and it is my very first tin: a black one with roses on it {looks like rosemaling (? sp.)}. This is one I got when I was very young from my mother and it has held sewing supplies in it since I was 7 years old. 🙂
Happy crafting!
Barb 🙂
That is so sweet Barbara. I also have one or two that have sentimental value. Isn’t it funny how we get over a few pieces of tin?
Mary, Now that is one amazing transformation!! Very pretty and quite imaginative!! Thanks so much for stopping by!!
Hugs,
Deb
Debbie thank you so much for your sweet comment! I am loving my tins!
Love the bright hues you chose to makeover your cookie tins, Mary; they definitely do remind me of the sea, and the bright, sunny days we are blessed to have in gorgeous Greece! Finally, we are getting weather that’s typical for this time of year!
Poppy
It’s about time Poppy! We need to go swimming and get some of those cobwebs off our minds.
I can’t believe these were updated with fabric! They turned out beautifully and I love that you added a fabric-covered disk on the inside. Thanks for sharing your awesome upcycle with us at Merry Monday this week!
We have to hide that tin Marie!
These are really well done and useful. You would never guess they were once cookie tins. They will be so handy. I can imagine them all lined up on top of my cupboard giving me extra storage for cookies cutters, icing tips and other goodies.
Ohh that sounds like a great idea leanna! I had previously used them for my sewing things but now I will have to find a new use for them since I’ve got too much stuff.
Gosh, I love them! They are super cute. I can’t wait to try creating something like this. Too cute for words!
Thanks so much Carolann. Why have plain when you can have cute!
Mary, What pretty fabric you used! These are really pretty and a great upcycle project too!
~Laurie
Everything gets a makeover in my house Laurie! 😉
Mary, they look great! Your attention to detail is really amazing, covering every inch of your tins perfectly!!
Thank you Kim. I wanted to go for the total makeover!
I love what you did with these tin cans. Beautiful results.
Thank you so much Ivory. Wish I would have thought of it years ago!
I love these biscuits and the tin cans! They bring back so many memories! They look even prettier now Mary. Great color choices!
And you know everyone has some of these at home hiding somewhere.
These are so cute! Love the fabric and colors you used. I need more storage for little things all the time. I can see these stacked in a pretty closet keeping everything organized! pinned 🙂
I am going to put them front and center, since I went through all this trouble. They will match other things when I’m done.
These have such a lovely finish Mary, I love a details tutorial so all the steps are clear, so thank you for that!
I like how you painted the lids in a plain colour for a contrast, they look great.
Thanks Julie. I was glad I did the tutorial too. many times we just assume that others will know how to do something but that is not always the case. And its nice to see all the steps.
I saw this on instagram and I had to read all the details! It looks great and would make the perfect gift with some homemade cookies!
You are absolutely right. But I’m staying away from the cookies for now. I am going to use this as an organizer for storage.
Mary, these are really awesome! The use of the cardboard for the inserts is great and the design you created on the bottom is just awesome! Pinned!
Angie thanks. I figured if I was going to cover them I might as well do a proper job!
What a creative idea! You’re one of my features today at the Sew It Cook It Craft It Link Party.
Thank you so much Lina. I am truly honored!
I love the fabric that you chose. I have been into blue and green for several years now and used it on my back deck. Great job!
🙂 gwingal
Really beautiful colors Nikki. They are so soothing!
Your covering is so neat Mary and I love the colour of fabric you chose
Thank you Amber. It is soothing yet fun!!
Very clever upcycle! I love the colors you used!
Thanks Dara, I;m doing the room with a coastal feel and this fabric just felt so right.
such a cute makeover and fun fabric!!!
Thanks Kim, I want the whole room to be fun and bright!
That looks so pretty, the fabric you picked is just gorgeous.
Fun and happy, thanks Christine.
What a fabulous idea Mary! I love the fabric and colours you chose! Will have to try making some of these for my craft room! Thank you for sharing!
Thank you Sam. Why should something be plain when it can be pretty? 🙂
I love the idea, but was wondering, did the lids fit after the fabric was added. It seems like the thickness of the fabric might make that prohibitive.
Cheryl you are right the fabric was pretty thick and it was a tight fit, but they do close. In the future it is good to use a thinner fabric.
Just another thought, for all those who want tins without cookies, check at your local thrift stores. They often get tins donated in a variety of sizes.
Thanks for the tip Cheryl!
i had done this yrs ago with contact paper , man what a mess ! i have all sizes and shapes of tins so i’ll try with fabrics now !!
I have also tried it with contact paper. You are right about it being a mess. I think this was much easier with the mod podge because you can move it around and get it just right before it dries. Thanks for dropping by June.
Hi Mary! I remember this project!! I reuse cookie tins all the time ~ just found two Christmas ones that I just put out during the holiday season. 🙂 My favorite is an old tin from the 1960’s which I appropriated from my mother and still use as a sewing box. Mom was only too happy for me to take over all sewing from age 7 onward!
Happily shared,
Barb 🙂
Wow Barbara, that was such a young age to start sewing. And now I’m sure you are an expert and have mom’s tin by your side.
Love this idea Mary and the fabric you picked is perfect for jazzing up the tins.
That is such a happy fabric and just what was needed in that room.
These are so pretty and such a great upcycle! I love the colors and love how many ways they can be used. Thanks for sharing on To Grandma’s House We Go, I’ll be featuring you next week!
Thanks so much Chas. Hope you have a great weekend.
I love your tins! Great idea! The colors are perfect.
I really love those colors too. They are like a wake up call.
Wow! Those turned out beautifully! I love the concept of upcycling. I could certainly use tins like that to store some of my beads……
That sounds like a really great idea! I keep all of my ribbons.
Super inspiring, Mary! I’m thinking a tin may have some velvet in its future! 😉 Thanks for sharing on Homestyle Gathering!
Julie I think they it would look awesome in velvet.
Thank you for stopping by to share last week and this week I am featuring your post and I have it Pinned, stop by and check it out and share other links!!
Have a great weekend!
Thank you so much Karren!
Hi Mary, I see you’ve not lost your touch! Who knew an empty butter biscuit tin could look so good? My husband tends to use old tins for storing screws, nails and bits like that. His expression would be classic if I titivated his tins up with some pretty fabric!

 The Exterior
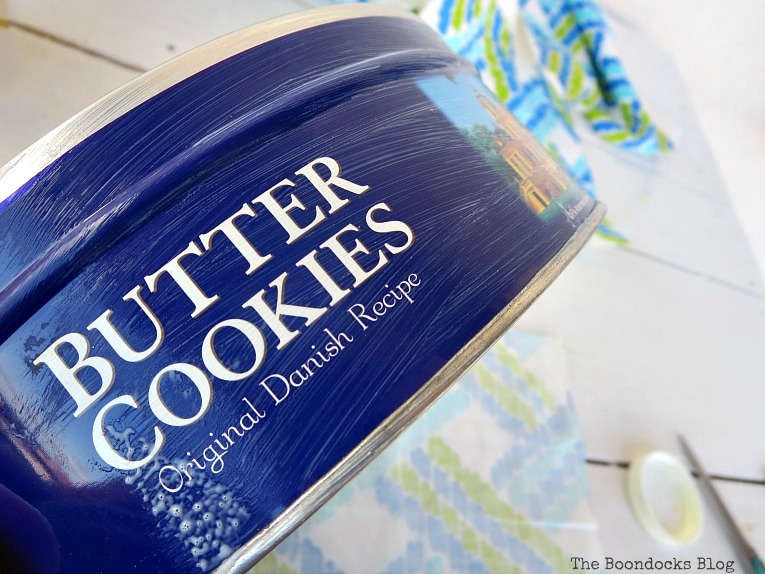


 The Interior Bottom
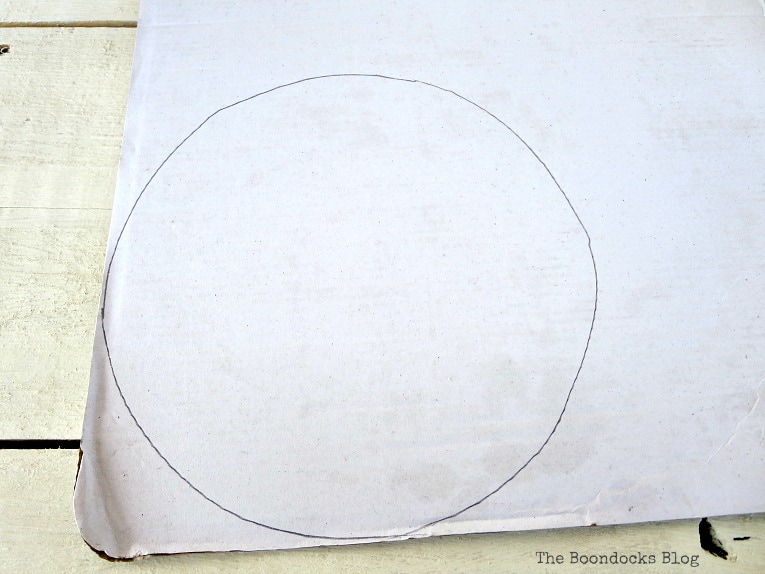


Your cookie tins turned out so pretty Mary! I love the bright colored fabric, great choice. It does remind one of the sea with the pretty blue. I’ve upcycled jars with fabric, but haven’t tried a tin yet. I like how you covered the whole tin inside and out. Great tutorial shows each step! Adding to my list of things to try! 😊
Thanks Linda. I really enjoyed doing this. And I wanted to show that it doesn’t have to cost a fortune nor do you need fancy machinery to get a high end look. I hope you make some too.
Those cookie tins are perfect Mary! Wrapping them in fabric is a clever idea and the bottom and inside look fantastic, you’re a pro! I love that summery fabric too!! A great cookie tin recycle!
After having them for about 10 years it was time for a beauty makeover! 😉
Really pretty project, and such a great way to re-use tins – love the fabric (and they match your wonderful chairs!)
Sarah it seems that this is becoming my blue summer. Thanks.
These look great and are so practical, too! We all need more storage, right? 😉 Especially for craft supplies! -Marci @ Stone Cottage Adventures
Yes Marci, why shouldn’t our storage be pretty as well as practical!
Mary they look super cute! All this fabric and glue scares me a bit but I think it’s worth trying it!
Ntina it’s nothing to be scared of. It really was easy as long as you fold the fabric into thirds and use that as your guideline.
Wow Mary, this is such a great idea! I do have some of these cans at home, and they are full with stuff that need to be hidden. I will definitly try out your crafty idea 🙂
I’m so glad to hear that Cristina. Who says we can’t have pretty and functional.
You are so creative Mary! Those tins are a big improvement now!
Pretty and Practical, right?
What a great idea! I have a small collection of holiday tins that I’m holding onto yet don’t know how to use. You’ve given me inspiration! Visiting from Monday Funday.
Glad I can inspire. I had these for 10 years and they were holding my sewing stuff but now I use a suitcase for that. Hah. Do I have too much stuff?
Super up-cycling project! The cookie tins are so attractive, now. They provide secure storage for so many things — they are not only attractive but also functional.
That’s what I wanted to achieve. It would have been a shame to get rid of them Carol. Now they are earth friendly and pretty!
You’ve used that lovely blue paint again. I like the fabric choice too a bet they look good on your table with your blue chairs.
That color seems to be the one for me this summer! I can’t seem to get enough of it.
That’s a great idea Mary and it’s such a lovely way to color co-ordinate them with your existing decor. Those cookie tin come in so handy and we have a whole bunch in the garage somewhere. Looking at the finished product you would never guess that they were boring, empty tins after you finished them off so beautifully
They needed to be refreshed after so many years of boring. I have a master plan here! 😉
Mary, you did an outstanding job on this. I love the bright colors and how the cans can hold all the stuff you need but want to keep hidden. No one will know it isn’t just a pretty storage container.
Thank goodness for that Debra because they really looked dated before.
These are lovely, Mary. Anyone would be delighted to receive a gift of home made cookies in a tin like this! And I love the colors, too.
Thank you so much Jeanie! It was time for a new look and this was an easy project. I wonder why I haven’t done it before.
They turned out beautiful, Mary! I love the colors! Fabulous idea!
Andrea I had them sitting around for 10 years. I should have done this sooner.
Love the colors you choose Mary, and they will look extra special with your new pretty chairs too!
xxx
Yes Doreen they are going in that room with the bookcases that I made over too.
I don’t have any cooking tins! Now I have to go find some! LOL Bruce and the kids will be excited by the treat and I get to keep the tins. These look so nice and I do have a bit of leftover fabric that I can use, lol. I like the way they look and I can use them to store so many supplies and they will look great in my storage area! Perfect.
I’m partial to the colors too, blue is my favorite, and this reminds me of the sea and a sunny summer day.
Go to Aldi and get some cookies. Mine are actually old because we no longer buy cookies since I have a baker in the house. But I really liked the blue color. Of course, now I like the fabric even better. It does remind me of summer and the sea too.
I have those exact tins. Now that they are so pretty, what are you storing in them?
Nothing special, sorry to disappoint. The plan is that with three of them, we can put the keys, the cards and whatever else that normally goes on the table at the entrance. Except we don’t have a table.
How’d you know that I have some of these tins??
What a great idea, Mary! I’m going to have to go raid my mother’s fabric stash!!
Jodie
http://www.jtouchofstyle.com
I want to come over too and raid your mother’s stash. I bet she must have some pretty amazing fabrics!
There’s that pretty fabric that keeps on giving! Great way to spiffy up old tins and I just happen to have a few in my storage room. These would be such a pretty way to hold a gift inside for any special occasion. Or perfect for a sewing room to hold bobbins, thread, the choices are unlimited! Pinned
Marie I used to have all sorts of sewing trinkets in them too. But I ended up with so many of them I had to transfer them all to the vintage suitcase. Now each thing has it’s place and I can actually find them. So I’ll be using the tins for something else.
This is such a clever repurposing project. The color and fabric choices are really endless.
I may have to try Mod Podge again this summer.
It is really easy Lisa. Just follow the tutorial. I wanted to do this because I remember being intimidated by this project. But once I started I realized it was not difficult, it just had lots of steps.
Mary how cute are these! Oh the possibilities:) I need to start buying cookies now! ha!!:)
Summer yay for cookies! I had these for 10 years before I decided enough was enough.
Mary, this is such a wonderful way to upcycle those tins!! I love the bright, fun fabric! The tutorial was great, each step well explained. You did great on this project Mary!!
I really wanted to share the tutorial because it is really easier than it looks. But I wanted to show all the steps. And boy there were a lot! Lol!
I love the fabric choices and your final shot of the finished tins with painted cans looks fabulous
Thanks so much Carol. I really had fun doing this project. And it turned out to be mush easier than I thought although all those steps in the tutorial would dispute that.
What a creative idea for the cookie tins! They look wonderful covered in fabric! Thanks for the great tutorial! 🙂
Many sometimes the prettiest things cost practically nothing.
Αυτό που μου αρέσει σε σένα Μαίρη είναι που παίρνεις και το πιο απλό αντικείμενο και το μεταμορφώνεις. Δεν σταματάς πουθενά και αυτό μου αρέσει πολύ σε όσους ασχολούνται με το diy.
Έτσι είναι Χριστίνα. Να μάθουμε να μην πετάμε αλλά να τα προσαρμόζουμε στις ανάγκες μας.
Your tins are so pretty Mary! I love the fabric you used.
No one will know what is hiding under all that fabric! 😉
Very colorful and fun.
And we should have fun with our projects! 😉
I think those cookie tin cans are international because hubby has the same. The fabric you chose is so colorful, perfect for them and the coordinated colors on the lids make them high-end looking. Now they are not only beautiful but practical to keep craft supplies too.
I knew you’d think of the craft supplies! I honestly don’t know what we are going to put in them. They had sewing supplies before but after a while they got to be too many! We shall see!
Those look really nice! Love the colors. 🙂
Thank you, they are a vast improvement over the bare tins.
Mary this is such a cute and clever project! I have a few of those same cookie tins and spy a makeover in their future. Have a wonderful week filled with sunshine.
Thank you so much Laura. I would love to see what fabric you chose for your makeovers.
This is such a fantastic idea! I love to bake and take some goodies over to someone’s house when I visit! I will definitely make these to make my cookies look like a gift! Thanks for sharing on the Homemade & Handcrafted Party! 🙂
That is such a great idea Sue. They would definitely look super special all wrapped up like this.
Your cookie tins look great, Mary. The fabric is so cheerful! Thanks for partying with us! Pinning to my upcycle board.
Thank you so much Beverly. I want the whole place to be cheerful!
Mary,
Your recycled tins turned out really well! I love the fabric choice. Yes, I usually reuse my tins but over the years have put some out at garage sales. One favorite I kept “as it” and it is my very first tin: a black one with roses on it {looks like rosemaling (? sp.)}. This is one I got when I was very young from my mother and it has held sewing supplies in it since I was 7 years old. 🙂
Happy crafting!
Barb 🙂
That is so sweet Barbara. I also have one or two that have sentimental value. Isn’t it funny how we get over a few pieces of tin?
Mary, Now that is one amazing transformation!! Very pretty and quite imaginative!! Thanks so much for stopping by!!
Hugs,
Deb
Debbie thank you so much for your sweet comment! I am loving my tins!
Love the bright hues you chose to makeover your cookie tins, Mary; they definitely do remind me of the sea, and the bright, sunny days we are blessed to have in gorgeous Greece! Finally, we are getting weather that’s typical for this time of year!
Poppy
It’s about time Poppy! We need to go swimming and get some of those cobwebs off our minds.
I can’t believe these were updated with fabric! They turned out beautifully and I love that you added a fabric-covered disk on the inside. Thanks for sharing your awesome upcycle with us at Merry Monday this week!
We have to hide that tin Marie!
These are really well done and useful. You would never guess they were once cookie tins. They will be so handy. I can imagine them all lined up on top of my cupboard giving me extra storage for cookies cutters, icing tips and other goodies.
Ohh that sounds like a great idea leanna! I had previously used them for my sewing things but now I will have to find a new use for them since I’ve got too much stuff.
Gosh, I love them! They are super cute. I can’t wait to try creating something like this. Too cute for words!
Thanks so much Carolann. Why have plain when you can have cute!
Mary, What pretty fabric you used! These are really pretty and a great upcycle project too!
~Laurie
Everything gets a makeover in my house Laurie! 😉
Mary, they look great! Your attention to detail is really amazing, covering every inch of your tins perfectly!!
Thank you Kim. I wanted to go for the total makeover!
I love what you did with these tin cans. Beautiful results.
Thank you so much Ivory. Wish I would have thought of it years ago!
I love these biscuits and the tin cans! They bring back so many memories! They look even prettier now Mary. Great color choices!
And you know everyone has some of these at home hiding somewhere.
These are so cute! Love the fabric and colors you used. I need more storage for little things all the time. I can see these stacked in a pretty closet keeping everything organized! pinned 🙂
I am going to put them front and center, since I went through all this trouble. They will match other things when I’m done.
These have such a lovely finish Mary, I love a details tutorial so all the steps are clear, so thank you for that!
I like how you painted the lids in a plain colour for a contrast, they look great.
Thanks Julie. I was glad I did the tutorial too. many times we just assume that others will know how to do something but that is not always the case. And its nice to see all the steps.
I saw this on instagram and I had to read all the details! It looks great and would make the perfect gift with some homemade cookies!
You are absolutely right. But I’m staying away from the cookies for now. I am going to use this as an organizer for storage.
Mary, these are really awesome! The use of the cardboard for the inserts is great and the design you created on the bottom is just awesome! Pinned!
Angie thanks. I figured if I was going to cover them I might as well do a proper job!
What a creative idea! You’re one of my features today at the Sew It Cook It Craft It Link Party.
Thank you so much Lina. I am truly honored!
I love the fabric that you chose. I have been into blue and green for several years now and used it on my back deck. Great job!
🙂 gwingal
Really beautiful colors Nikki. They are so soothing!
Your covering is so neat Mary and I love the colour of fabric you chose
Thank you Amber. It is soothing yet fun!!
Very clever upcycle! I love the colors you used!
Thanks Dara, I;m doing the room with a coastal feel and this fabric just felt so right.
such a cute makeover and fun fabric!!!
Thanks Kim, I want the whole room to be fun and bright!
That looks so pretty, the fabric you picked is just gorgeous.
Fun and happy, thanks Christine.
What a fabulous idea Mary! I love the fabric and colours you chose! Will have to try making some of these for my craft room! Thank you for sharing!
Thank you Sam. Why should something be plain when it can be pretty? 🙂
Congrats Mary! Your post received the Most Clicks at the #WednesdayAIMLinkParty. See here: http://grammysgrid.com/wednesday-aim-link-party-18/
Thank you so much, I am thrilled!
I love the idea, but was wondering, did the lids fit after the fabric was added. It seems like the thickness of the fabric might make that prohibitive.
Cheryl you are right the fabric was pretty thick and it was a tight fit, but they do close. In the future it is good to use a thinner fabric.
Just another thought, for all those who want tins without cookies, check at your local thrift stores. They often get tins donated in a variety of sizes.
Thanks for the tip Cheryl!
i had done this yrs ago with contact paper , man what a mess ! i have all sizes and shapes of tins so i’ll try with fabrics now !!
I have also tried it with contact paper. You are right about it being a mess. I think this was much easier with the mod podge because you can move it around and get it just right before it dries. Thanks for dropping by June.
Hi Mary! I remember this project!! I reuse cookie tins all the time ~ just found two Christmas ones that I just put out during the holiday season. 🙂 My favorite is an old tin from the 1960’s which I appropriated from my mother and still use as a sewing box. Mom was only too happy for me to take over all sewing from age 7 onward!
Happily shared,
Barb 🙂
Wow Barbara, that was such a young age to start sewing. And now I’m sure you are an expert and have mom’s tin by your side.
Love this idea Mary and the fabric you picked is perfect for jazzing up the tins.
That is such a happy fabric and just what was needed in that room.
These are so pretty and such a great upcycle! I love the colors and love how many ways they can be used. Thanks for sharing on To Grandma’s House We Go, I’ll be featuring you next week!
Thanks so much Chas. Hope you have a great weekend.
I love your tins! Great idea! The colors are perfect.
I really love those colors too. They are like a wake up call.
Wow! Those turned out beautifully! I love the concept of upcycling. I could certainly use tins like that to store some of my beads……
That sounds like a really great idea! I keep all of my ribbons.
Super inspiring, Mary! I’m thinking a tin may have some velvet in its future! 😉 Thanks for sharing on Homestyle Gathering!
Julie I think they it would look awesome in velvet.
Thank you for stopping by to share last week and this week I am featuring your post and I have it Pinned, stop by and check it out and share other links!!
Have a great weekend!
Thank you so much Karren!
Hi Mary, I see you’ve not lost your touch! Who knew an empty butter biscuit tin could look so good? My husband tends to use old tins for storing screws, nails and bits like that. His expression would be classic if I titivated his tins up with some pretty fabric!
xx