How to Make Shutter Art With A Stencil the Wrong Way
Sometimes good things come to those when they least expect it. I had been wanting…
I’m going to share how I made shutter art with a stencil the wrong way so that you can do it the right way!
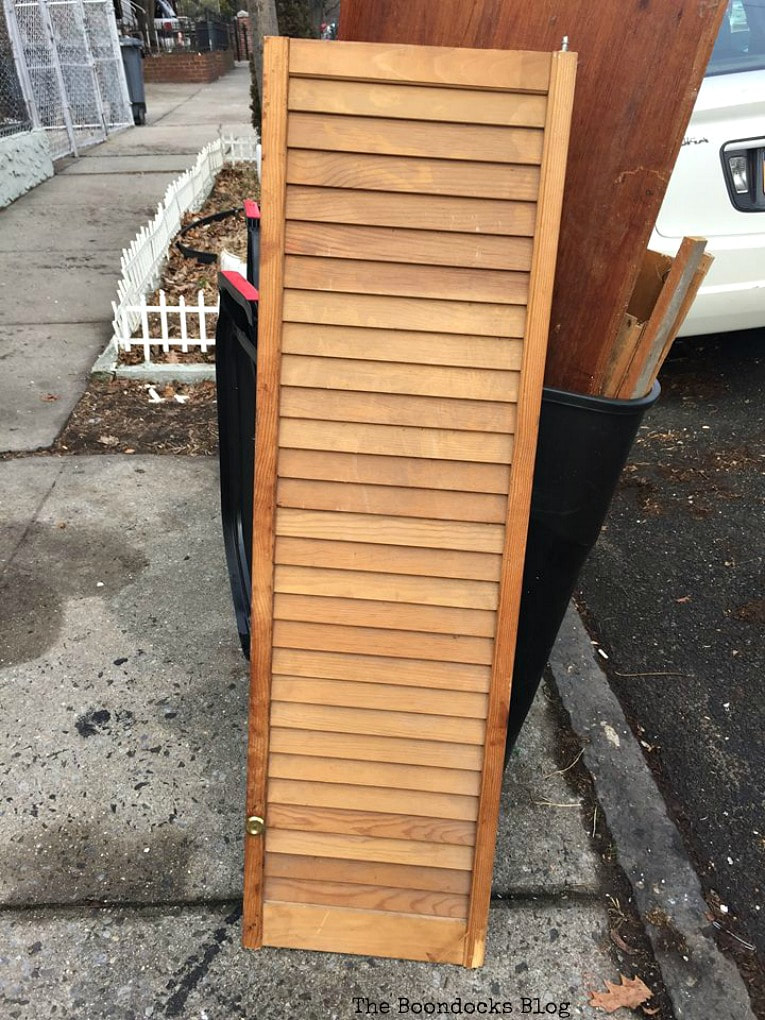
But first the back story. One day I drove my dad to the hospital to visit someone and I had to park the car a few blocks away because this is New York.
Imagine my luck when while sitting there a man walked up to the curb and put this beauty outside. I couldn’t believe my eyes. I waited patiently till he was a few blocks away because you never know, he might of changed his mind and come back for it, and then I jumped out of the car and grabbed this shutter. I had to literally jam it into the back of the car because it was pretty big. But you know where there’s a will there will be a way.
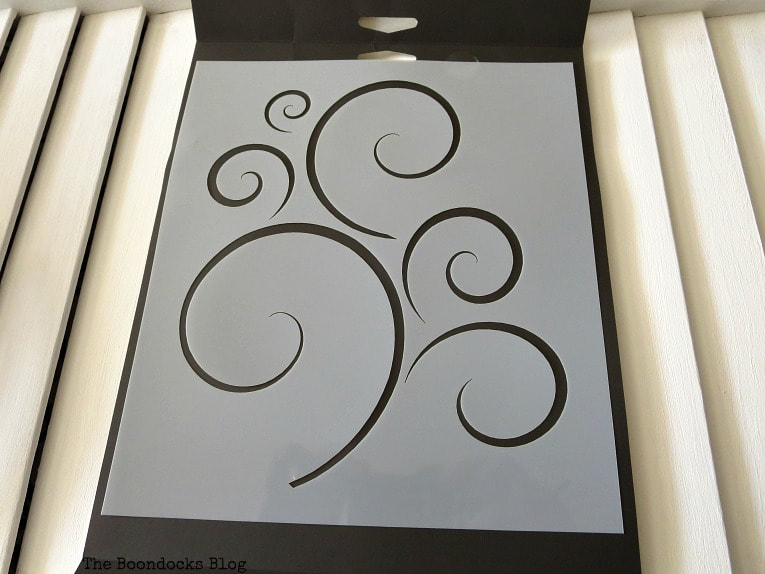
What I Used:
The How to:

Now I had done stenciling before so I felt confident that I would be able to knock this one out in a matter of minutes. After all it was simpler than the Fleur De Lis I had nixed. Haha!
A lesson I have yet to learn is that one should never be overconfident in their skills. EVER! Case in point, this project which defeated me because I was too smug for my own good!
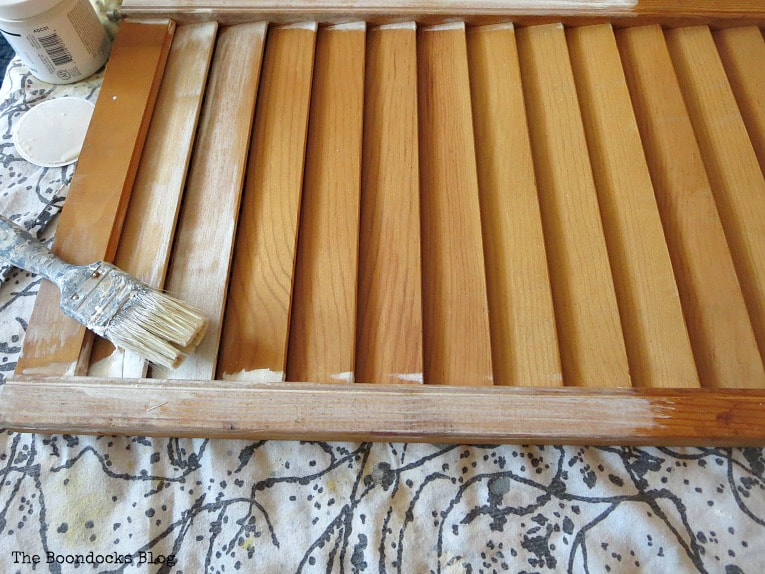
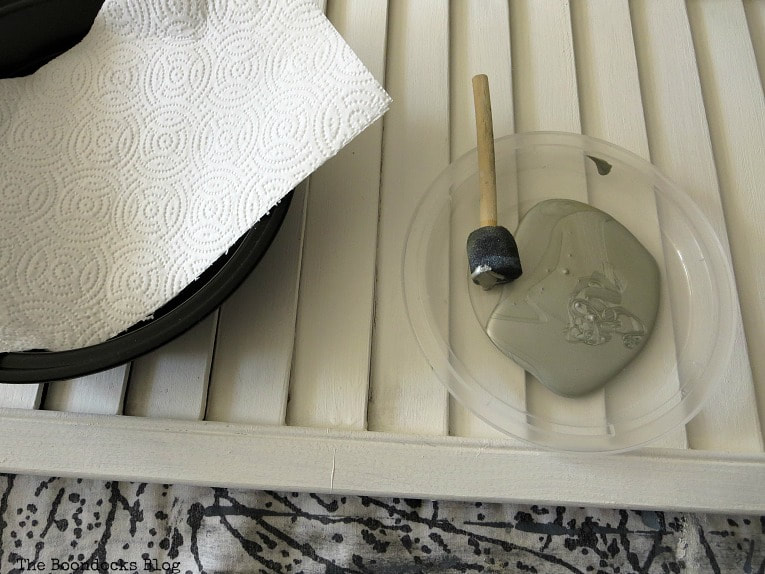
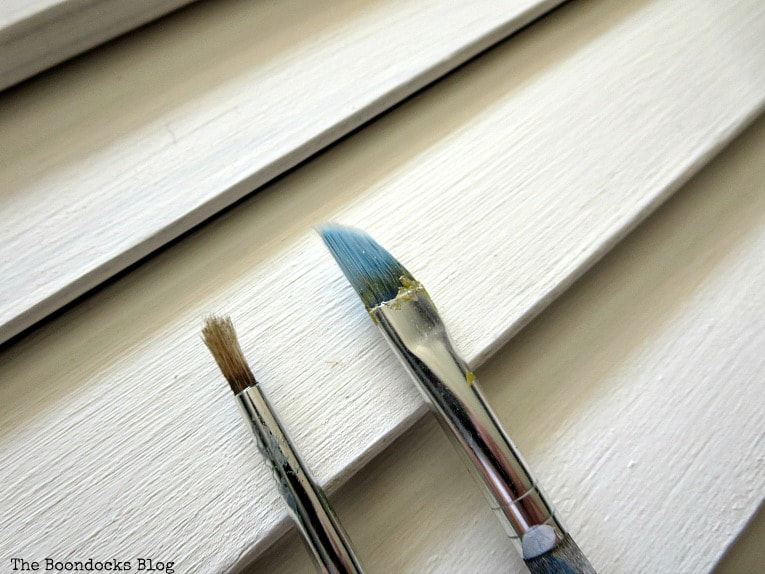
I had intended to use my pounce sponger. It had worked before for this project so I was sure it would work now. Besides everyone raved about it. How it was the best for stenciling. So it would be a breeze with this project. Or so I thought!
I set up my things, including a plastic dish with a paper towel to dab off the excess paint.
I started out by taping the stencil along one end of the shutter and then pressed it down to paint. I used masking tape to keep it in place.
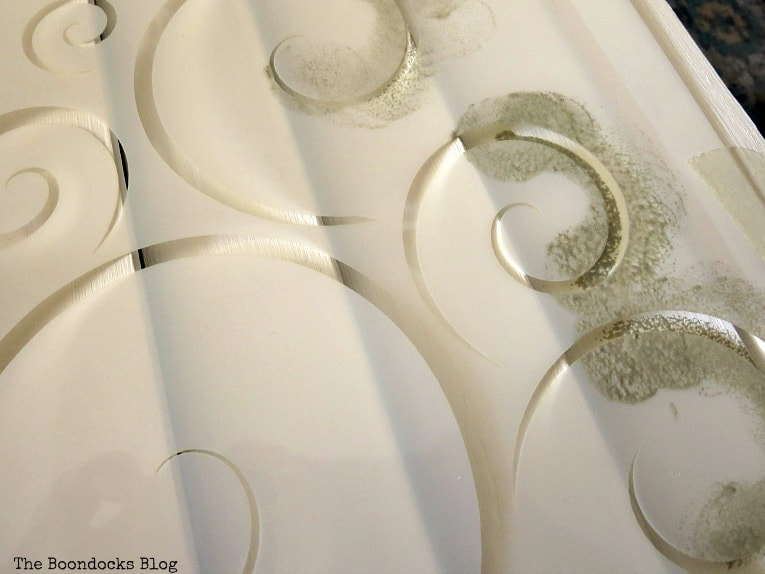
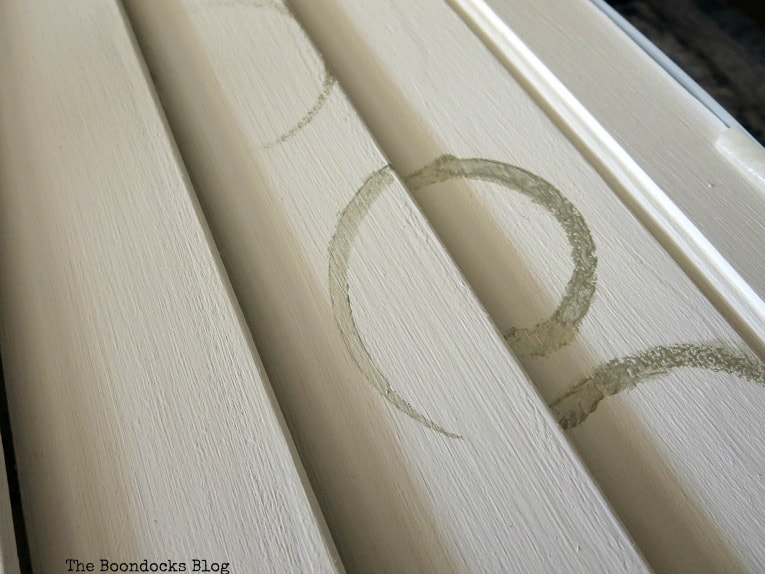
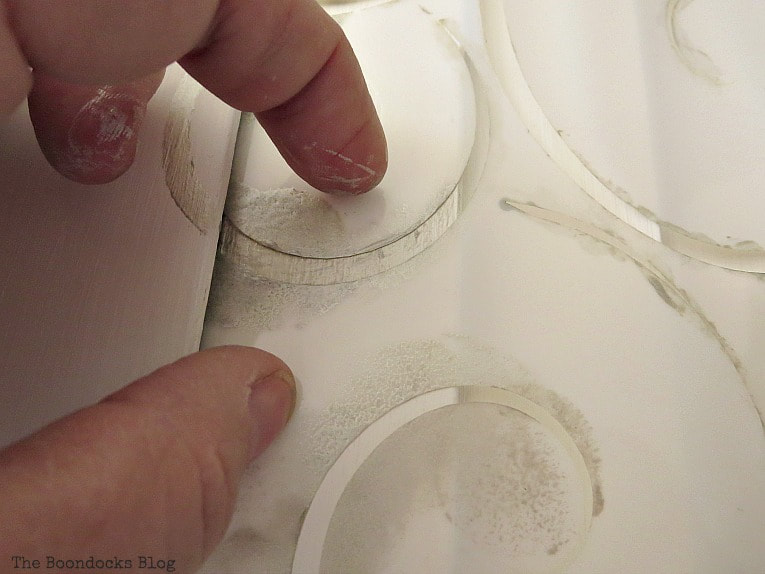
I had absolutely neglected to take into account the slats of the shutter. How was this even possible.
They were right there, staring at me! Laughing at me even!
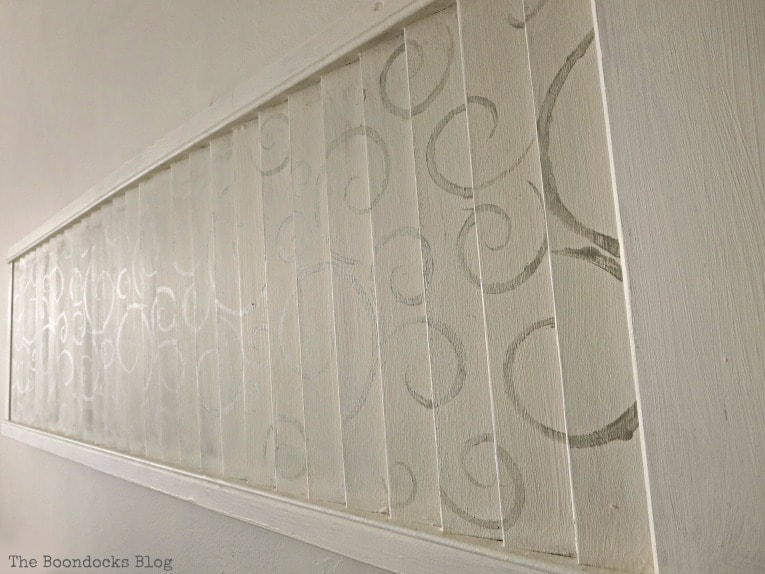
The stencil did not lay flat on the surface and the paint went on super thick even though I had dabbed most of it off.
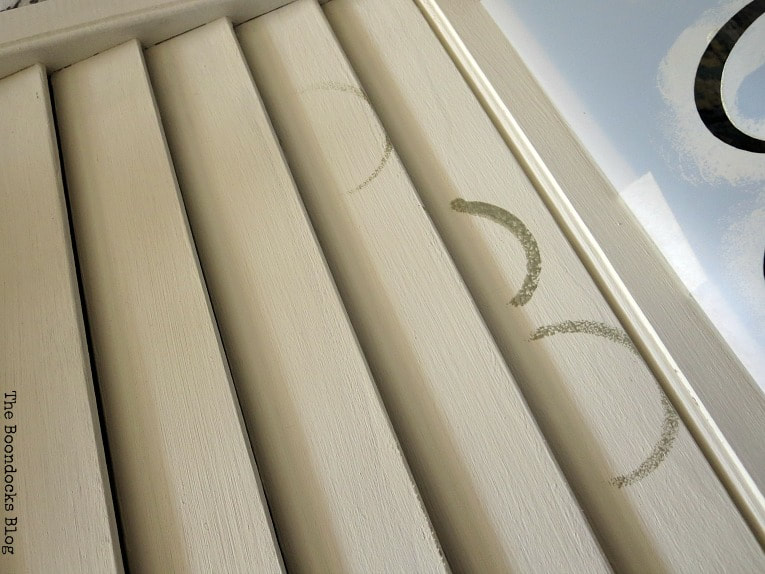

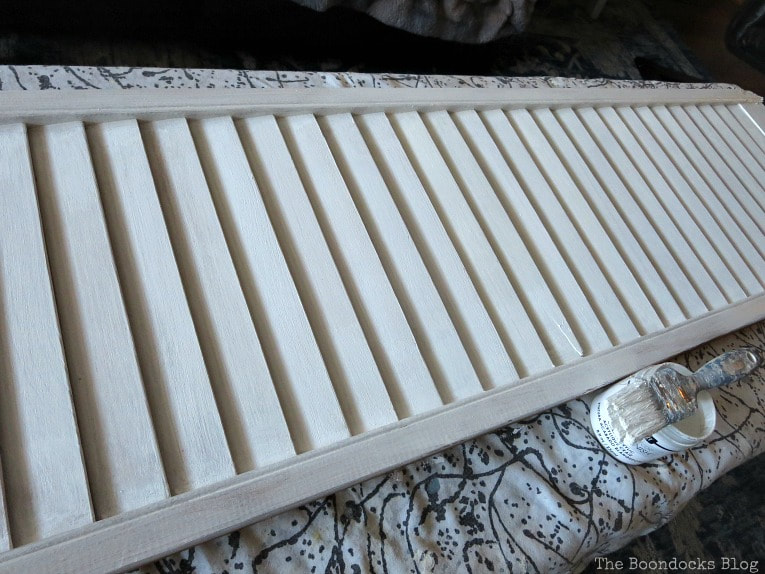
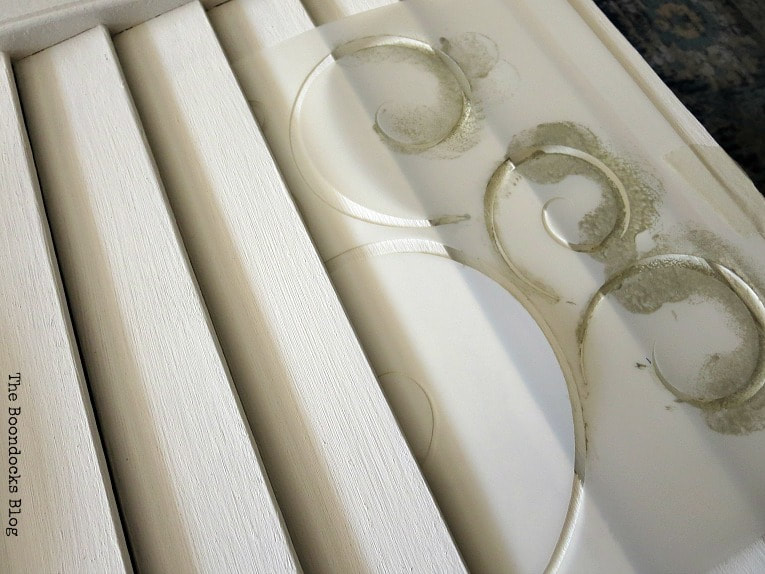
Here is the next attempt. It looks better right?
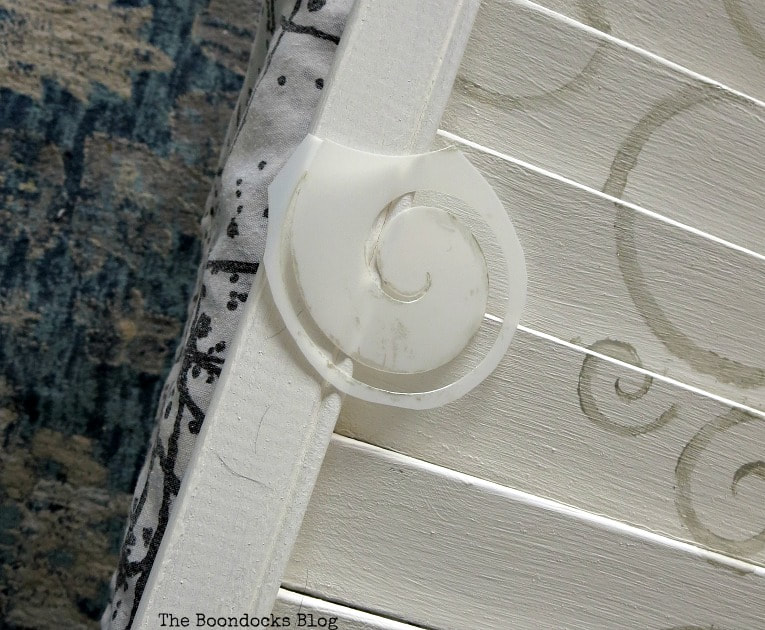
I realized that I had to insert the stencil inside the slat in order to get the design to lay flat on each slat.
What was meant to be a 10 minute project was obviously going to take me much, much longer.
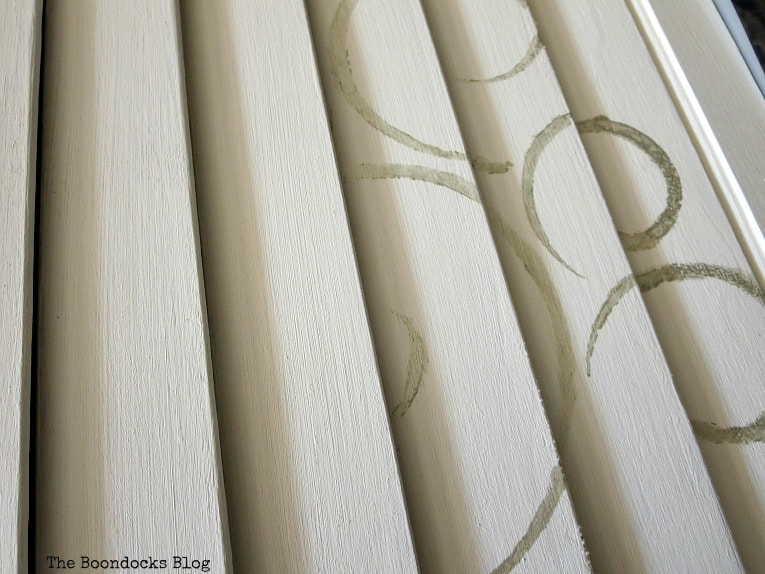

But it looked unfinished.
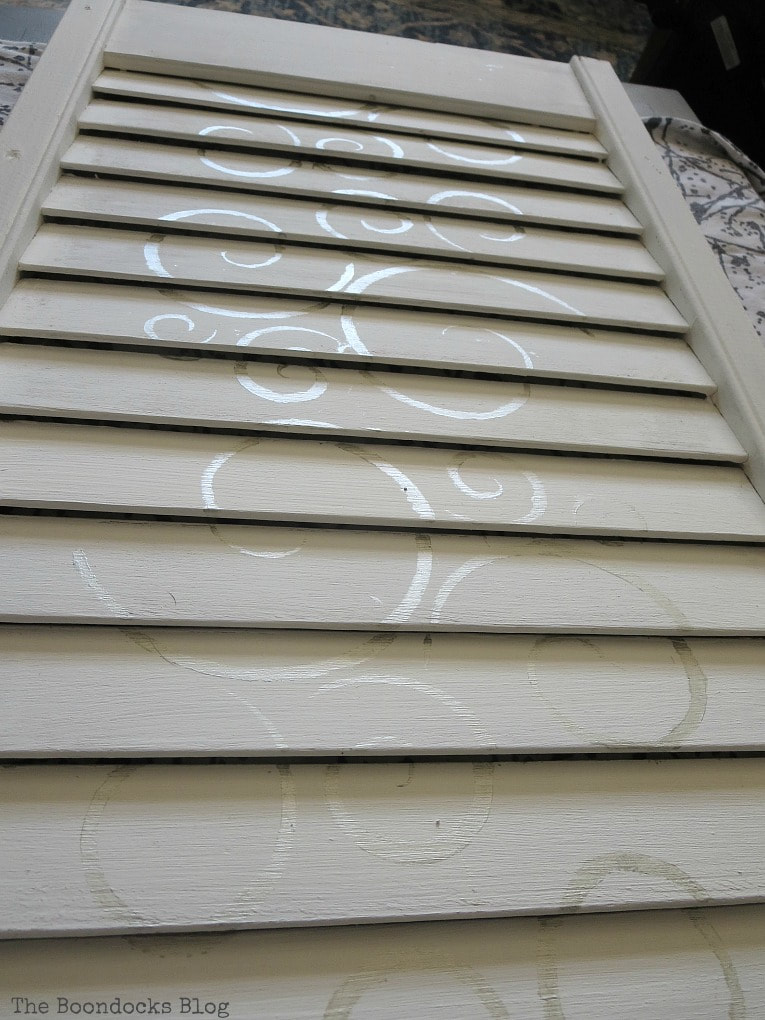
To give the overall look more balance and less sparsity. And of course to add another half an hour to my ten minute project!
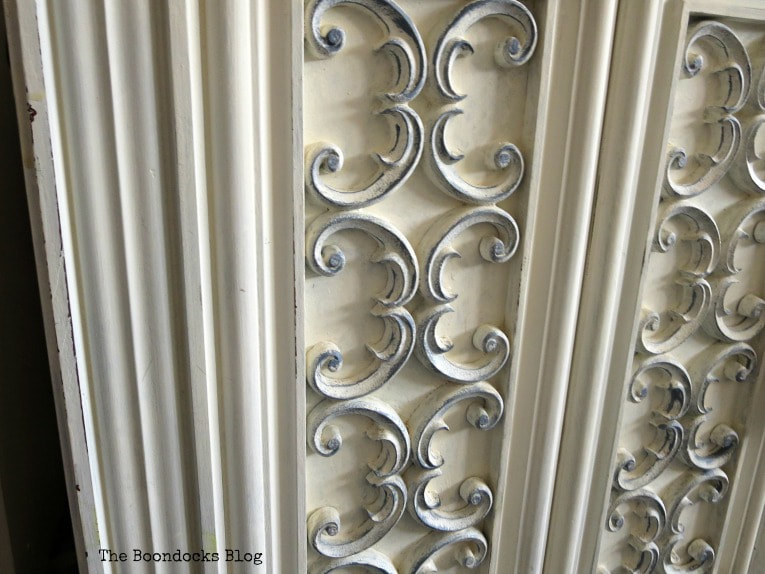
Finally, on what was to be a ten minute stenciling project, I was done!
Was it worth it? I could have gone out and just bought some type of artwork, hung it on the wall and called it a day!
But, no!
I needed to make my life difficult by doing all these DIY projects.
There is no joy in shopping when you can waste hours of your life DIYing! Am I right?
Have you ever seen that meme on Facebook about how we spend $90 making a project that we could have bought for $10. Well, that was me but replace the money for time.
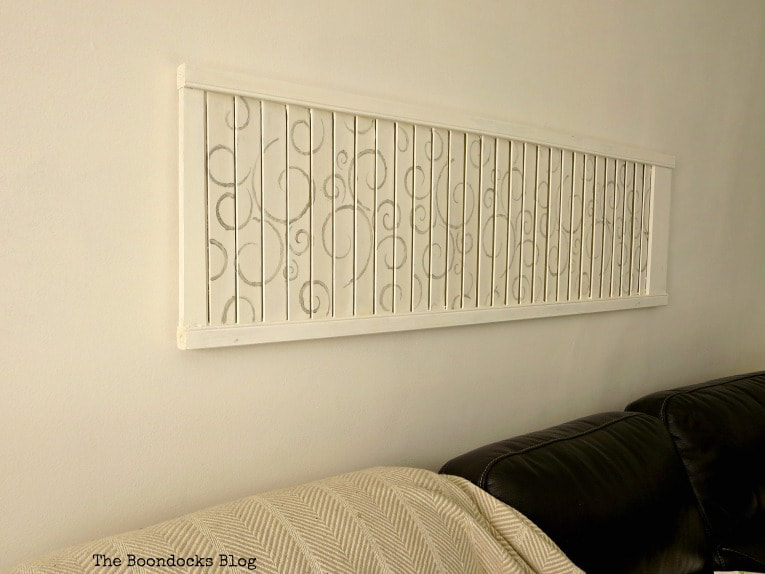
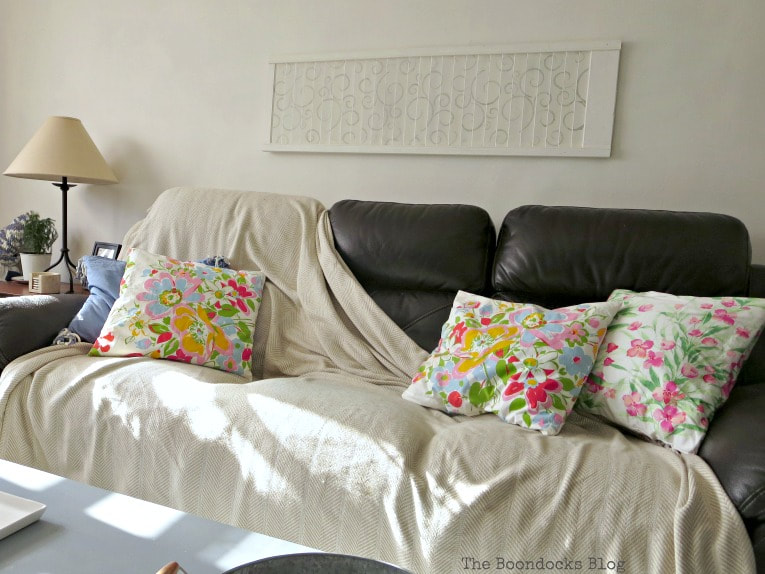
Plus, I needed something horizontal to go behind the sofa.
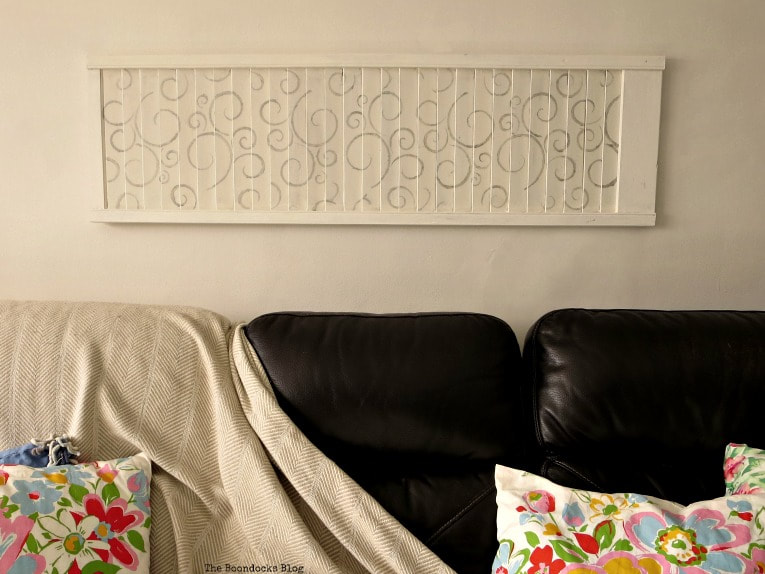
Now to explain my reasoning for this particular look. I wanted something that had presence but not too much. After all we still have that accent wall on the opposite side of the room. Too much on this wall would have been overpowering.
I needed to fill this wall but in a subtle kind of way. Are you following me?
I think of the slats as doing the real work, and the swirls are a bonus.
And what have I learned from this episode of how to make things harder than they need to be?
Pouncers are to be feared? Absolutely not. They have their place but not on shutters!
Ultimately, I have learned that I don’t always learn from my previous mistakes and I need to make them more than once in order to feel the red on my cheeks.
Or is three times the (un)lucky number? In that case I have one more mistake to make!
This tutorial on how to make shutter art the wrong way took a long time (much longer than it should have) but I’m happy with my art. In fact I couldn’t find another like this anywhere and believe me I scoured Pinterest for inspiration!
How many times do you need to make a mistake before you learn a lesson?


Linking up to these Link Parties
This blog is for entertainment purposes only; my DIY tutorials are not professional advice. Read my full disclaimer here.
I love it when I get your comments and I will try to reply to every one of them. Please do not add a hyperlink to your comment, otherwise it cannot be published.


So unique Mary…I have never seen stenciling done on a shutter before!!
It was my first time also Janet.
That’s lovely, Mary. My husband and i joke that we think we can get all our projects done in mere minutes!! Why does our always have to take longer? Awesome job though!
It always takes much longer than we think Rachel and sometimes even just thinking about it can take months on my part.
What a pretty project. I often have a rough time with stencils even when I’m working on a flat surface. For me it’s a patience issue. I’ll have to pin this for future reference.
I usually have a lot of patience but this one really tested me!
I know what you mean by our desire for a unique piece of artwork. It is well worth it! It is a lovely piece.
Thank you Debra, sometimes it comes with a cost of driving you crazy, but that’s okay!
Your wall accent looks amazing, Mary! What a great idea – but you should know there’s no such thing as a ten minute diy project! Lol! Glad it turned out so lovely!
You are so so right Gail. No such thing. I should have learned that by now.
Good morning, Mary!
I know how tricky it is to stencil, but I love the way your shutter art turned out.
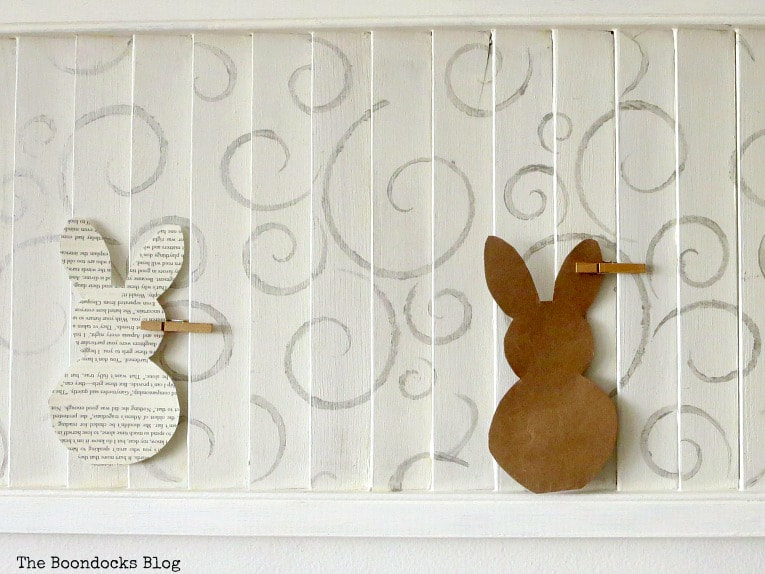
Your bunnies are extra cute. 🐣🐣🐣
Thank you Lisa, the shutter makes the perfect backdrop for those adorable bunnies!
This looks like it was a very tricky project, Mary. You did a great job on it!
Thank you Julie! I have no idea why I totally missed the slats that were staring me in the face when I started.
I think it turned out beautiful!! Hard work well appreciated and you taught me a lesson on stenciling on shutters…win/win for both of us!! Thanks for sharing…
Thank you so much Karolyn. I am always happy when I can impart my mistakes to others so they don’t have to repeat them.
I think your shutter redo turned out really well! I think I would have done the same thing and not taken into account the angle of each shutter slat, Mary. Great job! Love the subtle sheen and swirls, very pretty!!!
Happy Easter hugs to you,
Barb 🙂
Thanks so much Barbara. I cannot believe I did not see what was staring me in the face. Lesson learned. And it is what attracted me to the shutters in the first place, all that texture.
I think, I might have tried a quick spray paint on the back side with the stencil—and call any over mist–shadowing. If that worked I would give it a shot on the front—easy peasy.
Your results are great, just sounds like torture to me. Other option—slice your stencil to slat size—sticky spray them on, and then again spray, or pounce if you must.
Spray paint and I do not get along at all Sandi. That would have been an even bigger disaster. It would have looked like an expulsion of paint. But I really like your second idea a lot.
Bless you Mary, I think my head would’ve popped off and I would’ve walked away for the rest of the day. The next day I think I could’ve concentrated. I think it looks great and I totally understand. Sometimes you need something but it needs to be subtle thing.
Enjoy the start of your week
Cindy
Cindy I couldn’t have it competing with by cloudy wall. It would have been too much in a not very large room. But I’m glad I stuck it through because I had that shutter sitting in a corner for 2 months before tackling it.
As always, your post and shutter is very inspiring… Gets me to thinking about all kinds of possibilities! Nice ‘find’ on the shutter, girl!
I was so happy when I saw that man in front of me just leave that good as new shutter outside. I mentally jumped for joy!!
I had a laugh thinking of you stalking the shutter and waiting until the guy disappeared! I would have done the same thing. In the end it looks great!
I had been dreaming of finding a shutter just like this one for months before. I knew it would look perfect on that wall. It was as if the universe came together to give me just what I wanted. 🙂
In the end, it looks great and wonderful in its position. But boy, that had to be frustrating. And I’ve done that spend $10, nope, $90 thing before. Makes you crazy! But at least it turned out well indeed!
Thank goodness it did Jeanie. I had not seen another one like this anywhere. I was really after a very soft look so I had to make it myself as much of a pain as it was.
First I have to say kudos to you for even attempting to stencil the slats on the shutter. Then a high five for determination. You go girl because your shutter looks amazing and it’s perfect above your sofa!
I am really happy with it Marie. It was a pain but at least my vision reached fruition.
Oh dear, Mary, so sorry you had to go through all that frustration to create this gorgeous work of art, but it was so totally worth it and you made me laugh with how you described the wait before you nabbed that shutter 😀
Michelle, I was on pins and needles till that guy left and waited till he was 2 blocks away before I got out of the car. Just to be sure he wouldn’t regret his decision and turn back.
So very pretty – and creative!
Thank you so much!
Looks fantastic! I was thinking “why would you sencil a shutter? That sencil is going to lay flat!” Congrats on out smarting me. 😄😄😄
Hahaha!! Thank you Lorin. I did quite a number on myself not thinking it through beforehand. But I just had to realize my vision. I bet that happens to you all the time, trying to achieve something you have in your head.
Well, it wasn’t 10 minutes, but it surely turned out pretty! I think you nailed it!
I know I did. As long as it looks like something that was in my head all these months I am happy Amy. Just don’t look to close. 😉
I think it turned out beautiful! Now you have a one of a kind wall art and you can say ” I made that myself” everytime someone tells you they love your wall art. You don’t have to tell them how long it took. 😉
That is so true Linda. I can keep my suffering to myself. Haha!
That would definitely be a challenge…stenciling swirls on a shutter! But I think you did a good job. It looks very nice & provides just the touch on that long wall. It was a great find too!
It was the best find Florence. Ever since I had decided that is what I wanted on that wall, I had been on the lookout for a shutter. Lucky me that I chanced on it while in another neighborhood.
Great FIND! What is it they say about someones trash being someone elses treasure? I love roadside shopping myself. Great project also. Love it.
Thank you Pamela. You have no idea how happy I was to find it and at the most unexpected time in the most unexpected place.
It’s always the way, isn’t it, Mary? Projects you think are going to take forever are whipped up easily and what looks simple, often turns into a DIY nightmare. At least the process…because the result is an absolute dream. I know it was frustrating, but it looks perfect.
Thank you so much Kim. Only a true DIYer understands the process and frustration that goes along with these projects.
What a fun project it looks lovely!
ps the link is live now!
Thank you Tamar. I always come back to your link party!
Very clever that is beautifully made
Thank you Marja. It was so worth the work!
I liked it after you first painted it but you really went to town after that. So the slats didn’t come out, that’s tricky. I also love the looks of the chalky paint.
I am also a huge fan of chalky paint. It is so easy to use and is not expensive at all. I am also happy with the results even if I do gripe a bit.
As I scrolled through your photos and narration, I couldn’t, for the life of me, imagine how it would all come together, but, WOW! That is an awesome piece of art! And the perfect place to display it! Well done.
Thank you so much Betty. I had a vision of what I wanted from months before and I was determined to achieve it come hell or high water. Haha!
Mary, you have the patience of a saint! Tackling those louvers was a beast. It is GORGEOUS!
Thank you so much for that Larissa. I learned that patience from you. I’ve seen what you’ve had to wrestle with.
Mary,
thanks so much for stopping by and for your kind words! Thanks for your well wishes as far as my upcoming surgery is concerned and thanks so much for your prayers for my nephew..It is really appreciated!! I LOVE what you did with this shutter!! Beautiful!
Hugs,
Debbie
Thank you Debbie. It is always a pleasure visiting your blog.
I have some old original indoor shutters in my garage. Thanks, I think I’ve just figured out what to do with them!
I am so happy to hear that Susan. This one was a labor of love for me because I had the hardest time finding that shutter. So when I did, I jumped at the chance to recreate what had been in my head for so long.
It turned out so well, even if it was a pain to get there. I actually have four shutters sitting in my garage just waiting to be turned into something fabulous. Maybe I’ll try this with one of them! Thanks for all of the tips. 🙂
Thank you so much Amy. For me, because I had this vision stuck in my head for so long, it was an achievement.
Impatience is my middle name so I just admire your work doing a stencil on a shutter. The result looks so unique and beautiful.
Once I found my shutter, you just know I was not about to give up on it !
Looks amazing! I wish I was that good at DIYs
Cristina I was terrible when I first started. But I had a desire to make mistakes and learn. That’s all you really need.
Not all projects are wins the first time around–your perseverance paid off! Thanks for sharing at Vintage Charm!
Thank you Cecilia. I was determined to have this one work no matter how long it took.
Hi Mary, it seems to me that the “easy” projects often end up the most frustrating. Good for you to keep going at it. The final project looks great and I am sure your going to use it many different ways.
That is so true Leanna. I am really happy with the result and now that it is up on the wall I am happier still.
Fantastic post! Love it!
Thanks so much Liberty!
It turned out so great Mary! I can see how tricky that one was, but it was worth it! And I love the idea of clipping seasonal decor on the shutter! A great curb side rescue!
Katrin I was so happy to have found it. I was looking for one for a long time.
Wow! So pretty! Thank you for sharing the how-to with us!
Thanks so much Laurie, it proved to be worth it in the end.
Sounds like you were in the right place at the right time, my friend. I love the little easter bunnies on them.
That is so true Erica!
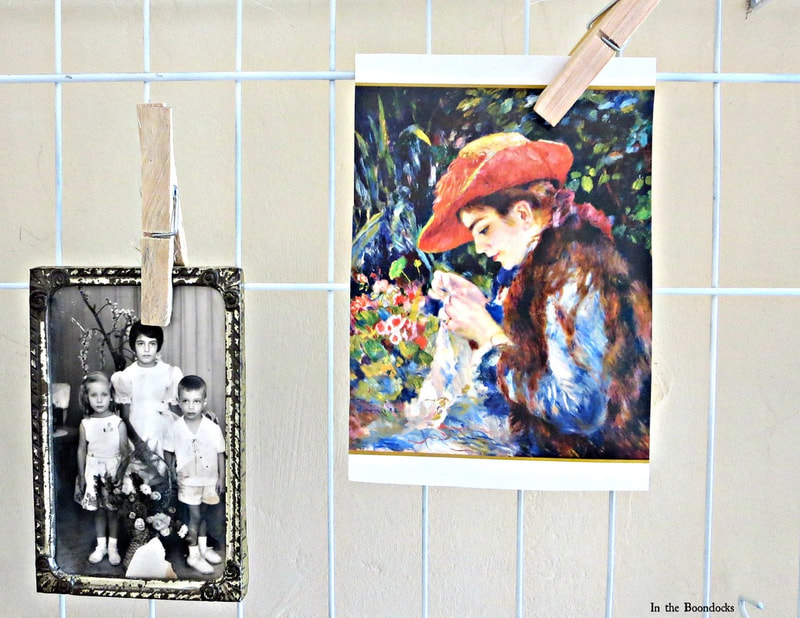
Very pretty. It turned out amazing. I love the idea to use it to display pictures. I pinned it.
Thank you so much Loren. I get to change it out every season.
Your shutter turned out great – minimalistic modern art!
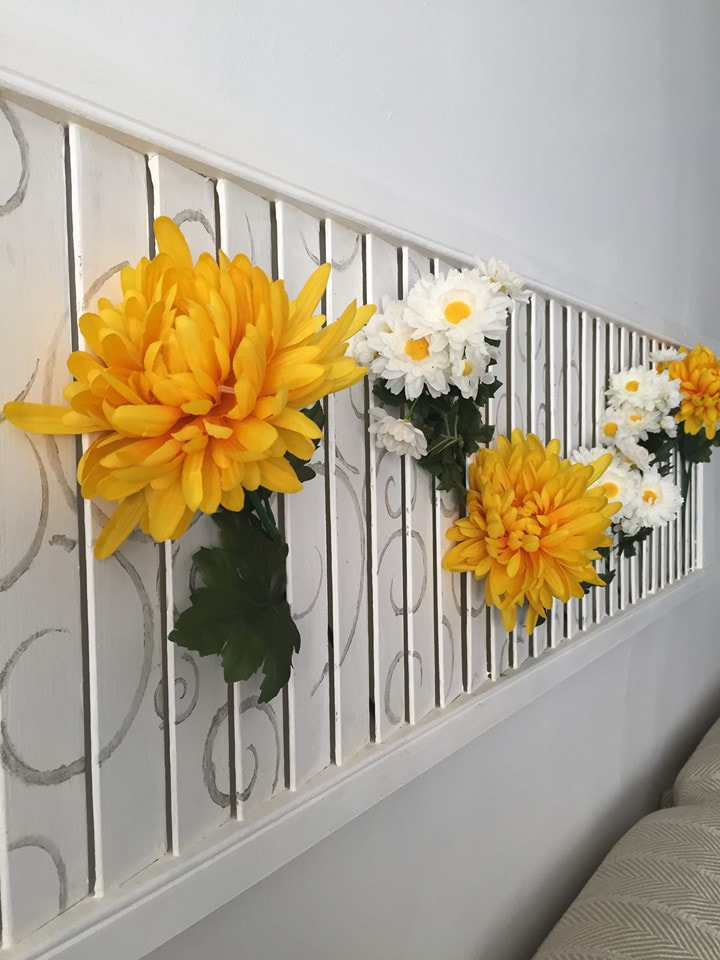
Thank you Ritta, I love that I can just change them out each season. Just wait till fall comes around!
Well, I’d say it was truly worth the effort Mary because it is a lovely addition to your living room!
I have to agree with you Maya. It is all decked out in white and yellow flowers.
Ha, I definitely struggle with using stencils, even on a flat surface 🙂 I love how you used the clothespins and bunnies on the shutters for your Easter decor!
Fascinating! You are a true artist.