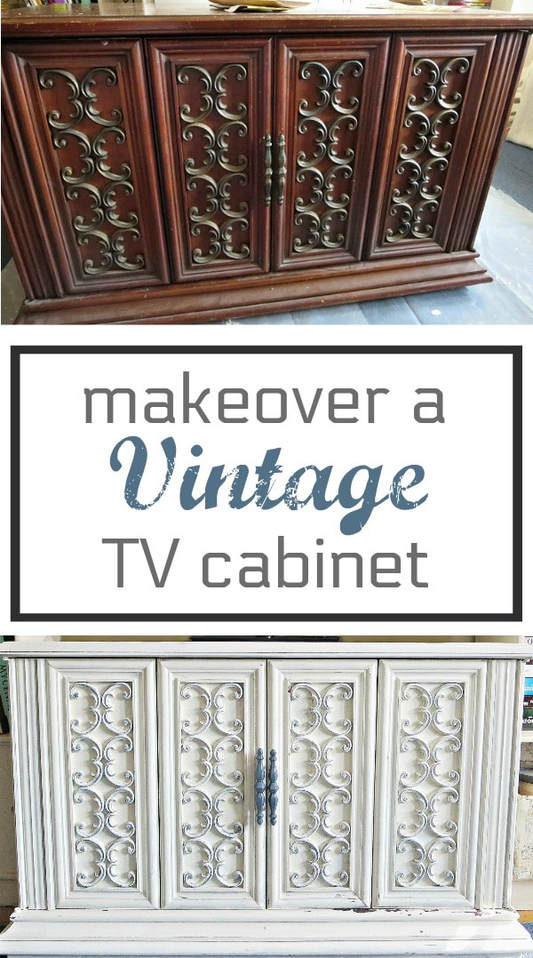
How to Revive a Vintage TV Cabinet with Paint
You won’t believe this transformation of a dark vintage TV cabinet into a bright and beautiful home decor showstopper using milk paint!
Sometimes in life you get what you wish for. I had wanted this vintage TV cabinet from the first time I laid my eyes on it. It was in rough shapre and full of dust but that did not deter me. What I thought would be an easy furniture makeover project turned out to be exactly the opposite. Read on and let me know – was the vintage TV console transformation worth the effort?

Bringing New Life to an old Wood TV Cabinet
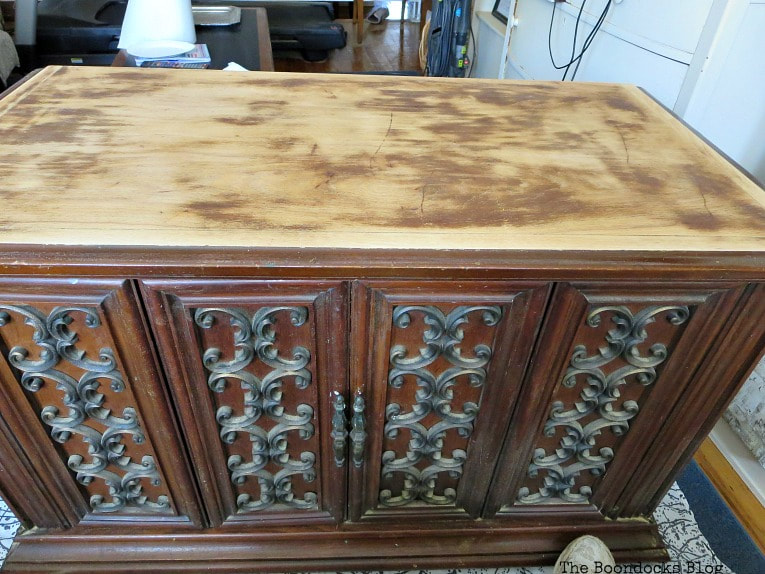
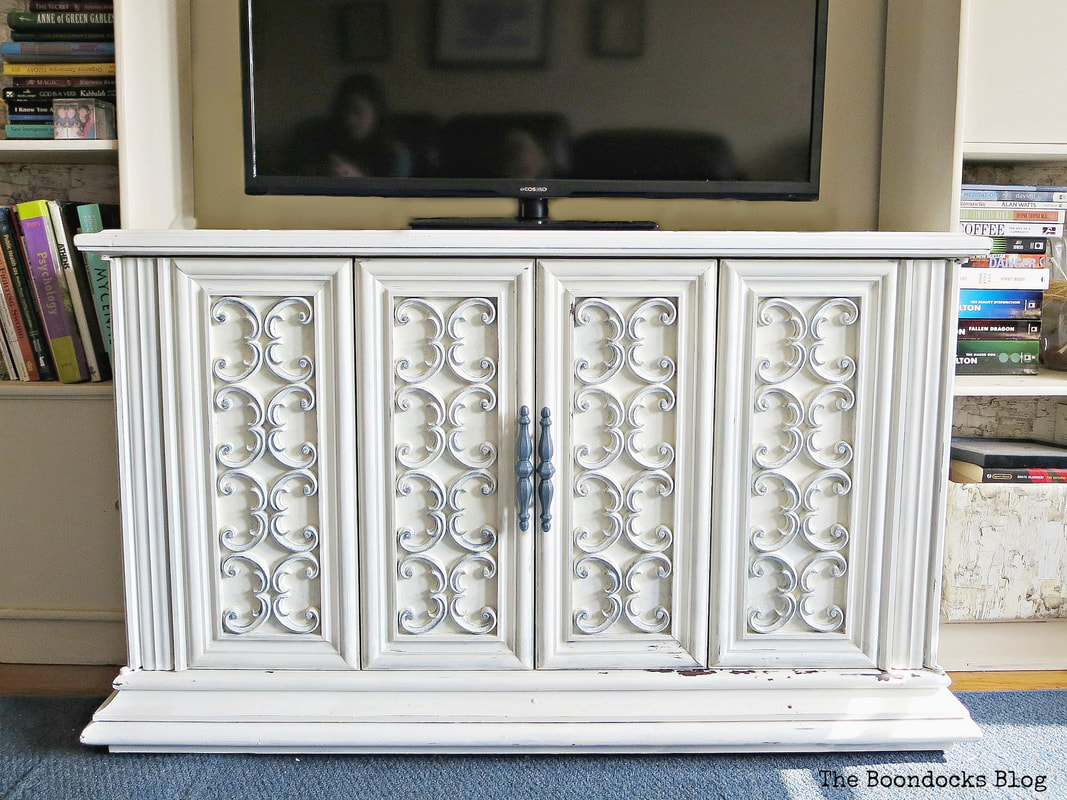
This vintage TV console has to be from the 70’s and once housed an actual television inside those ornate doors. Our neighbor had given it to my dad and he kept it in the foyer but I felt it had potential … I mean look at that scroll work. And so I wanted to revive this vintage TV cabinet.
I had wanted this cabinet for the longest time. Ever since I had spotted it outside in the main foyer of our house. But my dad, being settled in his ways would not hear of it. He is at an age where he hates to have his routine changed or things disturbed – that includes moving his furniture around. I begged and pleaded, and even offered to place another piece in the foyer because all he really used it for was to place the mail on.
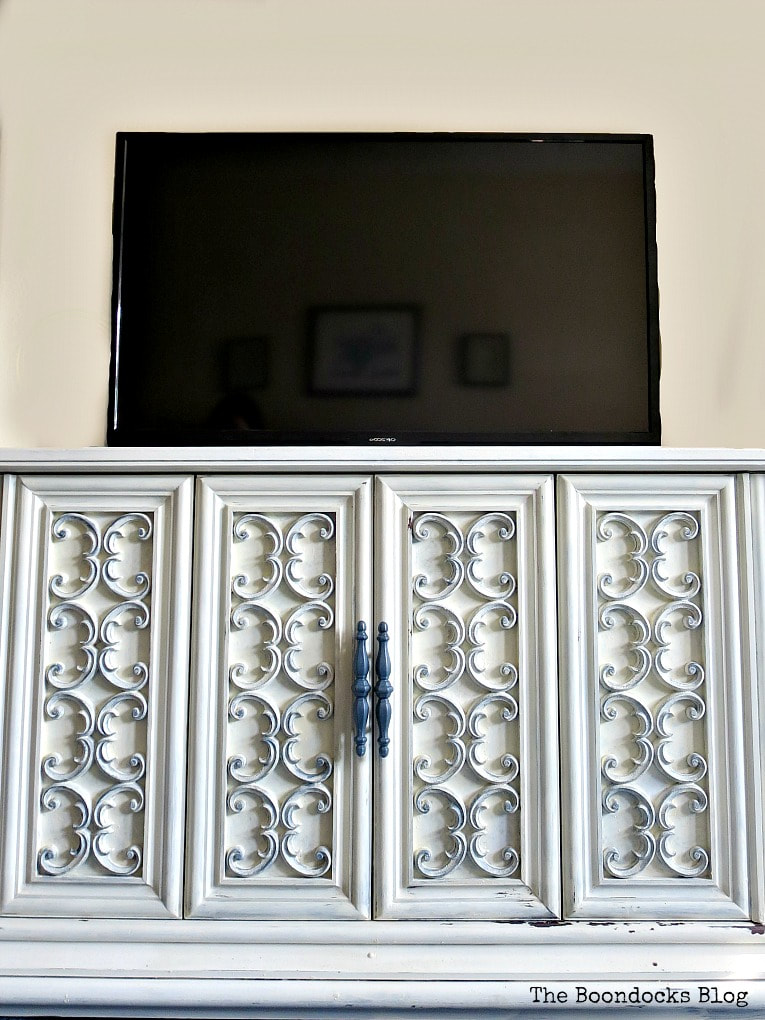
I wanted to use it in the living room as a TV stand. You know what it was meant for, sort of. Up till this point I had used my dresser for the TV but I really wanted my dresser back. Finally about a few weeks after my pleading, he relented … but only because I didn’t mention it again.
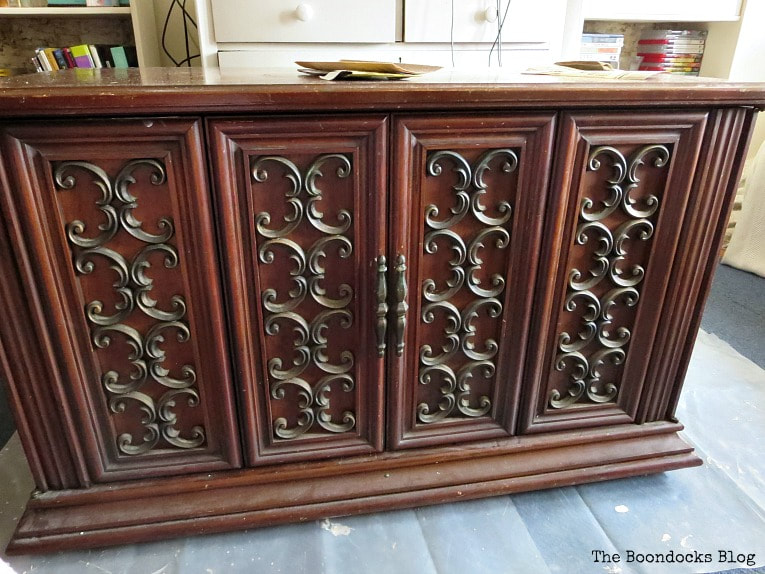
As you can see it was in pretty bad shape, and I thought I’d just give that cheap old cabinet a quick paint job.

What I Used:
Disclosure: This post contains affiliate links for your shopping convenience. If you purchase any of these products through the links, we receive a small commission at no extra charge to you. You can find our full disclosure here.
- Sander
- Sanding paper
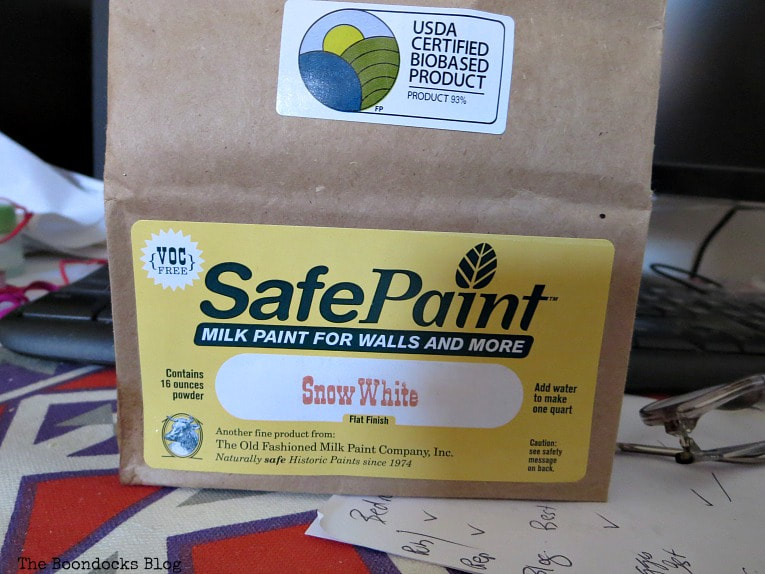
- Old Fashioned Milk Paint in Snow White Safe Paint Version
- Old Fashioned Milk Paint in Slate Safe Paint Version
- Acrylic paint in white
- Daddy Van’s All Natural Beeswax and Lavender Furniture Polish
- Decorative Wax in White
- Paint brushes
- Rags for waxing
How To Paint a Vintage TV Cabinet:
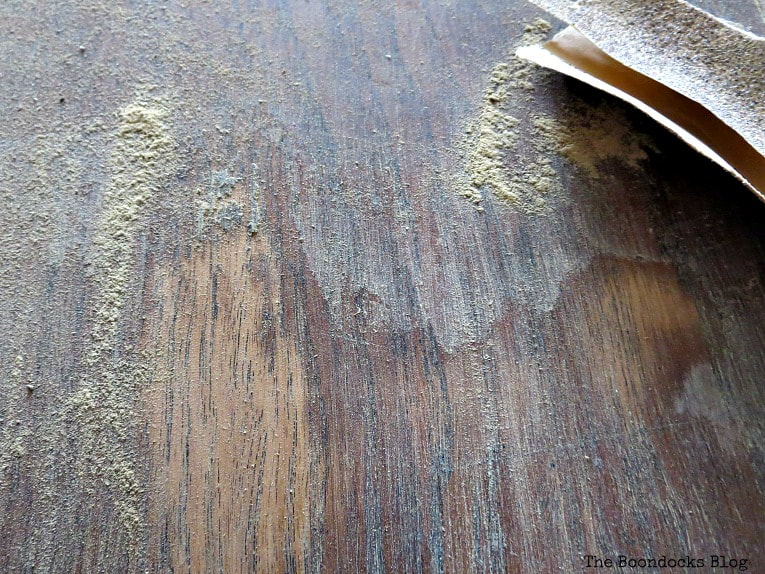
There was lots of sanding involved, and indoors too. It was a frightful affair. But I had no choice, I had to finish this thing. You see, we were going to have a new addition to the family – my kids adopted a puppy for me – and it had to be finished asap!
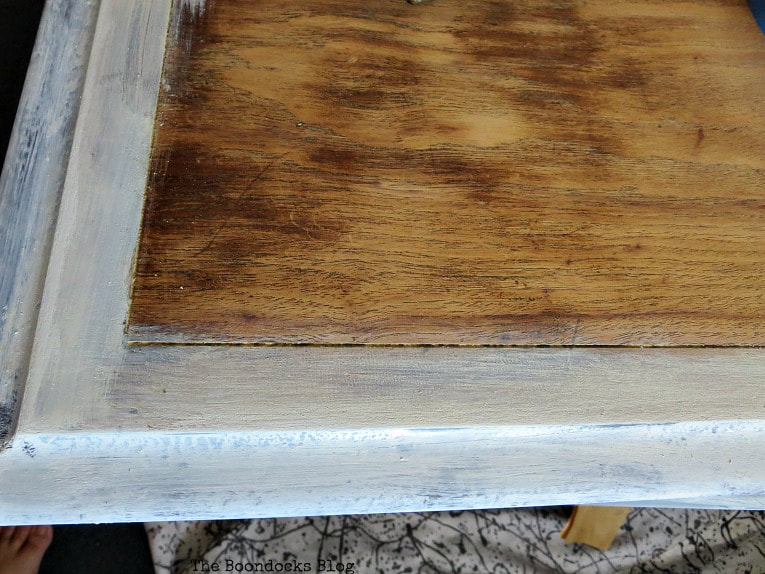
So sand I did, and lots of it! I realized that what I had thought was a cheap plastic top turned out to be good quality wood!
I had to remove the varnish and stain to get to this.
Not at all what I had been expecting. But it was a nice surprise!
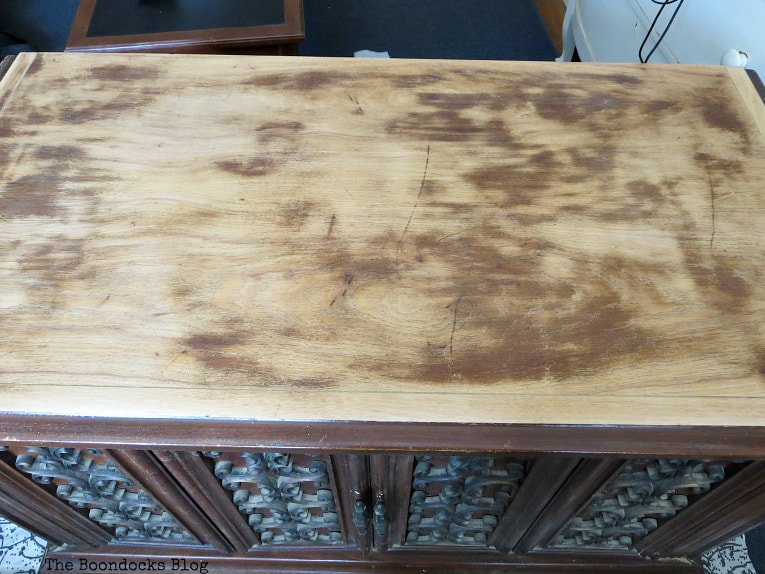
At this point I have to tell you what my original vision was for this cabinet. I had wanted to paint the top silvery gray and the rest white. The scroll work would also have touches of silver. You can imagine my surprise when I saw this wood.
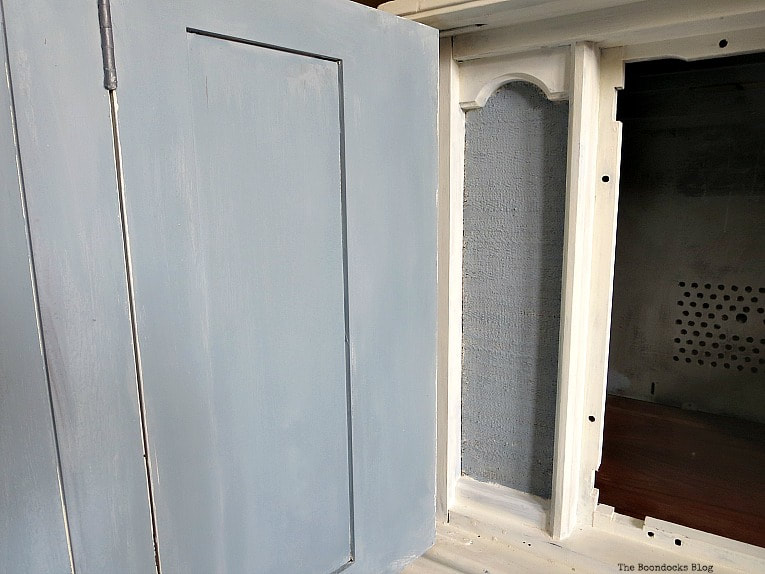
Not knowing what to do with the top, I instead proceeded to the sides. I had some leftover milk paint in Snow White from this project and used that…
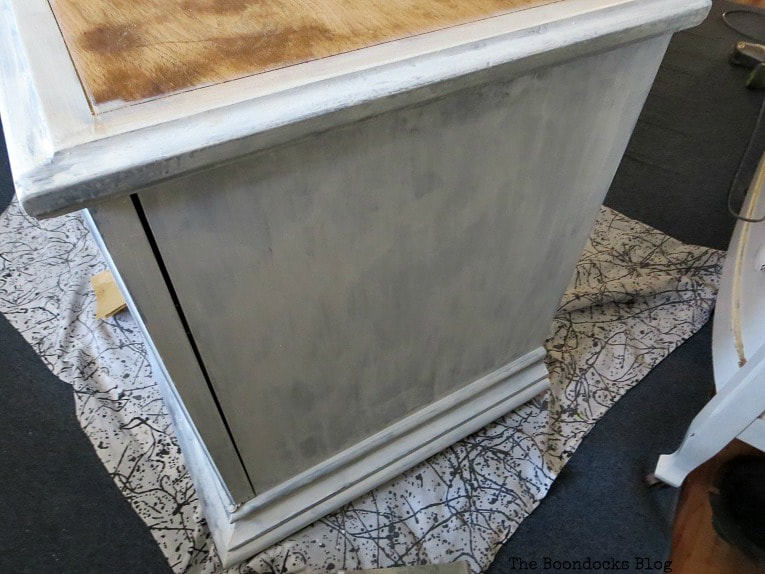
And I also used it here on the top.
The next day – because this was a week-long project – I saw this on the side. “What’s this?” I said to myself. Do you ever find yourself talking to yourself when working on projects or is it just me?
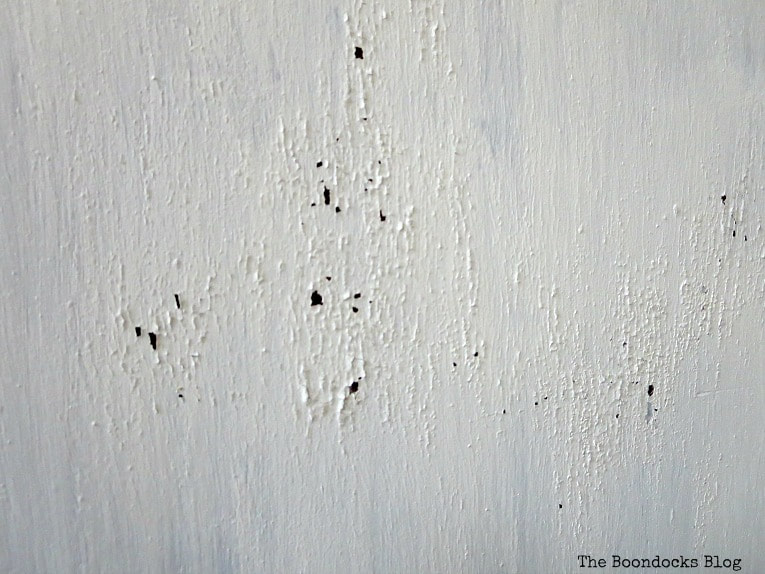
And then I remembered that the paint I had used was original milk paint. Not the other type that does not chip. Oh!!! I could have slapped myself silly at this point. I had been through this before a few months ago.
I then remembered that I had recently gotten a new shipment of Milk Paint and ran like an eager toddler to grab that box and rip it open! There it was, my favorite paint!! The SafePaint version that does not chip. Because chippy is good but sometimes you don’t want that much. If you are interested in purchasing this paint, make sure to go over to their website.
And as if the chippy wasn’t enough of a problem I also had this going on! When I painted the edges it left these marks from the brush. It wasn’t the paint’s fault it’s just that I had never painted furniture before where the brush stroke stopped abruptly like that.
Milk Paint can be tricky if you are not familiar with it. But lucky for me I have Facebook and that means groups with wonderful people that are out there to help and give advice at a moment’s notice. I went to this one and this one and got loads of tips.
What I ended up doing was using a larger brush and also painting the layers, one vertical and one horizontal until I had it all covered up and nothing was showing.
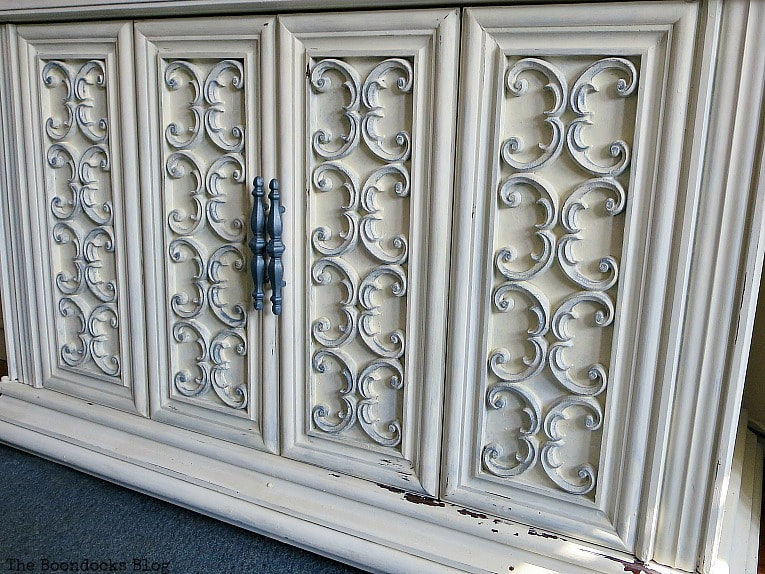
Then I had the scrolls to contend with. Oh boy can you see just how much fun I had with this cabinet. Why is it that when I see these projects on Pinterest I only see pretty pictures? How do they paint these things? With spray paint? I ended up putting on five to six coats of milk paint and then, still not being satisfied, I added a final coat of acrylic paint.

I have to be truthful, this is no fun at all! Oh and did I mention that all this scroll work is plastic?
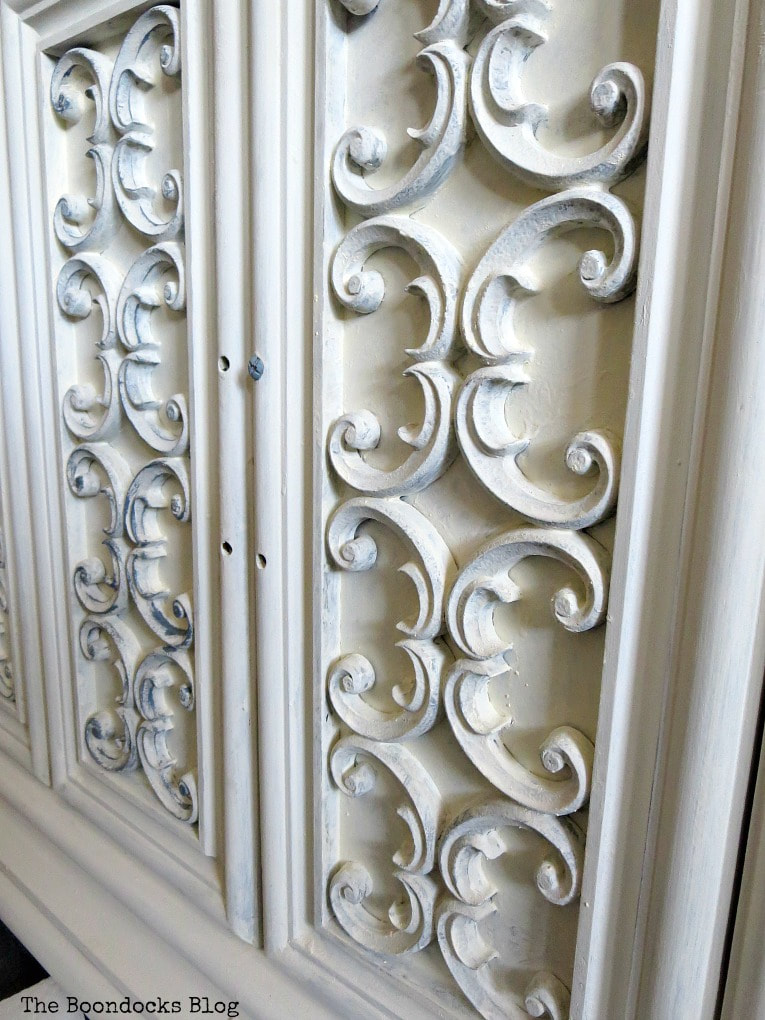
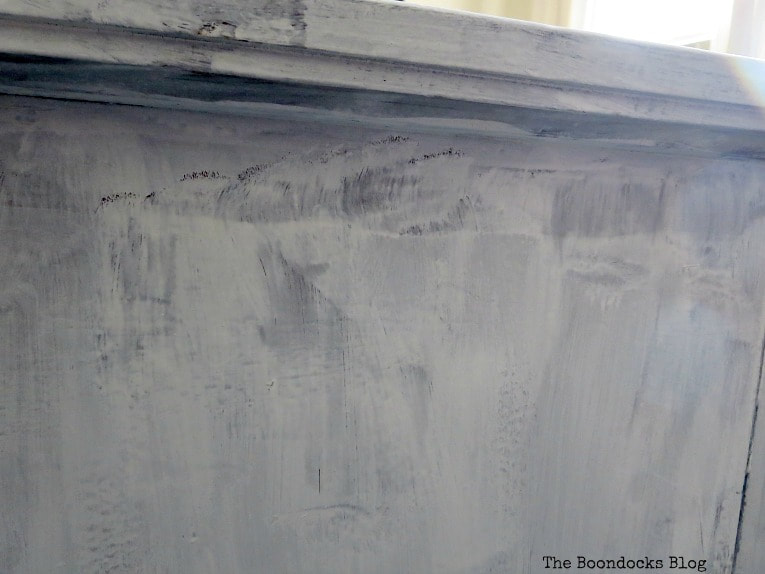
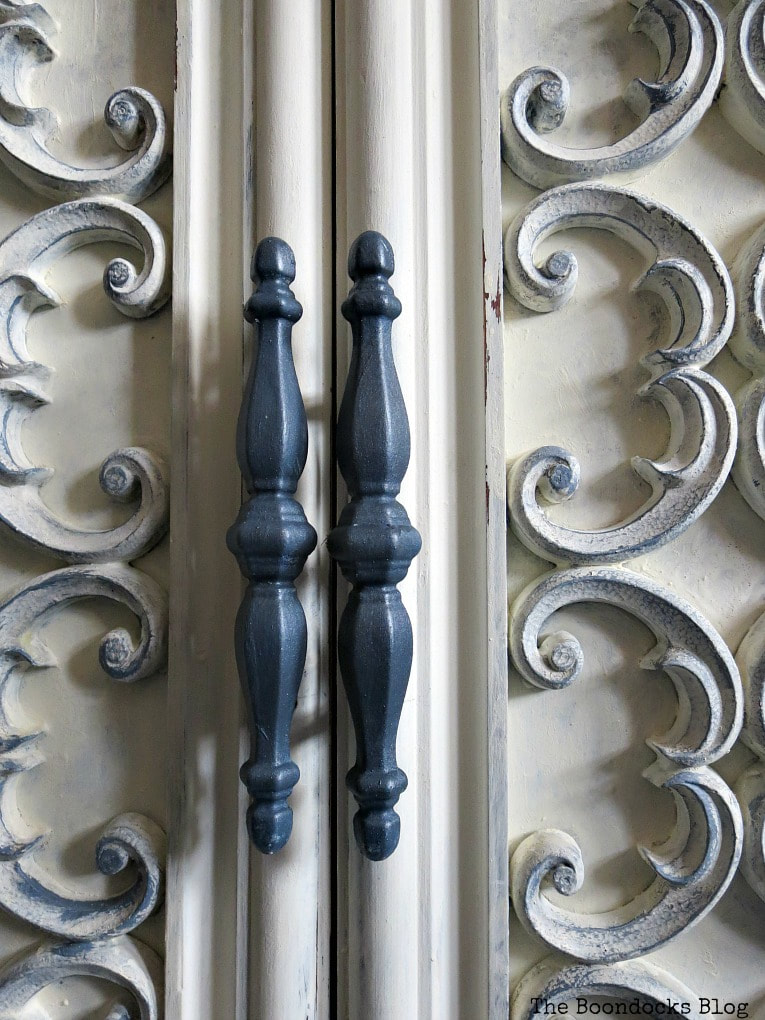
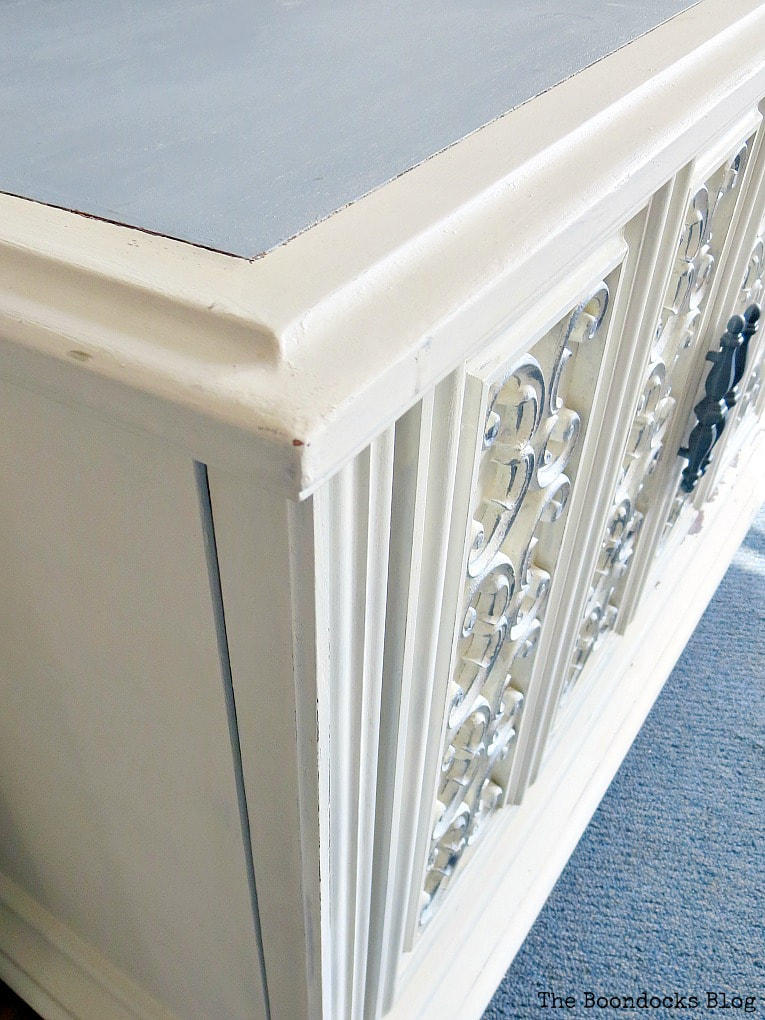
After all those coats of paint, I dry brushed the scroll work with slate milk paint. It is a gorgeous bluish grey color.
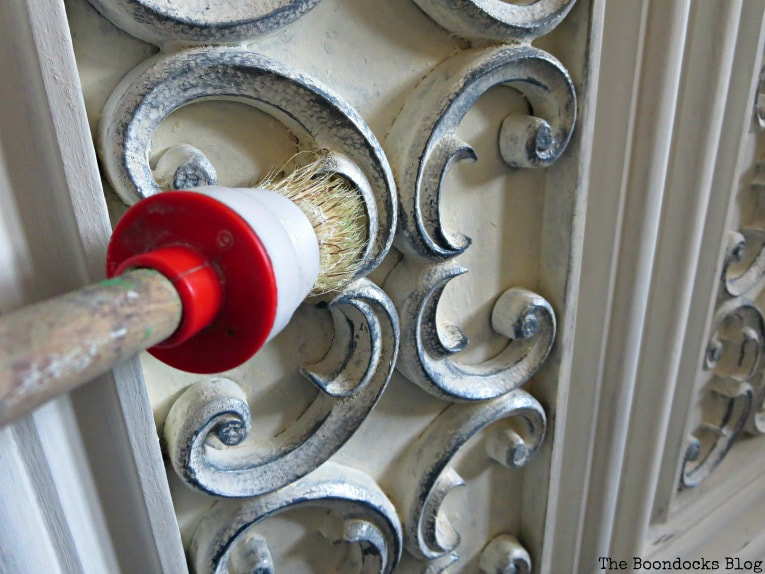
Below is the brush used for waxing the piece.
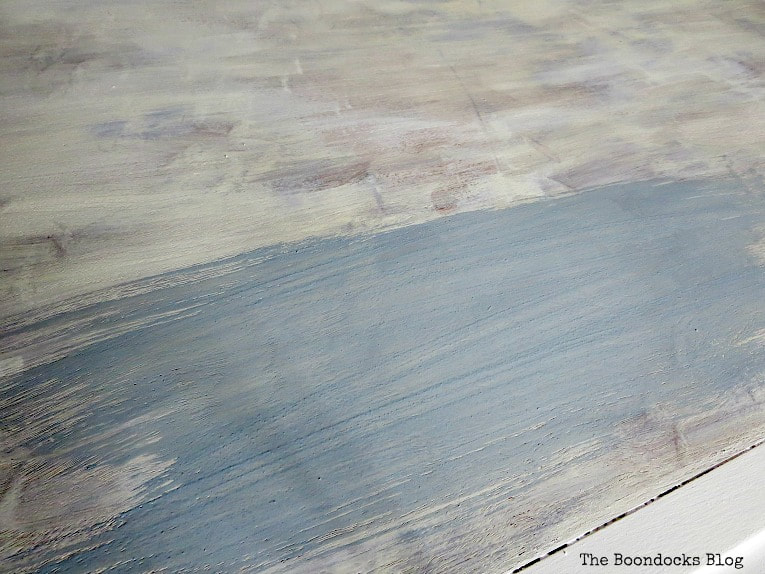
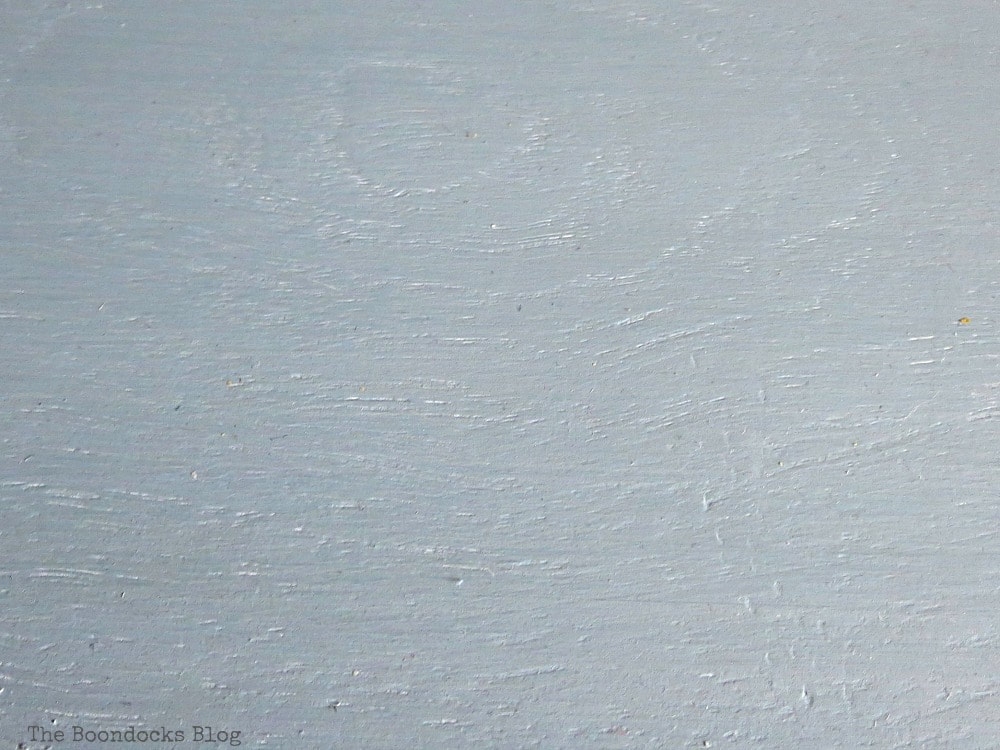
The wood top was done with two coats of snow white and then two more coats of this beautiful Slate color. I had thought it would turn into a smooth grey but instead it became this gorgeous soft blue which I like so much better.
So you see my plans were altered right there. It’s not a problem since I’m introducing elements of blue into the living room.
And wanting to add a little more depth I went over it with a white decorative wax, you can see a similar one to the one I used here.
I painted the inside of the doors and the speaker covers, slate as well. And the hinges were done in a metallic deep grey. It is here that you can see the beauty of Old Fashioned Milk Paint. When painted it takes on a life of its own and adds layers and different shades, almost like a soft cloud brushing the furniture.
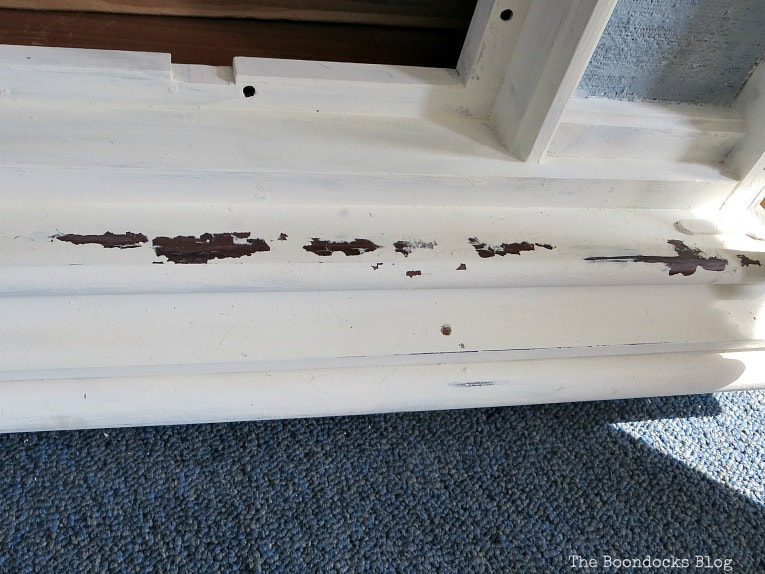
Now let’s talk about the bottom of the vintage TV cabinet. One side, no matter how many times I painted it, would chip away. I don’t know why maybe I needed to sand it better? But as I was working on the piece I came to appreciate the natural wear of this area.
Also a few days after I had started work on this TV console we got a puppy and he in his enthusiasm tried to nibble on the other side of the cabinet. So I suspect we may have a few more of these accidents in the future. I figure this is all a part of real life living. I ended up distressing a bit more and that was the end of that.
And here is the little culprit, eight-month old Tatou! Now how can you get mad at that face?

The hardware was painted with the slate milk paint, mixed in with a bit of metallic color. I then finished the whole thing off with some wax to protect it all.
See what a warm, pretty color the top it. It turned out so much better than my original vision of the grey.
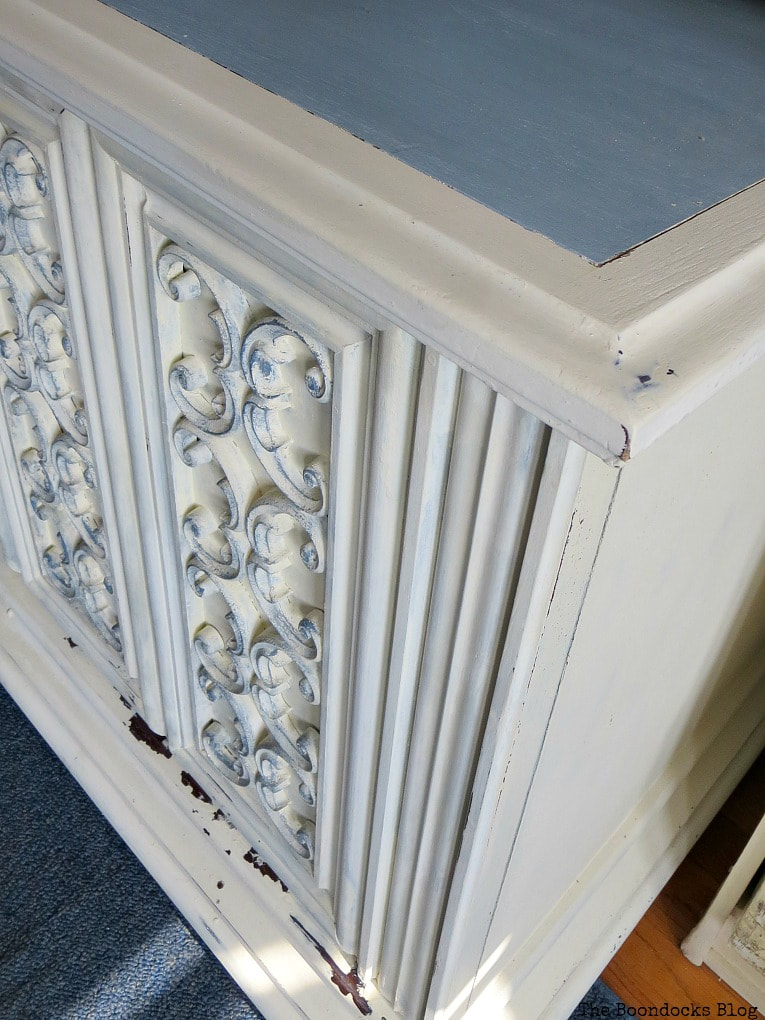
The scroll work was done with a light feathery touch to just add a bit of emphasis to the curves.
So now I have a whole lot more storage, which we can always use. And the best part? The living room looks like a new room now. Who would have thought one piece of furniture could make such a difference? Should I go out and buy new furniture so it can live up to the TV cabinet’s standards? And what about Tatou? Will he destroy those too? So many questions…
Why, even my dad was impressed with the makeover and he said “It is very beautiful” which is super high praise coming from him. Remember, he didn’t want to give it to me in the first place.
A quick look at the before so we can appreciate this transformation.
Ahhh much better!
Perseverance got me here, and also knowing when to keep my mouth shut so Dad would feel bad that he didn’t give me that old vintage TV cabinet to make over right away!
But now that he sees what I’m capable of, maybe I can wrangle a few more pieces out of him. In all fairness, I don’t think I’ll be able to top this one. It’s not every day you come across scroll work like that. And using Old Fashioned Milk Paint certainly made all the difference in the beauty of the color and in the details.
Have you ever tried Milk Paint? What are you waiting for?

If you really like what you see subscribe to my blog and get my adventures in your mailbox. The form is on the sidebar and on top. Your e-mail will never be shared with a third party.
This blog is for entertainment purposes only; our DIY tutorials are not professional advice. Read my full disclaimer here.
We love it when I get your comments and I will try to reply to every one of them. Please do not add a hyperlink to your comment, otherwise it cannot be published.


Wow! What a transformation Mary. You can’t go wrong with white. So much work but well worth it.
Most likely the reason the paint wouldn’t adhere to that one area could be someone at one piont used furniture polish. I’ve had this happen and have had to shellac before painting.
Vicki I’m all about the light these days. Because our home has small rooms I am working on lightening most of the furniture so the spaces will look bigger. This one certainly has made a huge difference.
Thanks for the tip. At this point, because I see the pup has not been trained yet to stay away from the furniture, I’m gong to go with the distressed look. But in the future I’ll keep it in mind. Thanks again!
Mary you did an amazing job on this piece.
One of the things I love about milk paint is the brush strokes sand right out when you use a circular sanding motion.
Your cabinet is lovely.
You are absolutely right about that Lisa. And the beauty still remains.
Fabulous, Mary! What a transformation! I think I would have been discouraged with all the scroll work, but you persevered and was determined to finish. And it was totally worth it! Beautiful! I’ve discovered that I don’t like painting anything – I’ve messed up and not finished too many things!
Aww Gail, practice makes perfect. You should have seen the messes I made and still do. I try to document everything here because it’s all about the journey.
OMW Mary, no wonder you begged your dad for the cabinet. It’s gorgeous. Those doors, the size everything. And I must admit I was a little surprised at how amazing it looks after you painted it. I loved how the cabinet looked before, but the colors you used and subtle sanding on the scroll work takes it to a whole new level. How beautiful and your newest addition is adorable. I’m sure he’s going to bring you lots of laughs and slobbery wet kisses for rescuing him
Michelle, it’s all about seeing the potential in something. I think it is something we as DIYers develop over time. I certainly never saw it’s potential 3 years ago. And it’s been sitting in the same spot for as long as I can remember.
Instead of distressing the scroll work I added a hint of the slate color which is so pretty. And in other places I distressed to make it look natural. From now on I’ll let Tatou take over the distressing. Haha!
In spite of all of the trials and tribulations the cabinet is gorgeous. It was worth all of your hard work.
I agree all the way Debra. This one was going to be special from the moment I put that sander on the top and realized it was wood.
Mary, it came out perfect! Its look genuinely vintage! Love that doggie too! You must be enjoying his company.
Hugs
Maria we are having so much fun with little Tatou and spoiling him like crazy.
Looking beautiful!
Thank you so much, I am really happy with this one.
Hi Mary!
Before I forget, put a note on the milk paint can saying something like: “Don’t forget, this paint will crackle on _________” that way you’ll have that note for next time. I was forever leaving notes on paint cans {and what room/item I’d painted with it – for touch-ups} for future projects. It helps. 🙂
Too funny about your dad! I like Mr. Tatou!!! He’s now out on my Animal Friends board… First pin of the day! ;)’
Happy wrangling for more furniture… Lol!
Hugs,
Barb 🙂
Barbara Old Fashioned Milk Paint comes in two versions. One is pure and chips in various spots. And the other one, the SafePaint version is good to use when you don’t want any chipping to occur. Also these paints do not last that long. I keep the small amount I make in the fridge so you can imagine what the situation is like. They have to be mixed right before they are used and discarded within a few days.
This paint is all natural and so is not premixed like some other versions. Thank you for your sweet comment. And Tatou thanks you too!
What an improvement, Mary! I hope you enjoy it for years to come! I have yet to try milk paint. I really need to!
Julie once you get past that learning curve, which I am still on by the way, you are going to love it. It is perfect for the farmhouse look we all love.
For as many problems you had with this makeover, it sure turned out beautiful!!
Thank you Cheryl, it was so worth it, as long as the pupster doesn’t distress it too much. 😉
Mary I have not tried milk paint yet and now I really feel like finding a piece of furniture curbside and transform it, even though I don’t have room for one. This is such an interesting cabinet now, that you gave it some love with your paints. I love the top and the brushed front! And of course… your sweet puppy !
Katrin that sweet puppy has stolen my heart and now I want to spend all my time with him and not my furniture.
I really wish new furniture had half the quality these old pieces have. The scroll work on the front is beautiful and you did a great job of bringing it out and showing it off.
Thank you Leanna, I was really surprised at how good it was.
Mary you must be so thrilled with how your TV Cabinet turned out! Milk paint is so fun to work with and love the detail on the front of your cabinet!
I think it has to be one of my favorite paints. You never know what kind of delightful surprises it will reveal to you.
So much brighter now. The scrolling really pops, it looks like a whole new piece and really catches your eye!
Thanks Amy. I could kick myself for not realizing it’s potential sooner.
Great work. It looks lovely!
Thank you so much, I am really proud of this one.
What a transformation Mary! It was worth all of your hard work! Your dad must be so proud!
He actually gave me a compliment which is quite rare for him. 🙂
My father did once. I nearly fell off my chair. It was at my wedding and he said I was a “caring child”. He said “she is a caring child” twice. I was 25!
From dull and dark to beautiful! I just love the new look, Mary. Your hard work paid off. Bravo!
Thank you oh Senpai!! I am learning from the best! <3
Wow Mary, what a difference! Its sad how many of these great detailed pieces from the 70’s end up in our landfills when they look so fabulous with a fresh coat of paint. Fist pumps sent your way for painting all those details with a brush! I would’ve taken the easy route and pulled out my paint sprayer. So glad to hear your dad loved it! Pinned 🙂
Marie I cannot believe I didn’t see its potential till I became a blogger and became exposed to so much inspired work from all you ladies that do furniture makeovers. But I guess better late then never!
Wow…I have seen these pieces and they are dated. You took it from vintage not to vintage hot!! I know it was a lot of work, but like I said when I started…it’s a wow!!
Thanks so much Kim. I am really glad I finally won the battle with dad and in the end he even liked it. Let’s hope it stays nicely distressed and not turns into a disaster with my pupster.
I love these scrolly pieces from the 70’s , all that detail is so appealing, and perfect for accenting too! The new puppers is just adorable and looks like our dogs little brother. Thanks for sharing your project at #FridaysFurnitureFix Mary, always a pleasure.
Thanks Brenda, I have to say I was really surprised to see that most of the cabinet was solid wood and not plastic like I had originally thought.
It looks so lovely but boy that was a lot of work! All those scrolls that look so pretty now must have taken forever to get looking like that – great job!
Thanks Julie, sometimes you have a vision in your head and you cannot rest until it is completed. That is how it was for me and this project.
I love vintage furniture. The makeover is great. The details on the piece really gives it character. Thanks for the inspiration and sharing on Sunday’s Best.
Rhonda thanks for the sweet comment. I am so happy with how this one turned out.
Mary, you did a fabulous job with this makeover. It’s great that your dad finally relented! What a gorgeous piece it is now. Thanks for sharing at Snickerdoodle. I’ll be featuring this at tomorrow’s party. Hope to see you there!
Thank you so much Bev for the feature.
Such an amazing transformation! Such a beautiful cabinet. I love all of the detail. Thanks so much for linking up to our link up.
Thank you Heather it was worth making this one over.
Wow what a difference Mary! It’s gorgeous! Love how it turned out, and the beautiful color. Hope your dad turns loose some more pieces now that he has seen your beautiful work.
I hope so too. I only wish we had a bit more room to place them all in the house.
Oh my friend! You always surprise me with your furniture transformations. I am sure you have a lot of hidden treasures so I am waiting to see you it is going to be the next one. Your tv cabinet looks gorgeous!
Thank you so much Christina. This one has to be the hardest one I have ever done but it was so worth it.
All your projects are very impressive. Looking forward to see what is next.
Although the end product looks more modern, which I’m assuming you wanted. However, you ruined the antiquity value of the console. It was a beautiful natural wood console. After you sanded the top of it, all that needed was a matching stain and a clear coat of polyurethane for shine. It would have been a beautiful piece of nostalgic furniture. But you got what you wanted. Enjoy!