Bookcases Upcycled with Paint and Wrapping Paper
Change up your decor with painted bookshelves. Use white paint and wrapping paper to upgrade an old bookcase or built in.
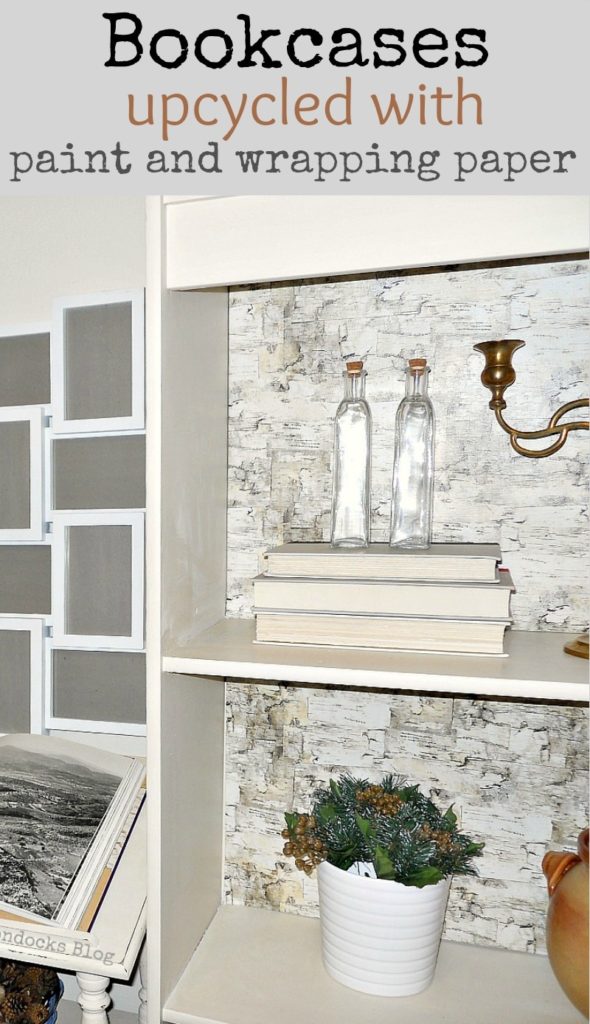
You don’t need to buy a brand new bookcase, you can upcycle your old furniture with a simple color change and some wrapping paper. Learn how painted bookshelves can make a big difference and can transform your decor space into a more pretty and modern place.
Painted Bookcases for a Fresh New Look
I was happy to visit my sons in New York in 2017. While there I made a number of changes. In fact, it is safer to say that I wreaked havoc. I made sure to repurpose and upcycle a whole bunch of things.
But my biggest job was the dining room bookcases upcycled with chalky paint and gift wrapping paper. This was the mess in the dining room of my son’s apartment. And it could only have gotten better after I painted the bookshelves with my chalk paint.
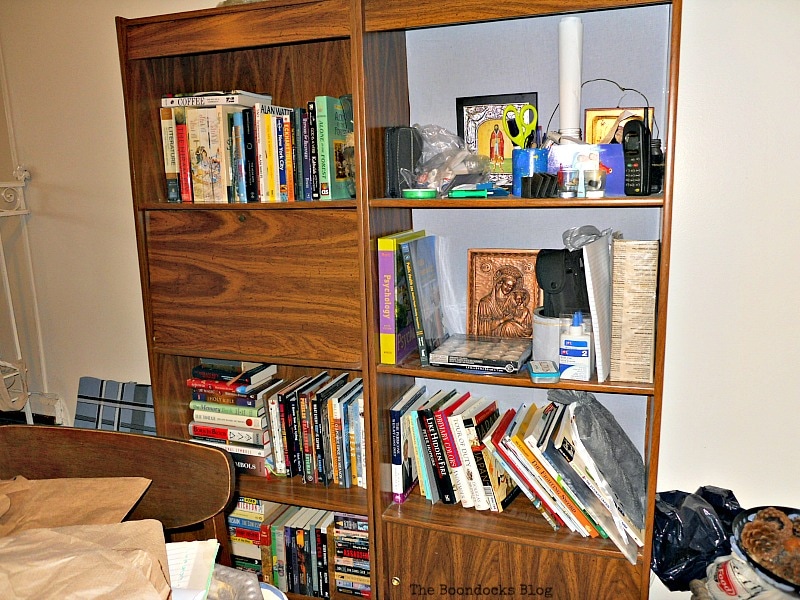
I had meant to simply organize the books but it looked just awful. Too much dark wood and too many colors. You can see on the right that one of the bookcases has a blue background. It does serve to break up the wood a bit. But I wanted to paint! Painted bookshelves can really transform a space.
My dad was not too happy about this turn of events. He asked me why I wanted to put myself through such a headache. After all, it was the dead of winter and here I was wanting to paint. I started by moving the bookcases apart so there was space between them to fit something else. I had a plan in mind.
What I Used to Paint the Bookshelves
Disclosure: This post contains affiliate links for your shopping convenience. If you purchase any of these products through the links, we receive a small commission at no extra charge to you. You can find our full disclosure here.
- Left over latex paint
- water
- Plaster of Paris
- chip brushes
- sand paper
- scotch tape
- Creme Wax
- Wrapping paper I used this
How to Paint Bookshelves
Using the white homemade chalky paint I had made for the dictionary stand, you can read all about how I made the homemade chalky paint here, I set to work. I should point out here that these are cheap bookcases, nothing special. These are not even wood, they’re particle board covered in laminate imitation wood grain. It would have been impossible for me to ruin them.
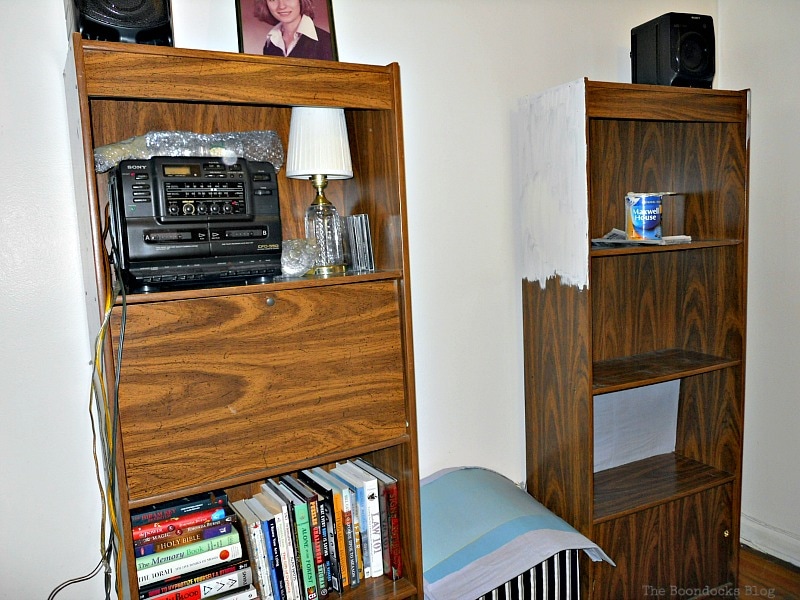
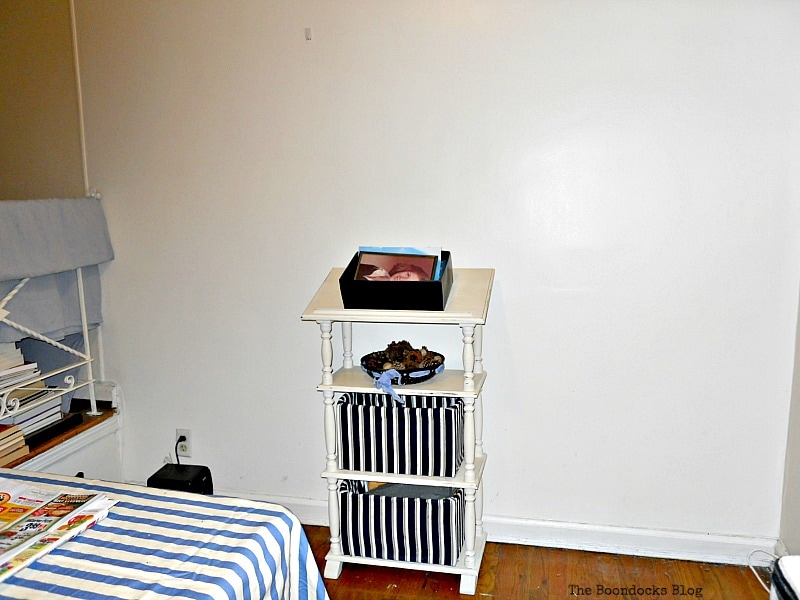
Here is what the wall looked like once the bookcases were removed. I positioned the dictionary stand in the center.
The bookcases were painted, sanded and waxed, just like the dictionary stand. All in all it took three coats of my homemade chalky paint to cover them well. And as before I only sanded at the end of the painting process not in between or before the chalk paint. Because I’m lazy that way? No, because I didn’t want to remove the laminate. Also between coats of paint it was not necessary since they were not at all smooth, thanks to my chalk paint.
This whole process took me a few days because I wanted to let the paint dry thoroughly in between coats. It was winter after all!
I then flanked the stand with the two bookcases like this. Well, in the picture you can see one of them.
That’s when I had an idea. I wanted to add a bit of interest to this all white painted bookshelves.

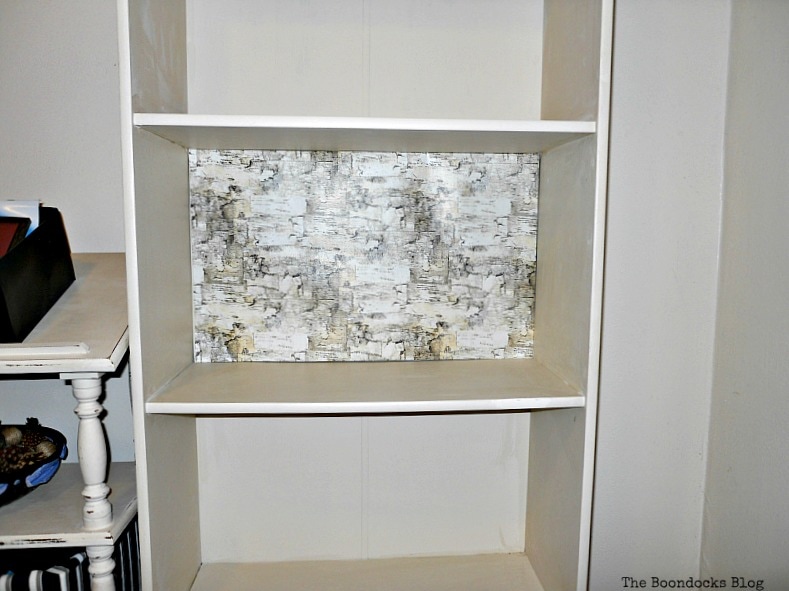
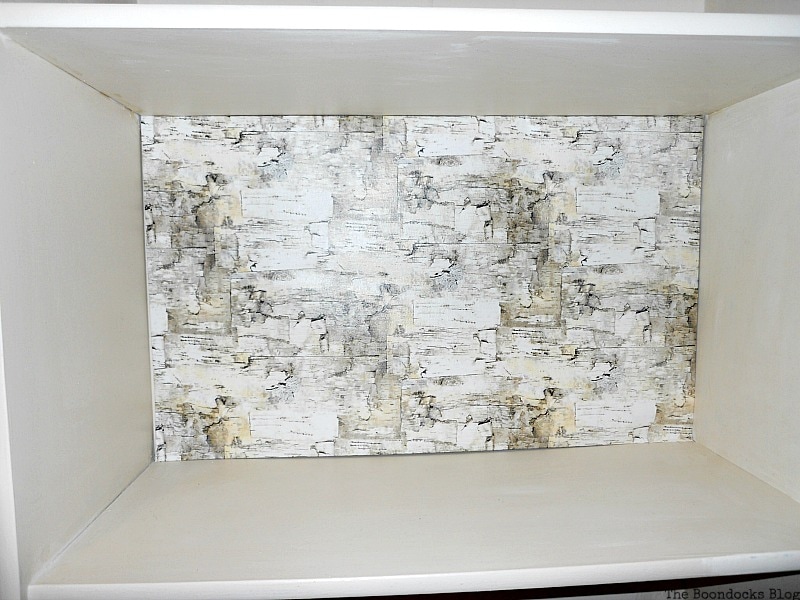
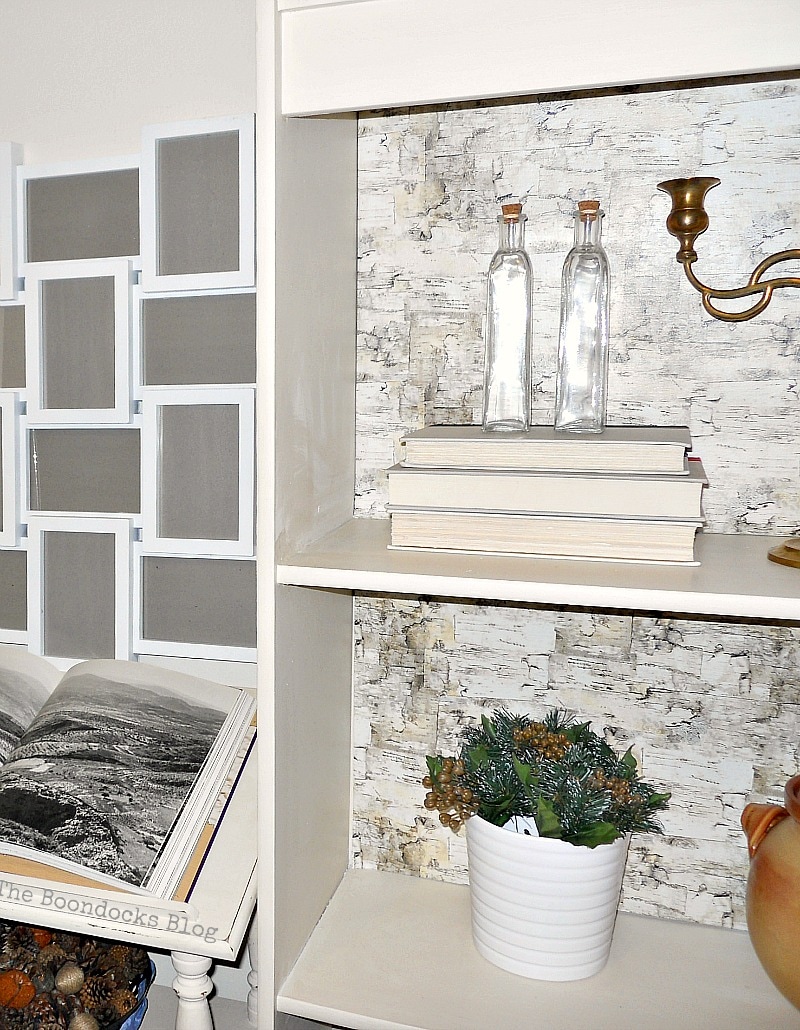
I had bought a pretty roll of gift wrapping paper which looked like birch. Now you all knowI never use wrapping paper to wrap gifts in. No, I repurposed it and placed it on the inside of the bookcases as a backdrop to add visual interest.
The interesting thing about these inserts is that they are removable. Yes that’s right because just like with everything else in my life nothing should be permanent. If I get bored I simply remove the inserts. You know i do this all the time, as with my recent Framed Heart Craft and my Card Displayer.
It was very easy to do. I measured out the back of the bookcase and cut pieces of cardboard to fit in perfectly. Then I cut the birch paper and folded it over the cardboard and taped it on the back. Below you can see a piece of blue cardboard that is folded over for extra strength and the birch paper taped to the back.
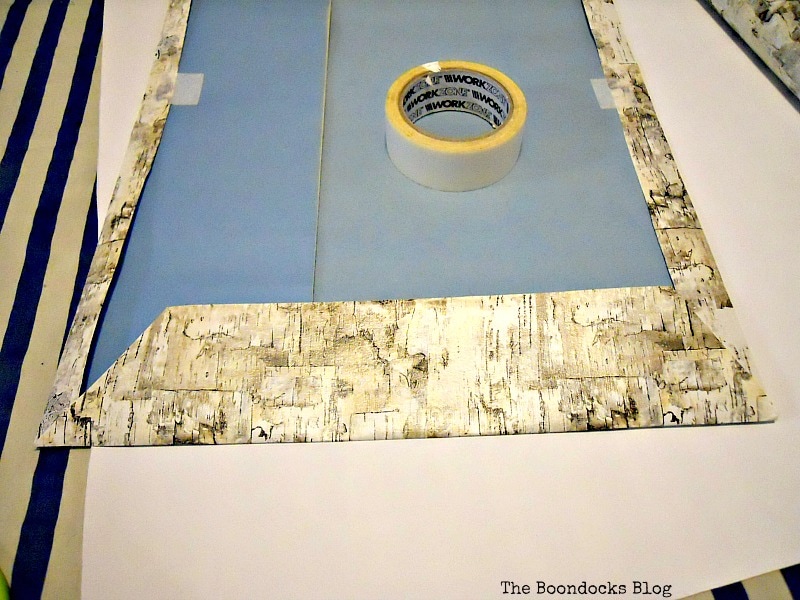
It was super easy to do and four out of the six inserts were the same size.
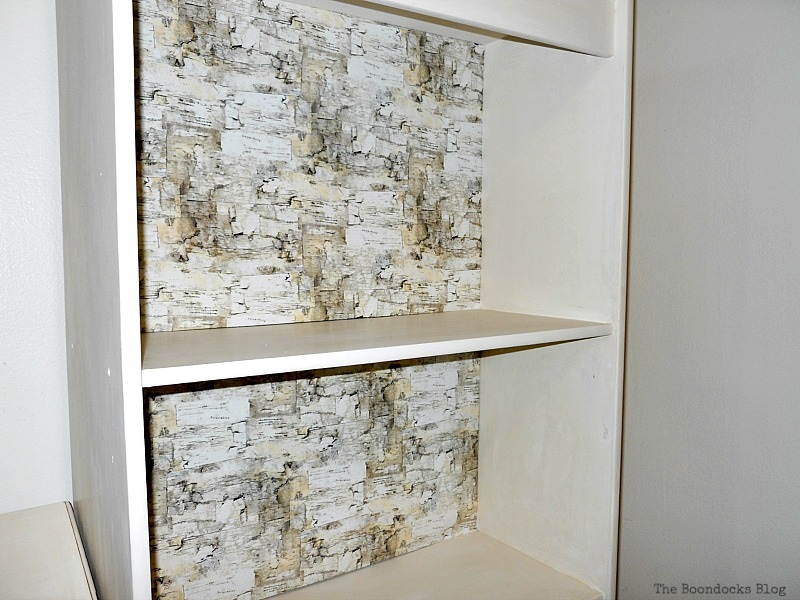
Now isn’t this more interesting than the plain white backs of the painted bookcases?
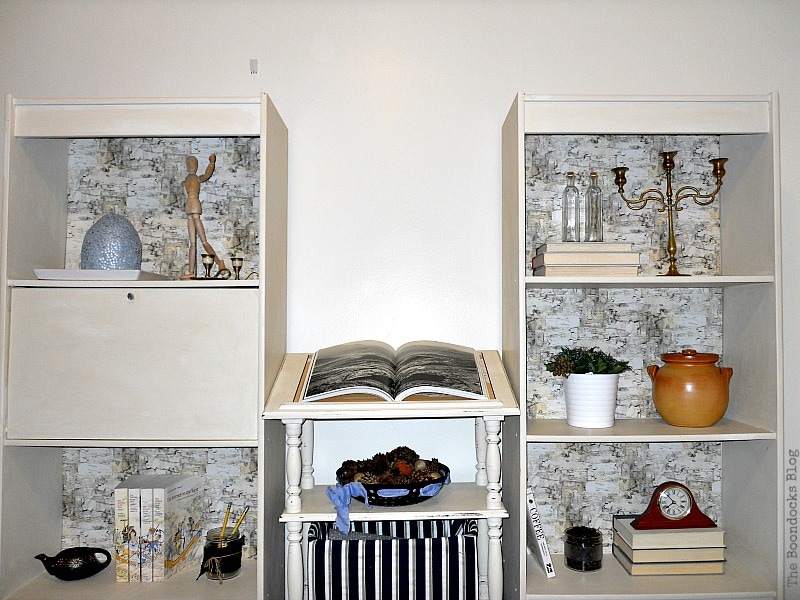
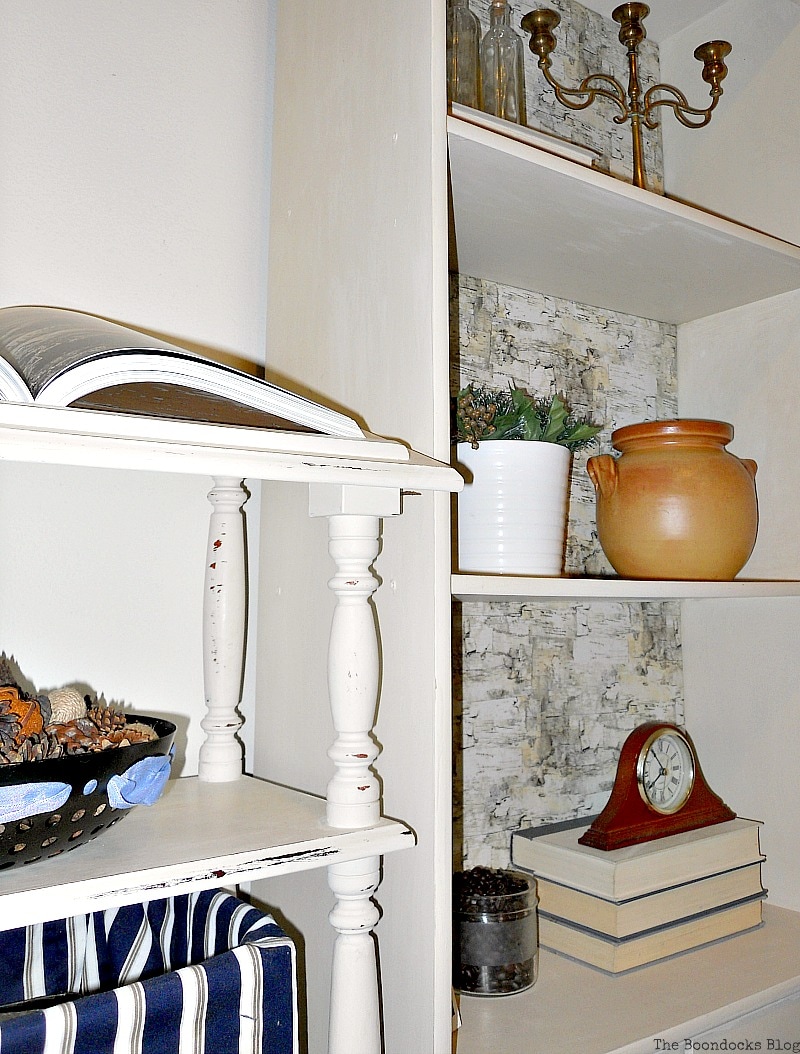
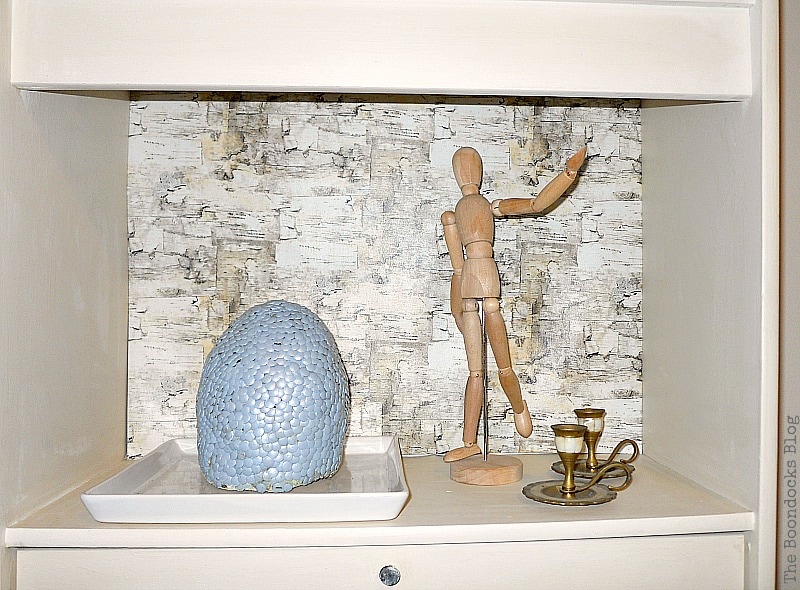
And then I had fun styling the bookshelves. I added a brass candelabra.
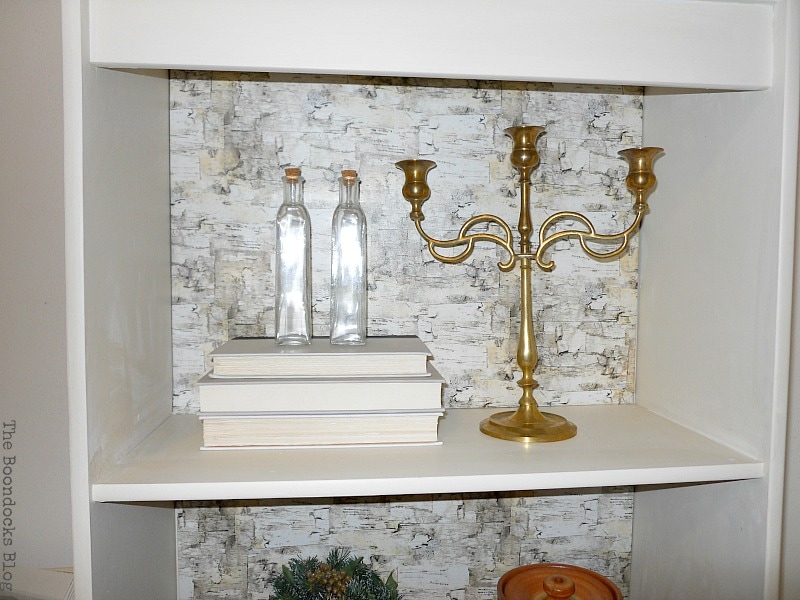
I also added a clay cooking pot that I had bought over from Greece. Let’s not forget my coffee with tea light.

I even added a vintage gas lamp that I found in my dad’s basement. Yes, he has one of those too!

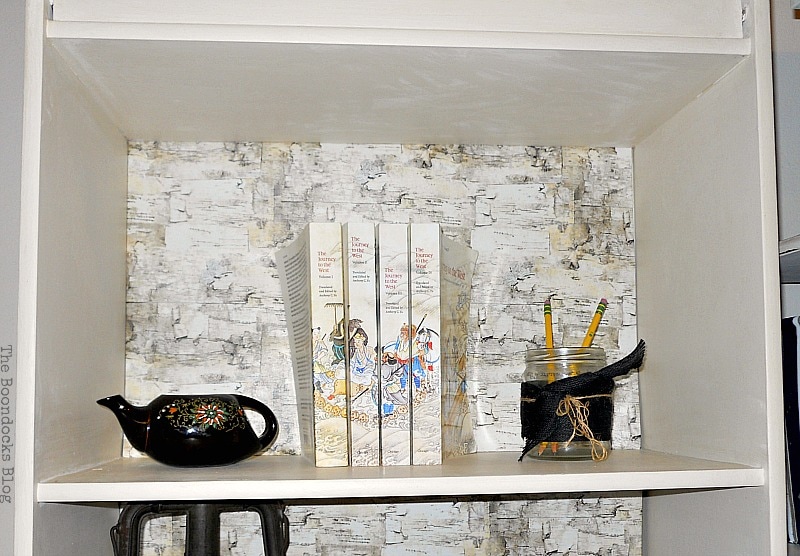
Here you can see a small sampling of my son’s books. The little milk pourer is unusual. At least I think that’s what it is. Correct me if I’m wrong.
And for all of you who have been following me on Facebook, you know what that blue thing is.
For the rest of you folks, it was a craft that I made with my son years ago. And yes, it is a dragon egg. We made it using clay and then placed way too many thumb tacks over it to give the illusion of scales. Finally it was painted silvery blue.
In the center of the painted bookshelves I placed the dictionary stand and even added a big art book. The storage underneath is two big cardboard boxes that have been covered in fabric. I really like the fabric for the boxes and they serve to anchor the whole composition.


I chose not to distress the bookcases like the dictionary stand because I wanted a simpler look. Anyway the birch effect gives it all the glamour it needs.
To finish things off, I added one of those frames that are so popular now. I think they look kind of cool like that, so that the whole bookshelves will not be too busy.
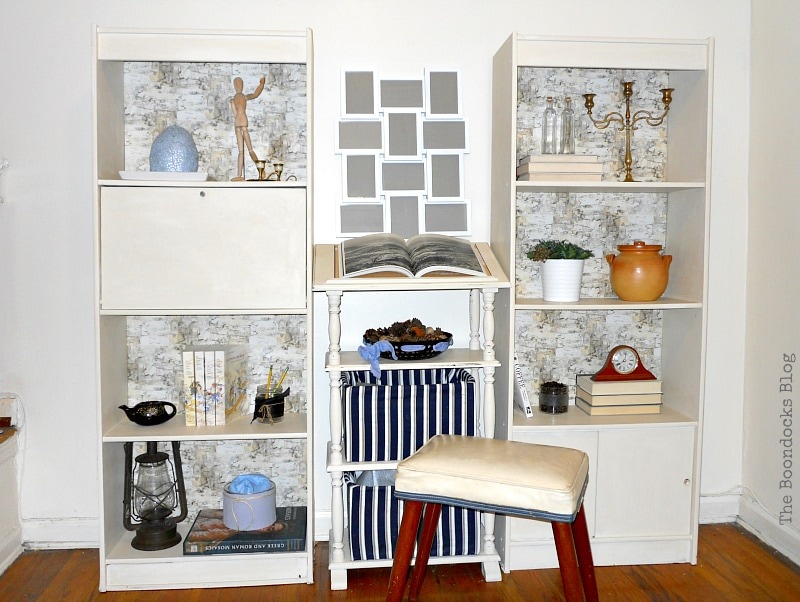
I didn’t put anything inside them, just left them with a grey background. They have dimension if not lots of color, but I like that.
But I have to confess this is all staged. I am working on a piece that will go there permanently, it should be ready soon. And then you will see how things really look in this room.
At this stage it is worth reminding you of the before. The new white color really transformed the whole room. It looks so much larger and brighter now. Even my dad was super impressed with the end result and that is saying a lot!

And that is the story of how my bookcases were upcycled with chalky type paint and gift wrapping paper. Now my dad is happy and so am I. My son, on the other hand, cannot find his books. But that is a subject for another post. “wink”.
If you’d like to see where the books went you can visit my project on the mirror and see the bookcases and the books. No books were harmed in the making of this project.
To see where the bookcases are now click here.
Are you like me, do you wreak havoc every time you visit your kid’s apartment?


More Upycling Project Ideas


Wow Mary! Those bookcases look amazing! You did a fantastic job on them. I love how you added the birch wrapping paper, I just can’t get over the transformation. They look nothing like the cheap particle board bookcases, and you didn’t ruin them at all. You improved their look tremendously. Did I say they look amazing, with just the right amount of glam!
I love the dictionary stand as well with the pretty fabric colored baskets.
Thank you Linda so much for your sweet words. I knew the minute I laid eyes on them that they had to change. And after I finished the stand it was a natural progression. I am really pleased with how they turned out. The room looks twice as big now.
HAHA! Just wanted to ask you about the books – I’ll have to wait then…
What great bookcases they are now. You were right, you most definitely couldn’t leave them the way they were – too depressing and pretty old-fashioned. Now it looks classy, absolutely stylish and bright.
How often have I heard friends say they’re unhappy with their home but lack the money to buy new furniture and all it really takes is some paint – muts tell them about you!
Welcome home,
Marjan
You will see the books soon. I have to put his books back otherwise he’ll never forgive me. Haha!
You know I used to think like that too Marjan. Oh I need new this or new that. But since becoming a blogger I’ve become fearless and willing to try almost anything. And this painting furniture… well, you become pretty good at it after a few mistakes. The bookcases were downright depressing to look at before.
I love what you did with your bookcase and book stand. The contrast of the wallpaper in the back of your bookcases give it an unusual, well defined look that I really like. What a wonderful transformation! Thank you for sharing your idea.
Thank you Linda for your comment. It really was pretty horrible before. And it doesn’t take much to transform a room from dull to something you can live with. Even after I put the books back (because I had to give my son his books) it still looked so much better.
I saw this on fb and I was so curious to see how you transformed it! I was not dissapointed, once again I admire your creativity and your skills! Amazing transformation Mary!
Ntina that grain wood looked so fake. What was the point of keeping it like that? If it;’s not wood then there is no use in pretending. It is so much brighter now.
What a transformation, wonderful
Thank you so much Caroline.
What a wonderful makeover! These look great! -Marci @ Stone Cottage Adventures
Thank you Marci! No more ugly brown bookcases!
What a HUGE transformation! Does your son love it? Or is he like my son (and hubby) who might not even notice the difference? In any event, you know it looks good…and that’s all that matters.
Have a great day my friend.
Hugs, Lynn
Lynn he noticed the difference all right. I had hid all of his books and he was grumbling about me misplacing everything. In the end I got a begruding nod of approval. I guess I can’t expect more than that.
Mary what a fantastic transformation! Oh my gosh, they looked really dark and heavy before and how they’re just beautiful! I adore white, it always makes things nicer I think, but adding that birch look a like paper was just the perfect move! And I also love that you separated them! Fabulous!
They were so depressing to look at before Katrin. Now when I glance over at them they make me smile. Oh who am I kidding, they are the center of the room now.
I love that the inserts are removable! I’m doing this to my office bookcase. Thanks for the idea!
I like to change things up every so often but not have to scrape off the paper. Janice, thanks for visiting and I’m glad you like the idea.
Amazing difference! I have some of those particle board cabinets and painted them, as well. It look several coats of paint, too. I’ve put them in my craft room closet and have filled them to store my supplies but I love the birch bark look you used. Beautiful!
Zenda we don’t need new furniture just a different way of seeing things. Thanks for your sweet comment. The birch paper was an afterthought. I picked it up on my way out of TJ Maxx.
LOL Mary, what on earth have you done to your Dad? And what have you done with your son’s books? It looks stunning and the whole space looks so much bigger and classier and just beautiful. I’m so glad your Dad also has a basement filled with weird, wonderful treasures for you to re-purpose when you move to NY
My dad is happy with it and begrudingly admits it is better painted. My son on the other hand is complaining because he cannot find his books. I placed half of them here and the other half elsewhere. But someone had to organize them.
Beautifully rendered, but moving the other books seems silly, when you could easily incorporate them here by eliminating some of the unuseful things on the shelves (like the creamer for example) and stacking them with the remaining useful things on top! I love everything else!
Wow, what a nice transformation. I know your son must be very happy, and loving having such a sweet mom like yourself.
I suspect he secretly loves it but he won’t tell me outright because he is afraid I might redo his room too. “wink”
Wow, what an improvement! I can just imagine what those bookcases looked like. Love the birch paper too. Hope your son likes it even though his books are missing. The whole space is utterly transformed. Is it possible now that you’ve made a believer out of your dad?
Yes Florence. He can kick and scream but he cannot deny the power of the chalky paint. As for my son, it will do him good to go on a treasure hunt for his books. 😉
Wowza Mary!!! That’s such an amazing transformation! I love the new color and wrapping paper backing. All the pieces and details you’ve added to the shelves are perfect. You did a wonderful job on this! I can’t wait to see your other projects.
This was the big one and I am so glad it is over! And I will want it like this for when I go back. It’s gonna be a long process transforming that whole house.
Great transformation!!! It looks so fresh and updated (I love the birch paper covered boards) and your staging is just awesome!!
Kaycee my mood is affected by ugly decor and that bookcase took the cake. It needed paint pronto! Now when I walk into the house I have a smile on my face.
What a difference! A world apart the before and after.
I wouldn’t even try with that bookcase but goes to show that a good DIYer can make anything beautiful again. 🙂
It was desperately needed. I have to admit I would not have tried it a year ago either but I was so fed up with it I figured I had nothing left to lose, it looked so bad.
You may have performed a miracle. Paint and paper to the rescue. Can’t wait to see what else you have in store.
Thank you Sharon. Two simple materials are all it took to make a difference.
Wow! I love the birch inserts! Since I now live in NH where the paper birch is the state tree, they really hit home to me. Keep up the good work!
Thank you Josephine. I love the soft look of the birch paper and it is really a nice thick and textured quality.
Mary, What a job to tackle, but you did it!!! It looks a 100 times better!!! Love the color and that awesome birch paper..great work!!!
Thank you Michelle. I think that paper makes all the difference.
Amazing transformation, Mary…especially in the dead of winter!!
Right Kim? My singlemindedness to get rid of the dreary brown had me outdoors in the cold painting. But it was so worth it.
The whole space is awesome sauce right now!! Not only it looks brighter and more classy with the paint and that gorgeous wrap paper, but placing the dictionary stand between them makes a positive visual impact. I really love how it looks now. What did your son and dad say about it?
Thank you Pili. My dad finally agreed that it was the right thing to do because it really was awful before. As for my son, I know he secretly likes it, he just won’t admit it to me because he hates that I disrupt his books all the time.
I bet your son is thrilled with what you did with the bookcases and styling. It looks wonderful. The birch paper is the right touch.
He is happy after his initial confusion. The room looks so much bigger now without that brown mess hulking at the end like before.
Very Good Mary!! Looks much better!!
Thank you Maarit. It could not have gotten much worst.
Oh my goodness! How beautiful! I just love the way it all turned out! Hugs and blessings, Cindy
Thanks Cindy. I think the light color makes a huge difference.
Wow Mary! Something tells me that your son is glad you visited!
(I think this comment will go through now).
I certainly hope so Doreen. Although he would not say it out loud. Because I really did place his things in order (at least my order) but he doesn’t see it that way.
Mary I’ve been reading your posts for the last 25 years, i cam truly say that this one I can relate to on a personal level. Well done. I’m sure your father is looking foward to you redoing the rest of his house as well.
It’s interesting that you say that because I have not been posting for 25 years. Maybe in another time dimension. Anyway I’m glad you like it since it doesn’t get any more personal than that. And I know you’ll find all your books. My father will be very happy when I tackle his house.
What an improvement! I bet it really brightens up your sons apartment.
Claire it’s as if a black void is gone. It was just so depressing before.
LIKE I’VE ALWAYS SAID THE QUEEN OF REPURPOSING. I JUST CAN’T BELIEVE YOUR IDEAS. YOUR MY HERO(ESS).
Thank you so much Baba. You are making me blush!
Mary—-what a fabulous transformation!!
This is what I’d like to do to my mom’s place—however, she won’t let me!!
I was going to ask about all the books? I can’t wait to read about it soon!!
jodie
http://www.jtouchofstyle.com
Jodie show her my post and she will be so surprised by the power of paint. I think it is little changes that make huge differences. And it was super cheap too.
Mary, the bookcase looks so much better now! Current and fresh with loads of styling possibilities as time goes by. I have that same birch wrapping paper that I too would never use as wrapping paper. Looks like you left lasting memories for your family back in NY.
I sure did Marie, and cannot wait to return to continue the transformation. I have so many ideas and so many garage sales to go to! 😉
Πολύ όμορφο το αποτέλεσμα μπράβο
Ευχαριστω Νατασσα! Ηταν αρκετη δουλεια αλλα αξιζε!
Great! Well done. It looks so good. Light and breezy.
Thank you so much! It looks bright and sunny in there even in the dead of winter.
What a wonderful makeover! So creative!
It was in desparate need of a makeover Birgetta.
Mary,
Fantastic transformation! Love the choice of wrapping paper too. So nicely styled too . . . how long do you suppose that will last? Hope you are having a fantastic week!
Laurie
Laurie, it will last a long while because it is reinforced on the inside with the cardboard and also the quality of the paper is very good, textured and thick.
Good Evening Mary, Oh my word, this transformation is amazing. Looking at the before and after pictures it seems impossible that they are the same units.
I never imagined that chalk paint could be used on particle board.
You must be thrilled that your dad loves the new look and I smiled when you said you had staged the bookshelves, because that is what I did when I painted my bedside cabinets, but afterwards I showed what they really looked like with my personal possessions. I look forward to finding out what you have done with all your sons books.
I’ve got to say Mary, I love how you left the book open on the dictionary stand…. a touch of genius.
Yes I am the same when I visit my daughters, they love me helping them and I love helping them.
Have a lovely evening.
Best Wishes
Daphne
Daphne I am so glad to hear you say that. I thought I was the only fussy mom who went on a mad rampage in my son’s house. It was very easy to do on particle baord. If you are worried, you can just sand a bit between coats. I know your husband will do that anyway. Yes, it had to be staged because real life is very different from pretty pictures.
Thanks Daphne for your vote of confidence. I cannot wait to get my hands on more projects.
A beautiful transformation of an old bookcase! The wrapping paper is absolutely the perfect backdrop to the bright white base. I also really like the effect of the frames.
I’m sure your son misses his mother!!
Welcome back to Greece!
Poppy
Oh Poppy all this back and forth is wearing me out. I know you have moved back and I feel for you. Looking out the window onto this gorgeous countryside makes my heart swell, but the other half is till elsewhere.
At least I can say I put my stamp on his funiture and so he will remember me for sure. Plus he still cannot find all his books.
Your creativity is endless Mary!! This is a gorgeous transformation by all means. In love with the wrapping paper you used. It’s a pity here in Greece we have not such kind of papers. Now the bookshelves and the whole area look totally different! Great job!!!
Thank you Christina. It was screaming for a makeover. The dining room is bright and airy now. Maybe I’ll tackle the chairs next time I go.
What a terrific makeover on these bookcases! I love the wrapping paper and the fact that you can remove it easily when you want a different look. I have 2 bookcases in my hallway that are on my to-do list for painting and updating. I have been planning to make inserts for the backs with poster board and either fabric or wallpaper remnants. I had not thought of wrapping paper. Great idea!
Carol I found these on my way out from TJ Maxx but I’ve also included them in the Amazon link above. They are very sturdy and textured. Good luck and we want a post on your bookcases too.
Wow Mary, you sure made a huge difference there and you did that bookcase a favor!!! Super awesome job…..ohhh and by the way — thanks for the sweet comment on my outdoor winter patio. I am glad you saw the elves from Lord Of The Rings sitting there and not the ogres…LOL
Yes Christine I did it a huge favor.
Christine, your whole house is ready to recieve the elves.
You are so creative – I love the three items together.
Carol thank you so much. I am so glad to have thought of sticking that stand in the middle, it really opened up the unit.
Oh my, what a difference! You really did a fabulous job in re-creating the bookcases, Mary! Looks great!
That’s just so you know that I was not on vacation the whole time I was in New York. I hope you are having a fantastic time.
Total transformation! The whole space looks lighter and brighter.
I was wondering where all the books are though, I imagined turning round and seeing the space behind you as you took these photos and it being just piles and piles of books! I’m intrigued to know what you have in store to show is next.
Julie I had piled them all in the living room. And for this project of course I staged it because I really wanted to show off the furniture. But now that it is over it is time for a reality check. I’ll be showing you where all the books are and a new addition to this whole unit in my next post.
I love the look of your bookcases Mary, they look fantastic
Amber anything would have been better then the horrible before.
This is a night and day fabulous transformation!
I couldn’t have said it better myself Sandra.
Mary, I loved how you transformed his bookcases, but the entire time I kept wondering where his books all went. So you will have to continue this story! I’m happy you’re back home, but sad that you left your family.
Carol it is a constant struggle. But at least I left them knowing that they are well and better off in New York. As for the book question, I will ease your mind soon.
Wow! What a huge transformation! The white brightens the entire room, you wouldn’t even know it was the same house. The shelves look fantastic and I love birch trees, so this is really special.
I’m sure that your son appreciates it when Mom comes, not only the time you spend with him, but all the care you take of him. And I’m happy your Dad came around, this is a stunning set of shelves!
It really suprised me to Nikki. But I had a vision and I stuck with it. I wasn’t about to let the winter stop me. And yes even my dad came on board after this one.
What a nice transformation Mary with just a little paint and beautiful and refreshing wrapping paper!
Thank you Maya. I am really happy with how it turned out.
These turned out great, Mary! The trick with the back pieces and using cardboard is pure genius! Pinning & sharing!
Thanks Angie, I hate to commit myself to one look.
I have been wanting to do something to my built in bookcases, but afraid of changing them permanently. This is perfect! Thanks for the inspiration.
I’m glad I could help Eilis and thank you.
Wow Mary! What a great transformation! Now it has style and character!
I have banished the brown Katerina and love the brightness of the room now.
Hi Mary. This is a fantastic makeover. The bookshelves are so bright and the birch backdrop makes it masculine. Really nicely done.
Leanna thank you. This is by far one of my all time favorite projects. The difference was instantanious.
What a beautiful transformation, Mary–just lovely. Doesn’t it feel so good to get a DIY project finished and be so pleased with it? You’re a good momma, that’s for sure 🙂 Thanks for linking up your posts with us at Vintage Charm!
I hope one day my son feels the same way Diana! He was fuming when I hid all his books and that paint did not have the best smell. But it’s all oven now !
Great job, Mary! I have the exact same wrapping paper, that will never see a gift! I wrapped some candles with it and also used it to cover paper mache Christmas trees for the cutest little ornaments. I LOVE it on the back of the book shelves. Thanks for sharing, Cynthia
Cynthia I totally agree with you, it is too pretty for gift wrapping. Such a waste. I really like your ideas.
Wow!! You totally transformed the bookcases and I loved the inserts. Great work and much brighter living room!! I wish my mum was like you!! :))
Haha!! Our mom’s I think were not as creative. They didn’t have Pinterest!
Mary,
The birch wrapping paper makes the whole project outstanding. However, I also was wondering where your son’s books were. LOL
My sister likes to organize my things which causes me stress. Without asking or discussing it, she surprises me. Well, I like my things my way… where I can find them.
Judith
Generally I try to keep my hands off his things but this called for some action. In my next post I have revealed where the books went. I couldn’t hide them from him forever.
And this is why I love paint so much Mary. What an amazing transformation!! Thank you for sharing at Create, Bake, grow & Gather this week.
Just beautiful! The bookcases look so much better with the milk paint and the birch log wrapping paper really makes them pop. The back of our built in bookshelves that flank the fireplace are painted a pleasing shade of green, but there are times that I wouldn’t mind changing it out–temporarily. You have given me an idea to try. Cardboard and wrapping paper. Great idea!
Mary you did an outstanding job your choice of paper set the scene I love it hope your son finds his books
You are so creative!!! I LOVE these.
Thank you so much Rachel. This makeover was the start of lots of makeovers that set the tone for the whole house.
The bookcases look fantastic! Looking at them pre-painting, I would never have thought they could have turned out this well. I would have likely just gotten rid of them. You did an excellent job!
Thanks so much Calleen. There is nothing I love more than a good upcycle challenge.
Oh my goodness, this looks amazing! I love everything about it and I am looking forward to seeing the project you are working on for the center of the two bookcases! Thank you for sharing at Celebrate It!
Thank you so much I already finished all of them and have since moved it to them to the living room.
Amazing transformation you made those shelves look new and current. Lucky son to have a clever Mom. Happy Spring, Kippi
Thank you Kippi, this was a great way to get rid of the gloom and usher spring in the right way!
What an amazing transformation! I love everything about it: the colour, the paper, the styling – really nice! 🙂
Thank you so much Teodora, I don’t know how I would survive without my trusty chalky finish paint.
What an amazing transformation. It look so lovely now. Congratulation, you had a great Idea.
Thanks so much Simona. If I don’t like something I take out that paint in a snap!