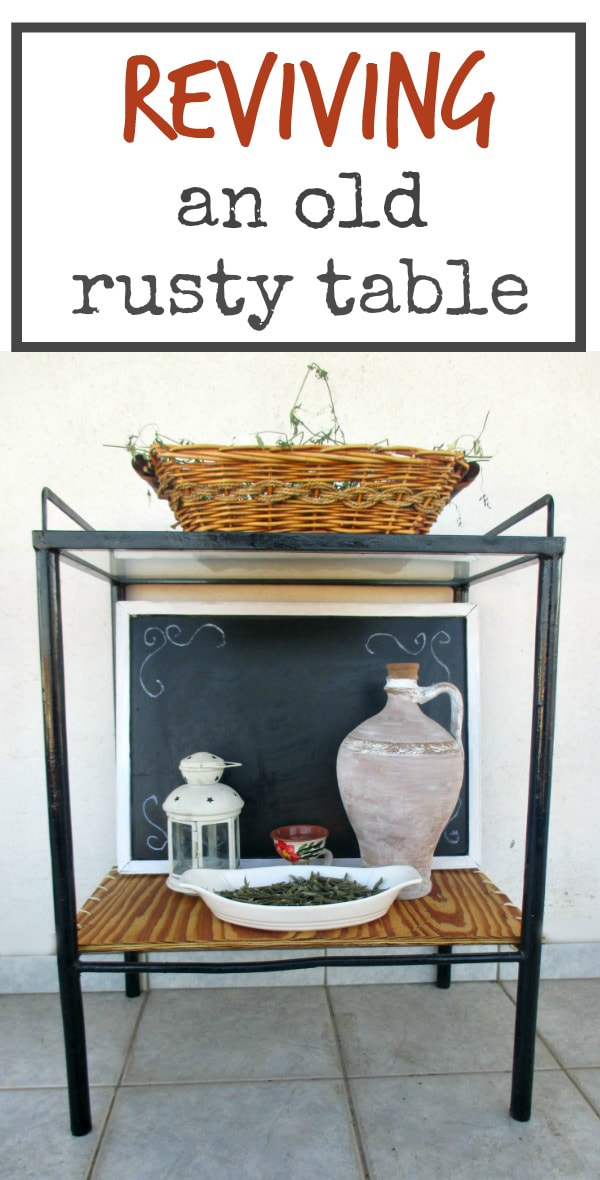
A Rusty Old Table Revived
One day I was taking a walk at the farm and I spotted this rusty old table….
One day I was taking a walk at the farm and I spotted this rusty old table. Now I must have seen this old thing about a million times, but I had never really “seen” it. I had never seen its potential until now.
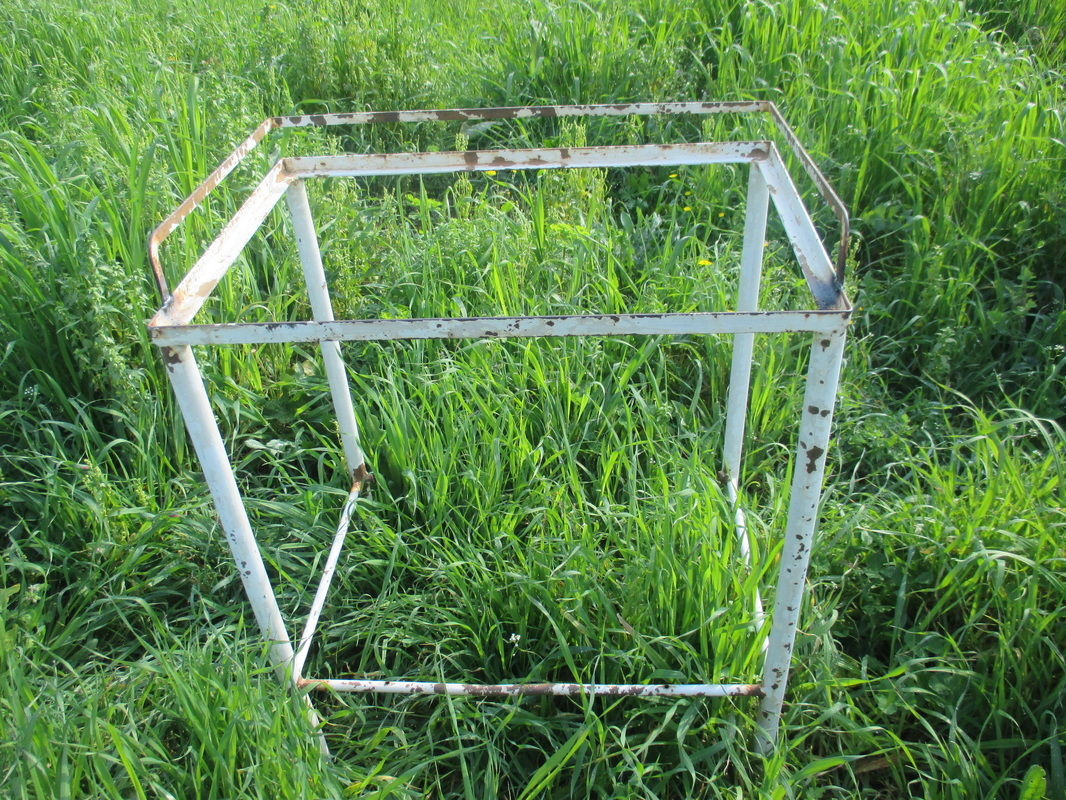
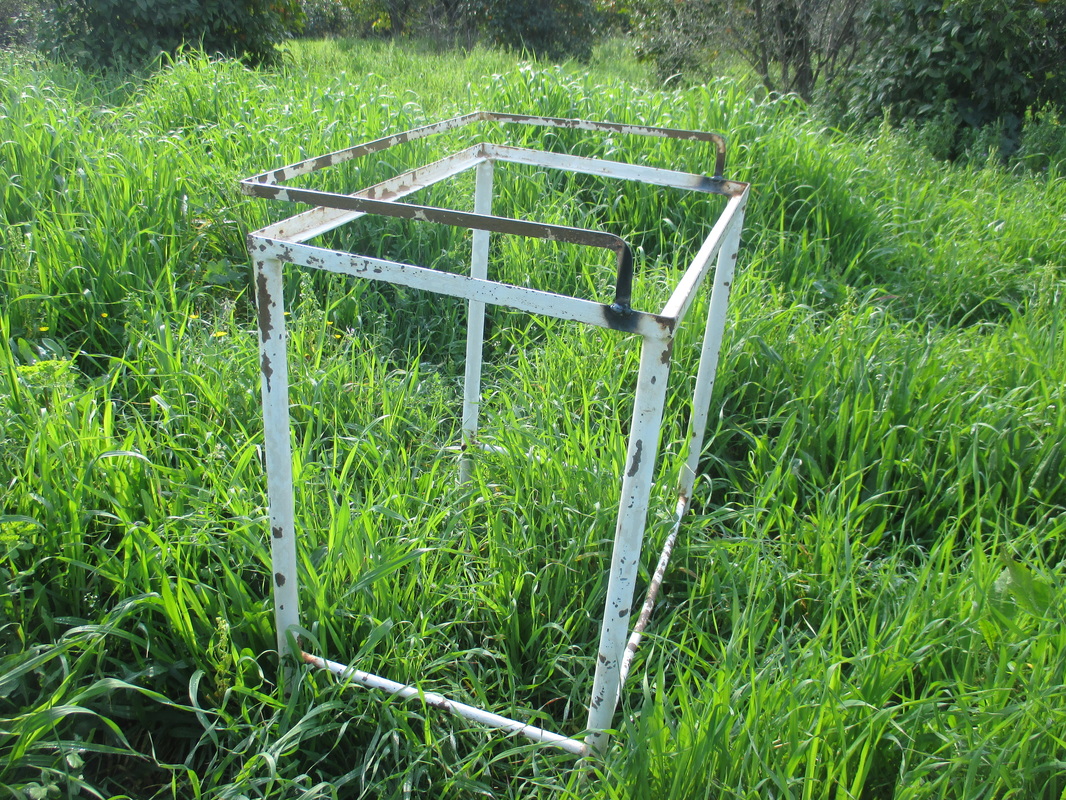
When I tried to lift it, the top metal part stayed in my hands while the rest of it fell away. I realized I had my work cut out for me. So I had to take a quick trip to the metal man to reattach the top.
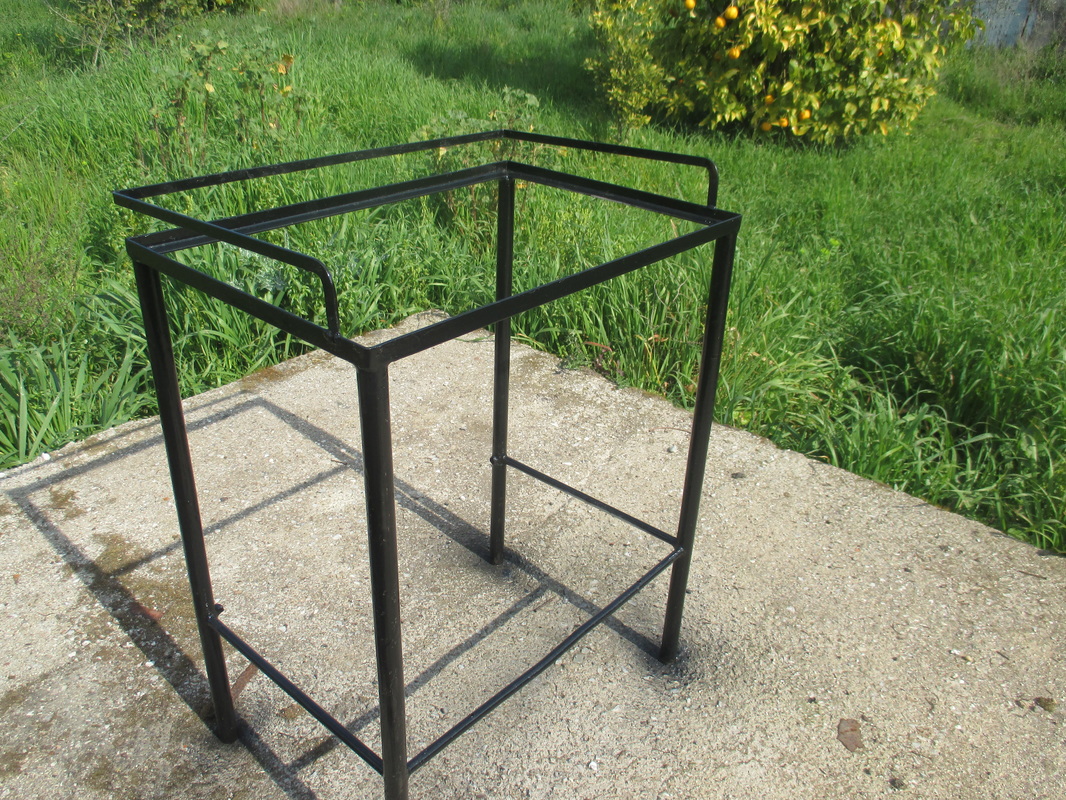
I sanded it down to get rid of all that rust. I got most of it and then painted it my favorite black using spray paint. Two coats later and it looked like this.
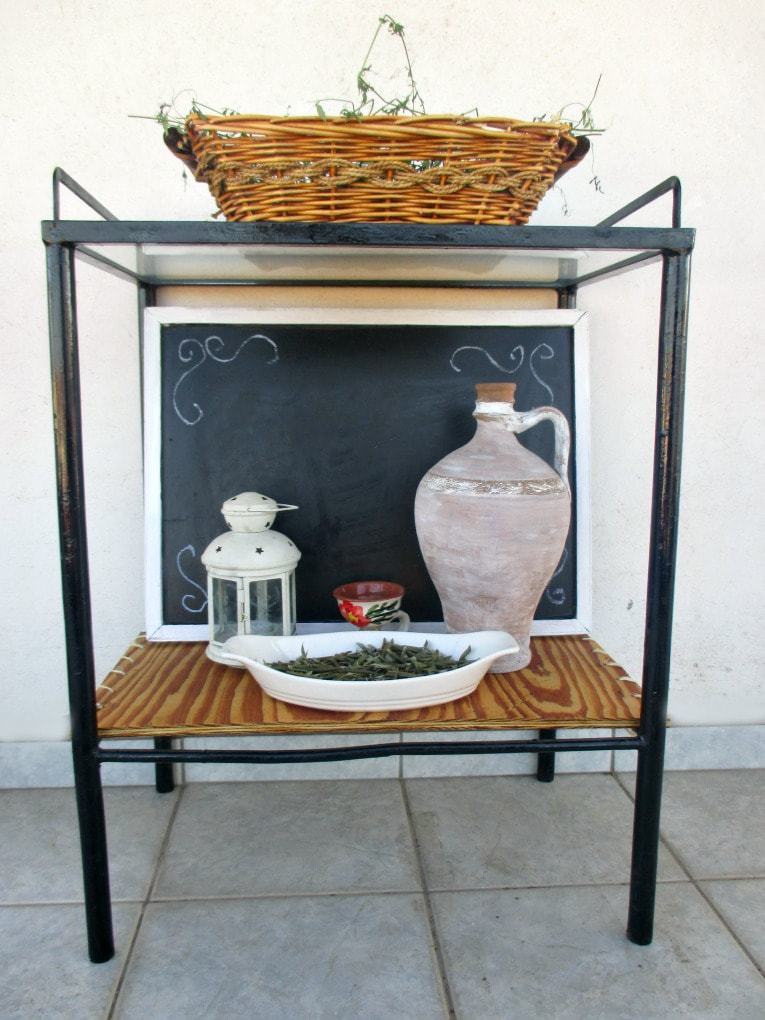
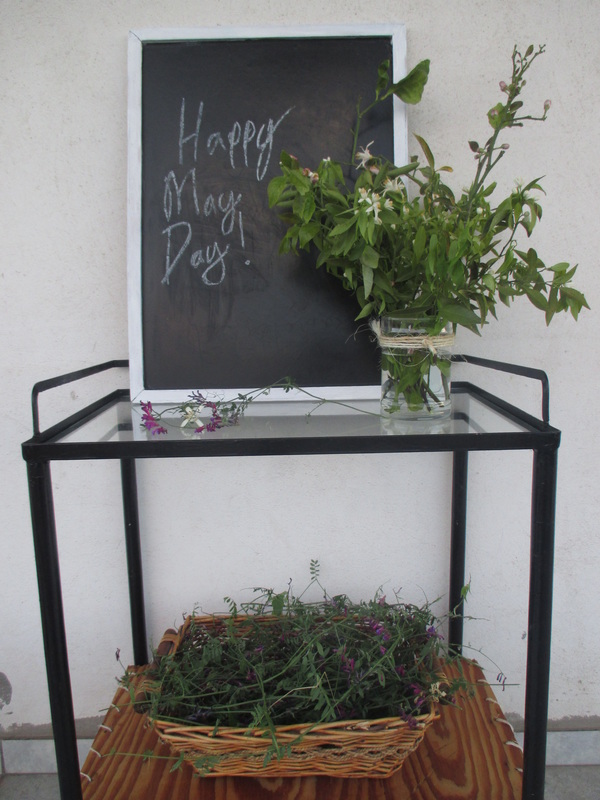
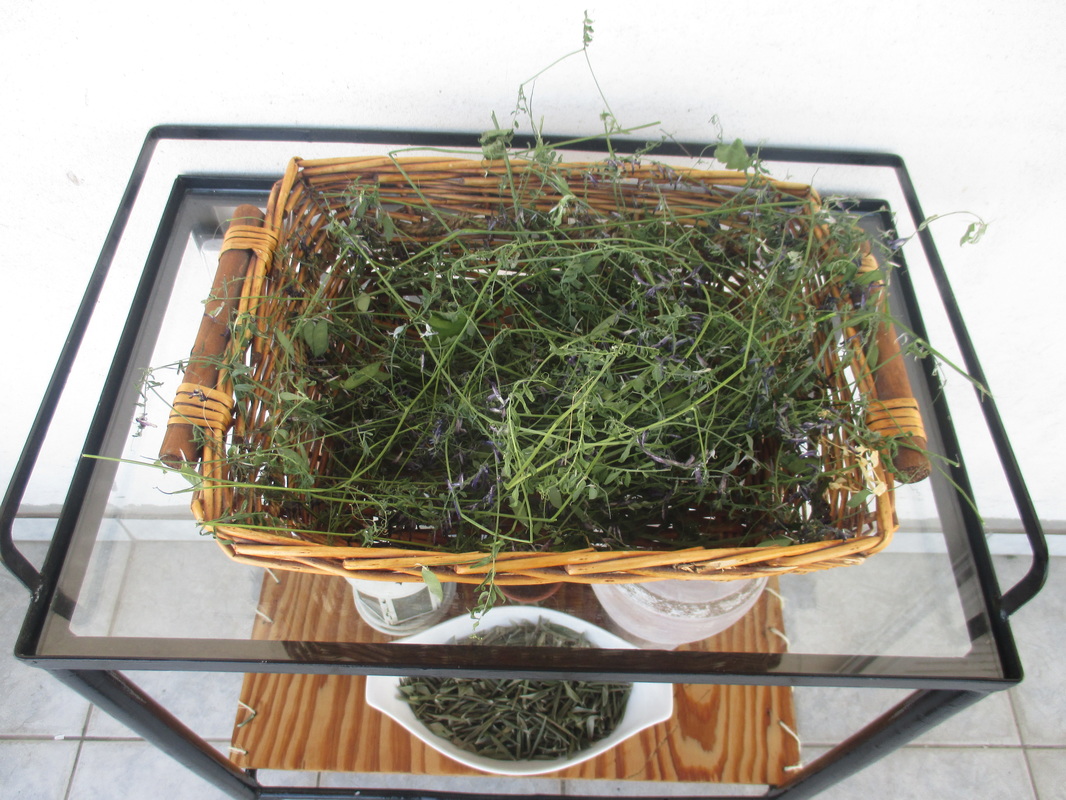
The next step was to find a shelf for the bottom. I found some plywood and had it cut to size.
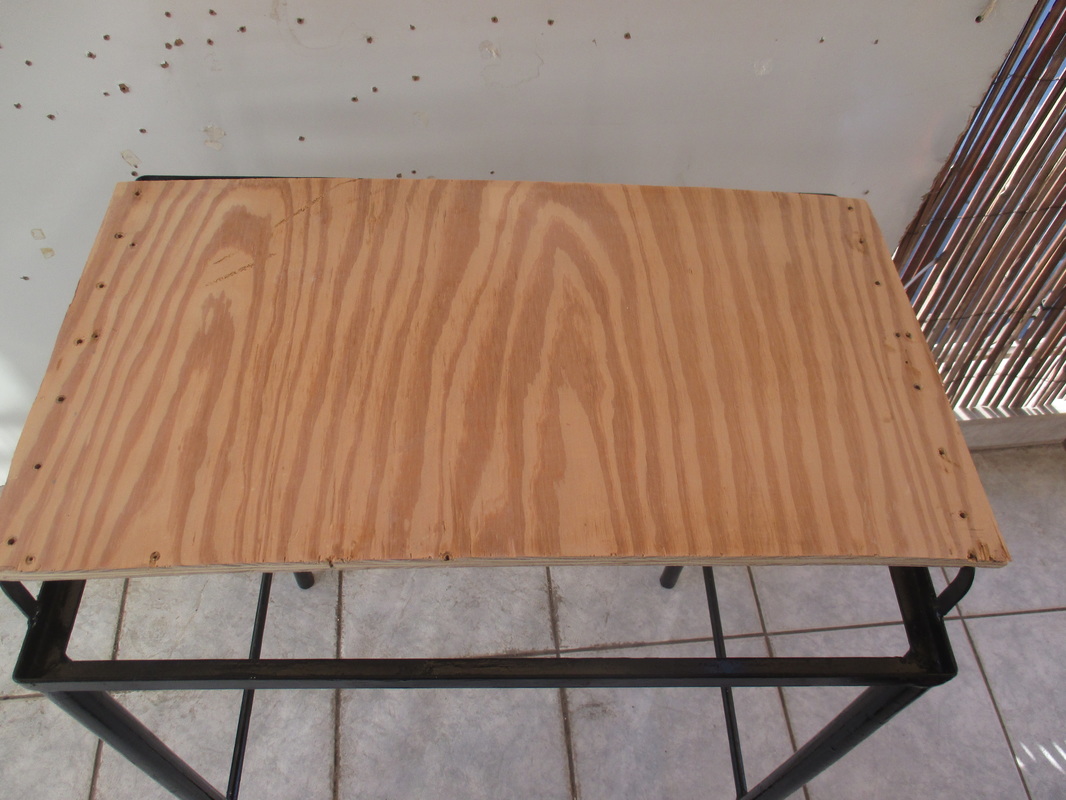
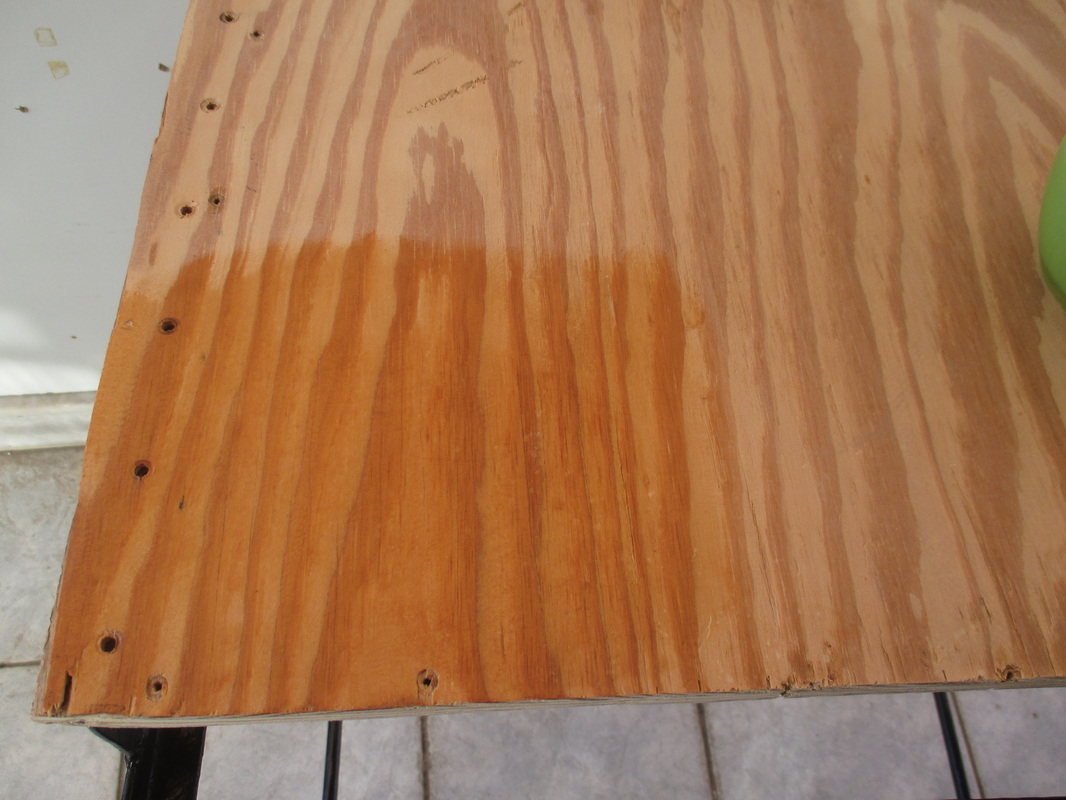
The plywood had some holes on the edges from previous uses, so I decided to go along with it and add some more holes along the edges. 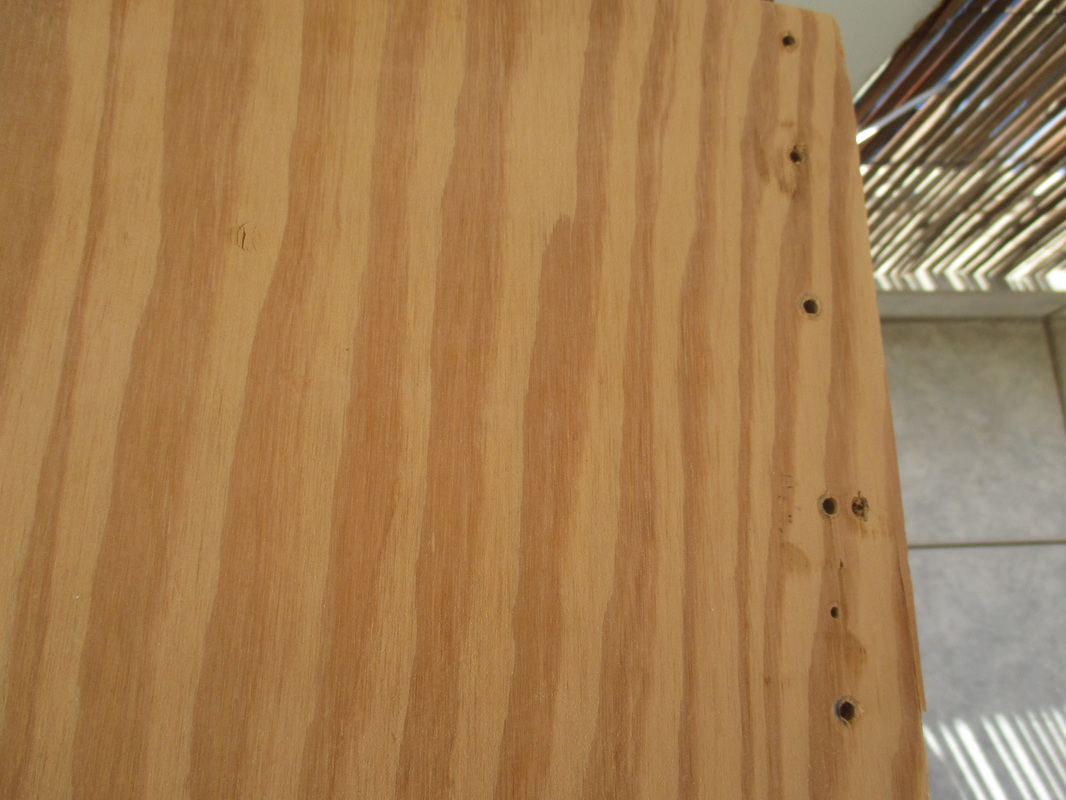
To give it a little color, I wiped it down with oil and vinegar. I used 2 parts oil and one part vinegar. This cleans the wood and also adds much needed luster. What a difference!
If you have been following me at all you will know that I jokingly refer to myself as “the twine lady”. So to keep with the twine theme and to utilize those holes, I passed twine through them and attached the shelf to the bottom of the table. I was going for a rustic feel.
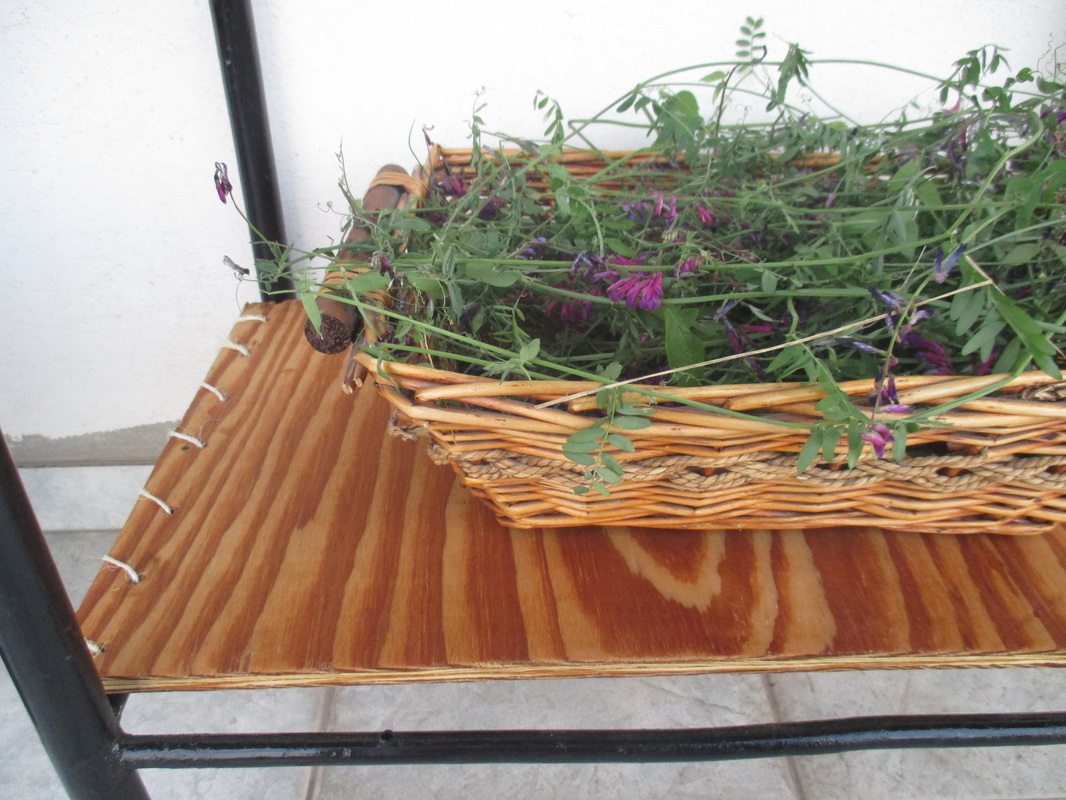
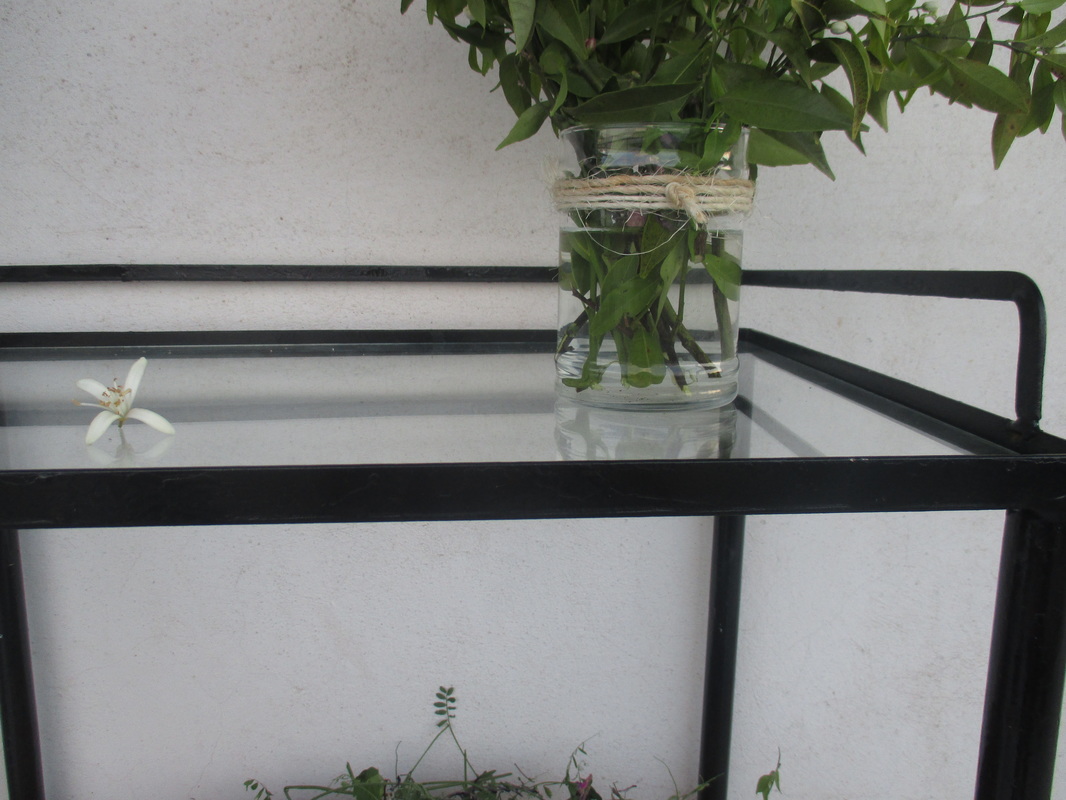
The last step was to add clear glass for the top shelf.
From this:

To this:
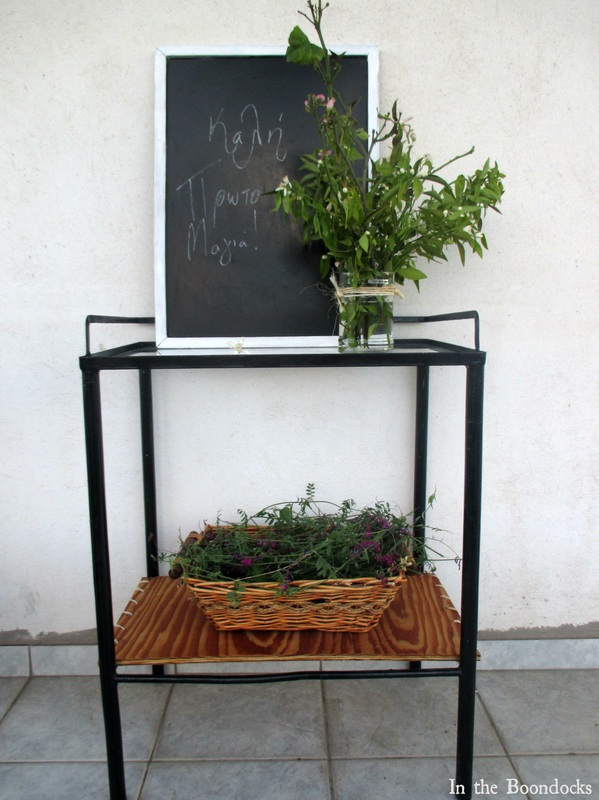
It is far from perfect, the bottom steel is not straight, and the rust would not come all out. But considering that I managed to rescue it from rust purgatory, I think a good deed has been done!


Disclosure: The items below are affiliate links and link to Amazon.com. If you purchase any of these products through the links, I receive a small commission, that way I can continue to provide you with lovely content. There is no extra charge to you for purchasing through my affiliate links.
And that is it for my rusty project. I hope you like it, I am especially proud of this one because it was sure to stay neglected at the farm if I had not spotted the beauty behind the rust.
I cannot express enough how happy I am to have started this blog and to share all of these wonderful ideas and projects with you all.
If you really like what you see subscribe to my blog and get my adventures in your mailbox. The form is on the sidebar and on top. To see my privacy policy click here.

You may also like:

The Story of a Dresser
Upcycling the Milk Crate Table


You did a fantastic work with it, it looks great now!!
Thanks do much Pili… it was my first major upcycle that I was so proud of!
That is amaaaazing, Mary!! I am so tickled you saved this piece and it looks wonderful (applause!!) I’m featuring your prodigal piece tomorrow. 🙂
Larissa, “the Godess is in the house”… Thank you so much for visiting! You know how much I love your work, and it is an honor for me to be featured by you!
I love a good rescue story and yours was great. Never heard of oil and vinegar on wood, what kind of oil did you use. Happy to have found your site.
Heather C. I use regular olive oil, since I have plently of it.. 2 parts oil and one part vinegar. Its great for refreshing old dried out wood, and for cleaning them too.
Έκανες πολύ καλή δουλειά. You did such a great job on this metal table. It’s simply gorgeous.
P.s. I like the dual language of this post, helps me keep up with my Greek 🙂
Dori, Ευχαριστώ πολύ!! I do the best I can, thanks for visiting, and if you have a website let me know.
I love what you did to this table…very creative and beautiful!!!
Thank you Keri. It was my first serious project. A labor of love!
That’s an amazing transformation! Very nice work.
Rebecca, this was one of the first ones I did. It was sitting in the farm looking like it was one step away from the landfill. Thanks for stopping by!
This is soooo cute!! I love the rustic appeal & the whole makeover!! Happy weekend!!
Paige.Rose
from
http://www.TheQuaintSanctuary.blogspot.com
Thanks so much Paige. This was my first baby! I bought it back from the brink!! Thanks for stopping by.
you totally saved this piece!
b
That’s how I feel too. I still cannot believe the mess it was before. Thanks for dropping by.
This turned out so great, Mary! I can’t even believe this is the same table.
Thanks Lauren, and to think in my pre-blogger days I had let it sit out in the rain.
Hi Mary! Thank you for linking up with Friday’s Furniture Fix last week. I loved your Revived Rusty Old Table. This project will be featured here tonight when we go live at 9PM EST. http://thirtyeighthstreet.blogspot.com/2015/09/week-7-fridays-furniture-fix.html
Thanks again for linking up. We hope you’ll do so again!- Carrie
Carrie,, thank you for stopping by but most of all thank you for featuring my little rust guy. I will definitely be at your party!
Love it so much I’m featuring it at tonight’s Trash 2 Treasure party. 🙂
Thank you Kammy. This one was my first real upcycle, I managed to surprise myself. Thanks for featuring it!
This is adorable…I want one! Now I just have to find something like this to up-cycle 🙂
Thanks Kate. If you are lucky enough to find something like this go for it. It was so much fun transforming it.
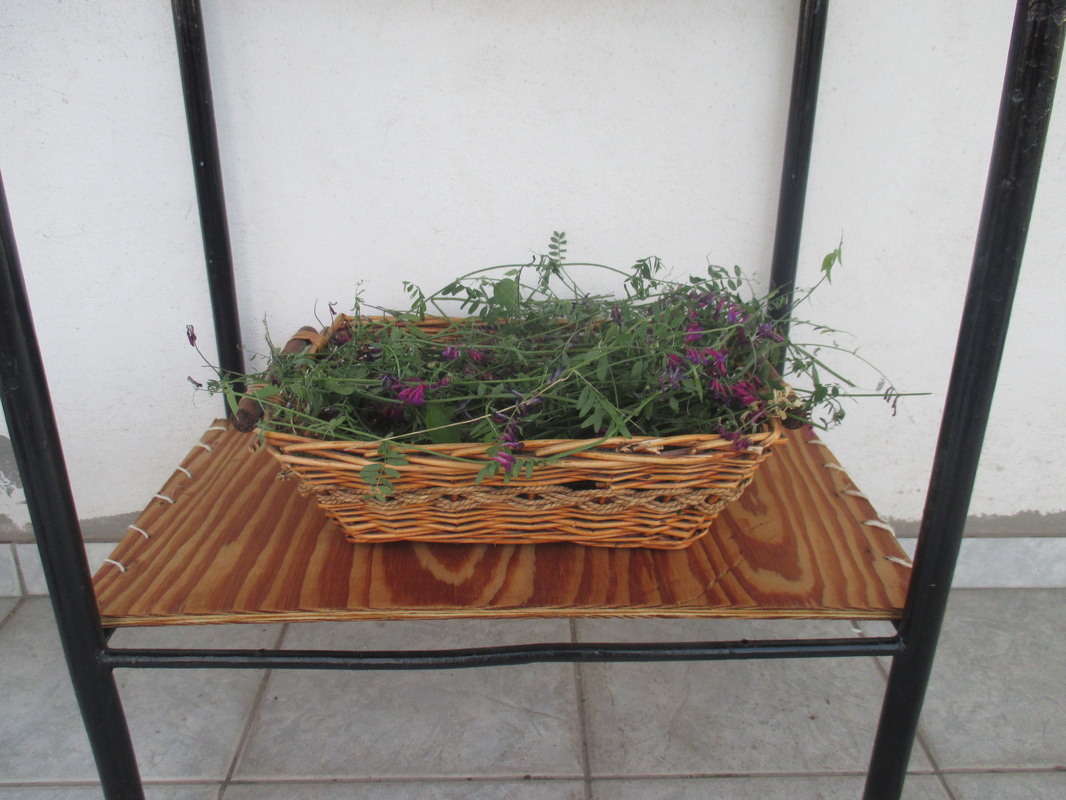
I love it, I even loved it in the before state! But you did an amazing job, I always like your rustic twine touches and it’s become such a nice side table now Mary! The basket with the flowers is beautiful!
The before state was pretty grose Katrin, not shabby chic at all. It was more like peeling chips with rust. lol. I was just looking at it again and thinking mayby I should paint the wood and make it white? What do you think?
Wow! So gorgeous! You have such a talent for seeing the potential of things. So glad to have you at FTAF!
Thank you Chellie, and I’m glad to be going back and revisiting my older stuff.
Mary, that’s the kind of table that I would love to happen upon. There are so many uses for it! And now it has a little special meaning given that you rescued it.
Well done my friend…Hugs, Lynn
It was half dead when I fo und it at the farm Lynn. Full of rust and ready to fall apart. I’m so glad it’s home with me now.
What a great rescue! I love the bottom shelf and the way you attached it is so unique! It’s funny how sometimes we don’t “see” what is right in front of us! You did a great job on this! I hope you have an amazing day!
Smiles!
Terry
The Curator’s Collection & Making Broken Beautiful Thursday
Terry thank you so much for your kind words. I enjoy coming to your blog every week even though I don’t always have furniture to link up.
Transformation is amazing….great job. I love how you fixed the bottom.
Thank you Vickie, this was one of the first projects I tackled. and it still looks great one year later.
I bet the owners of that cast off table are wishing they’d given it the great new life you breathed into it. Thanks linking it to our first Waste Not Wednesday link party. (http://www.smallhomesoul.com/waste-not-wednesday-link-party-1/).
I just love how you attached the bottom shelf, so unexpected but great at the same time!
Please come back again.
Toni thank you for your sweet comment. Of course I will be back to visit you.
I love it! This is definitely a trash to treasure project! I really like the different materials together, too 🙂
I try to mix things up a bit Julie. I’m really happy with this one, it has stood up very well.
I love this! I can see it as an end table on my deck – Thanks for sharing on the DIY Party!
That’s exactly where I had it last year. Now I’m using it to hold my computer tower because it is a nice size.
Hi Mary, you did a wonderful job on the rusty old table. Black is perfect for so many projects. I love that you used glass and wood. It’s so much nicer than two pieces of wood. Pinning!
Thank you Darlene. This is one of my favorites since it one such a hot mess when I found it.
Great rescue, Mary! Thank you for sharing @Vintage Charm!
I love all your upcycles and repurposed projects, but this one takes the prize! I can’t believe that sad white metal frame was turned into this gorgeous little table. It looks so great with the wooden shelf, twine and glass top! Once you’ve styled it with the basket, greenery and chalkboard I would never believe they were the same table! It looks fantastic!
This was one of the first ones I saved from certain death. I still have it ,in fact it is sitting next to me holding my computer tower because it is soooo big…lol
So glad to see this great project bought out from your archives and shared again. Thanks Mary!
Hugs, Lynn
Thanks Lynn, I really didn’t know what to do with this mess when I originally found it out in the rain.
It looks practically brand new now! So different to it’s abandoned state.
Stella a little TLC can make all the difference in the world.
Hi Mary,
Your complete refurbish of this table is awesome! All the little details, like the twine, really make this project unique.
You are featured on Thursday Favorite Things. The theme for the features that I chose is furniture makeovers. Thank you for sharing with us.
Olivia
Thank you for the feature Olivia. This one is real special to me since it was rescued from certain death by rust.
I love how you combined a glass top with the twined wood at the bottom Mary. It creates such an interesting contrast while letting you see what’s on the bottom shelf from a different perspective. Great job
I had become twine obsessed after the other project with the red plastic storage. There was no stopping me.
Oh Mary I love this! I would have hauled that to the rubbish tip but you transformed it into something so lovely. xx
Kate I figured I had nothing to lose by trying!
Great save! The table looks great twine lady, lol. I do like the added touch of the twine. Just adds to the rustic charm.
The oil and vinegar sure makes a difference, going to have to try that sometime.
Linda it’s almost like making a salad! Haha!
I love how you “sewed” the bottom shelf on! It looks great!
That’s a cool way of putting it Audra.
Nah, there’s no way you’re going to let something go to the dumpster! I know better than that! It’s a good thing you finally “saw” it though because it’s a great upcycle! Looks fantastic now. It reminds me of an old medical table my dad used to have in his office (he was an old fashioned GP). Whatever though, you did an awesome job on it.
Florence it has to be pretty old this table. We had it at the farm buried under a pile of branches. I was lucky to have spoted it otherwise it would still be there.
Oh, I really love how that turned out, I’m so glad you saved it!
Tania
Tania I thank my stars that I spotted it and saved it.
I love this table. It looks wonderful.
Thank you Debra.
Wow, what a transformation….and there is nothing wrong with a little accent rust:)
Kimm I’ve really come to appreciate rust since I did this project.
I love that “stitching” SO cool! You will be featured in tomorrow’s To Grandma’s House we go link party – thanks for sharing with us!
Thank you Tarah! Its always fun to drop by your party!
Such a great makeover, Mary! You certainly did a good deed and got yourself a useful piece of furniture in the bargain 🙂 Thanks for linking up your posts at Vintage Charm–
Diana I use it all the time, it is really timeless.
You did a beautiful job with the table, Mary…completely transformed!
I love a good DIY and this was a good one.
Wow! I am in love with the results. The table looks so modern I love it!
Hi Mary, that is a handy little table of sorts. The rust adds character & charm, an effect, I expect people pay good money for in some shops.
xx
It is always nice to take something that is old and repurpose it. This turned out so nice. Thank you for sharing at Classy Flamingos.
I am so in love with your table! It is gorgeous! Thanks so much for sharing at Celebrate It!
You did an awesome job bring new life back into the rusty old table. Its amazing the shine you get with a little oil and vinegar on the plywood. Love the added touch of the twine. Glad you rescued the little table.
HI Mary,
This looks great! I love an upcycle project! Thanks for joining in the fun at Inspire Me Monday! Definitely inspired!
Where did you buy the glass? laura
Laura we had it specially made to fit the top of the table. It was at a local glass maker.
This is such an ‘ugly ducking to gorgeous swan’ makeover! Who knew that rusty old thing had such potential?
Super transformation Mary! And I love that it was homegrown piece! 😉
Hi Mary
Featuring this one on Inspire Me Monday on my blog! laura
Thank you so much Laura.
Happy I found you on Instagram. I have a few friends t h at moved here from Greece. They go back often to visit family and they press their own olive oil and bring me some when they return home. It’s amazing
This project turned out super. Most wouldn’t see how this piece would be made pretty again. Us bloggers know a little elbow grease and paint can work wonders..
Love the added twine..
Cindy
Thank you so much Cindy! I don’t know how much back and forth I’ll be doing for now but I certainly can understand the draw of the beauty that is Greece. Thank you for your kind comment.
Outstanding job, and I especially love how you used twine instead of screws to connect the plywood to the stand.
Thank you Ivory that was a surprise to me as well.
Wow! Amazing! I definitely don’t have the same vision you have Mary. I totally didn’t see such a lovely piece in the “hunk of metal” and probably would have sent it straight to the dump.
I’ve been working on those super powers Mandy. It must be “extra-vision”. Haha!
Well done Mary! Saving the world from landfill, one piece at a time!
Haha! That is my aim Cath!