DIY Backpack Makeover using old Clothes
Give an old or oddly branded school bag an update with this easy DIY backpack makeover idea using upcycled clothing!
Do you have a dated backpack that needs a facelift? Or maybe the design isn’t age-appropriate any more. Learn how to use old clothes and some Mod Podge for a simple DIY backpack makeover, just in time for back-to-school!
Back-to-School is Around the Corner
School begins in the middle of September in Greece. No need to rush things too much. It is still very hot here and it’s hard to hit the books when you are trying to keep cool. Children begin grade school when they are 6 years old. There are 3 years in middle school and another 3 in senior high school. After that they can either go to a University or a vocational school for higher education.
This was the first public school my kids went to in Greece. They are almost done now. The youngest is in her last year of Senior high school. Schools generally start at 8:10 and go till 2 pm depending on the grade.
There is no lunch break but they do have a place where they can purchase snacks. The kids come home at 2 pm and then many of them go to tutorial schools in the afternoon. We all have to learn English here since Greek is not a widely used language.

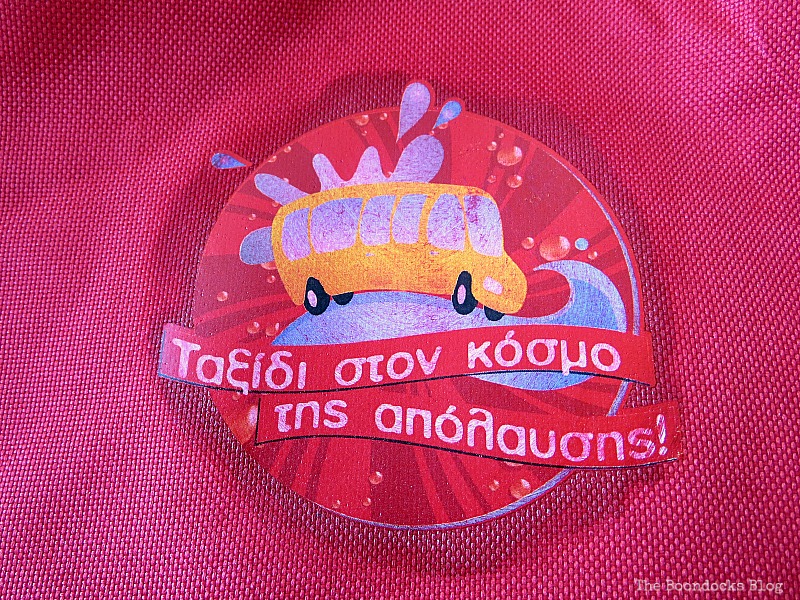
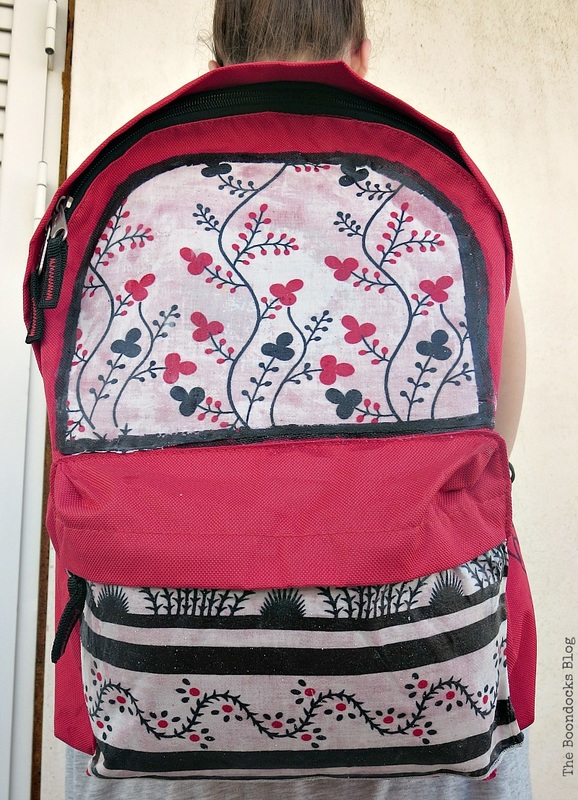
This small school bag was given to one of my girls when she visited a factory. It is nice and useful but not really appropriate for her age. She is a teen after all and teens want what they want! And who can blame her.
We were going to give it away but it was a nice size, not too big for those days she has few books and it was very sturdy. The only problem was that sticker on the front.
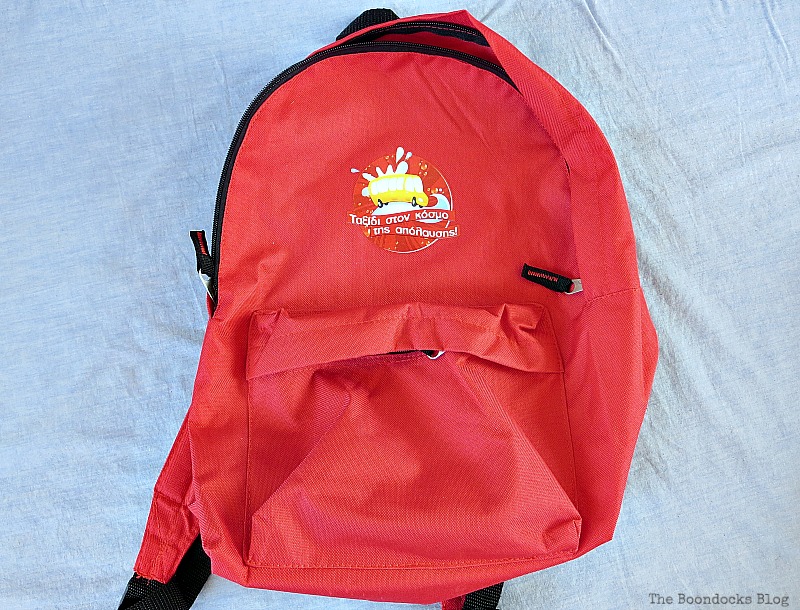
Giving a Backpack a DIY Makeover
My first solution to this sticker problem was to mix acrylic paint with some fabric medium and paint over it.
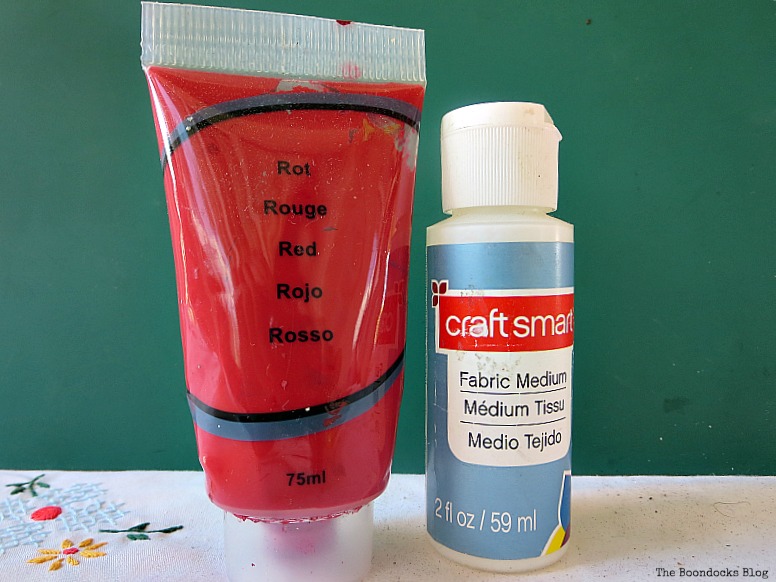
Of course once I was done I realized my mistake. First of all, I was not painting over fabric but plastic so the fabric medium was useless here. And secondly, it did not cover at all.
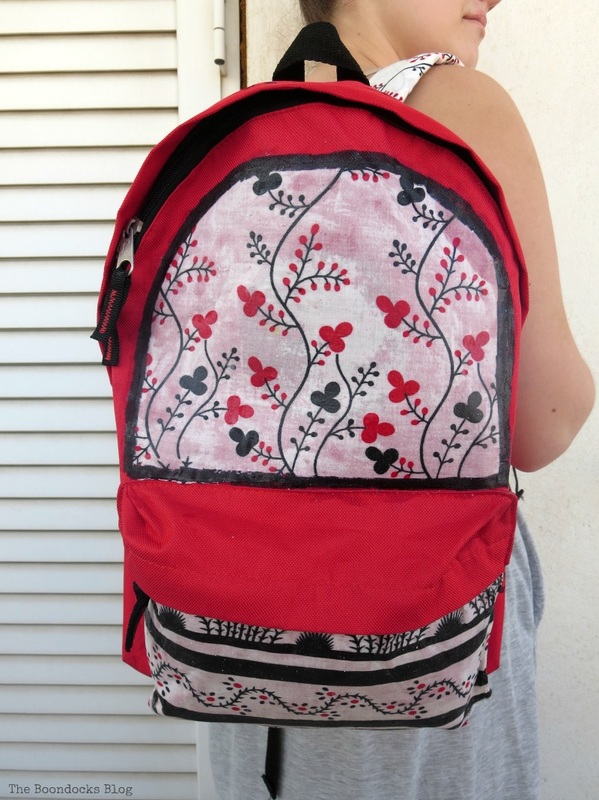
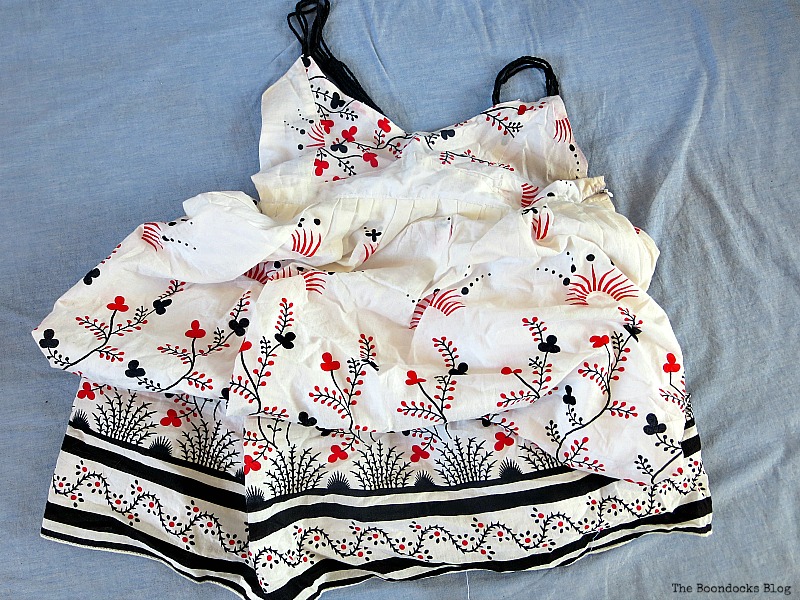
The next idea was to cover it with fabric. I had this pretty dress which was too small but loved the fabric. I’ve repurposed clothing before to make a seat cover and a pillow. In fact I make it a habit to repurpose clothing, you can see more in my fabric category.
Using plain paper, I made templates for the areas I wanted to cover with fabric.

I used a fabric glue to put this on.
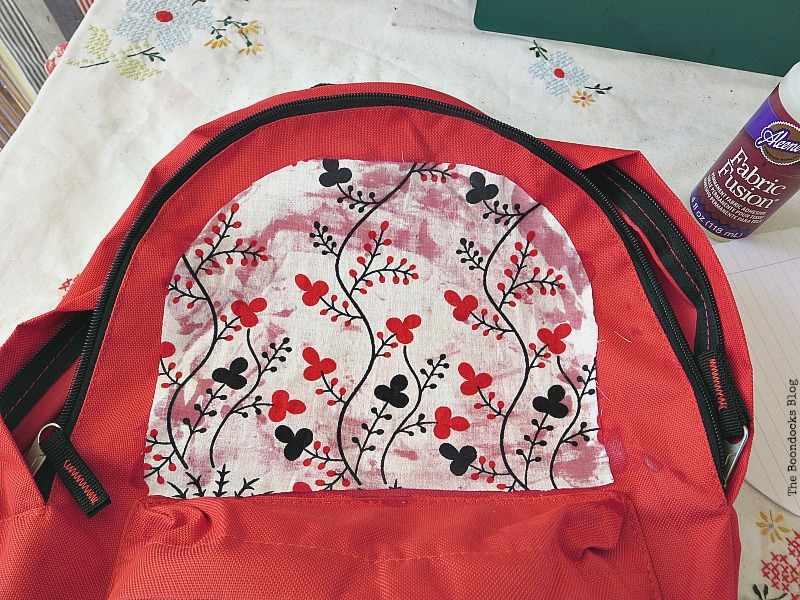
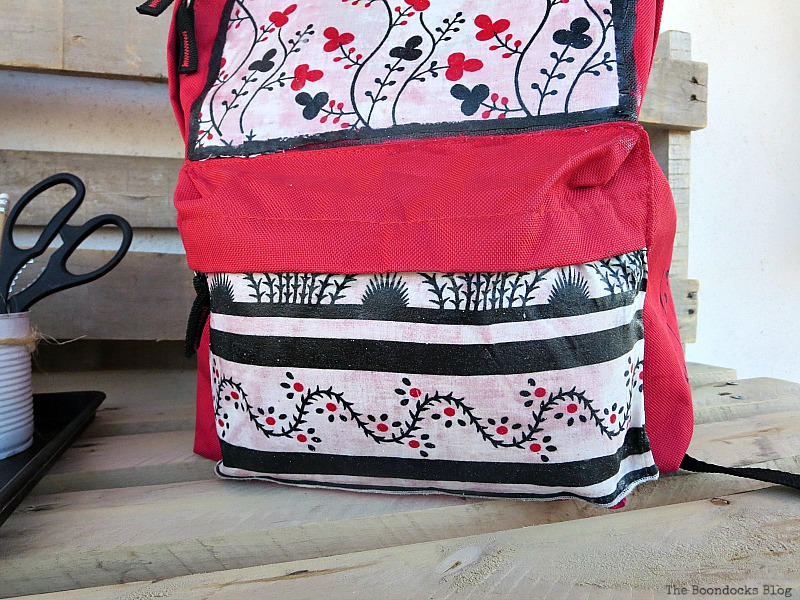
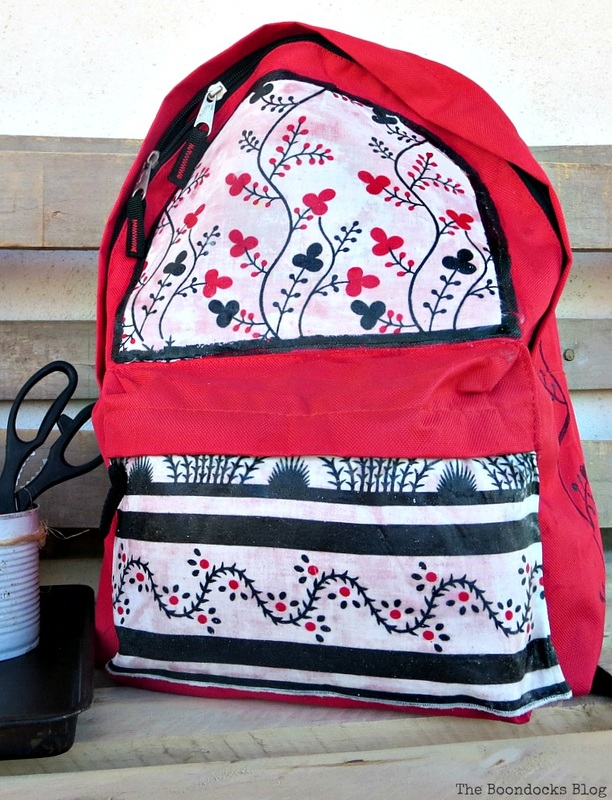
And the bottom, where the pocket is. I then applied two coats of mod podge to seal the fabric in.
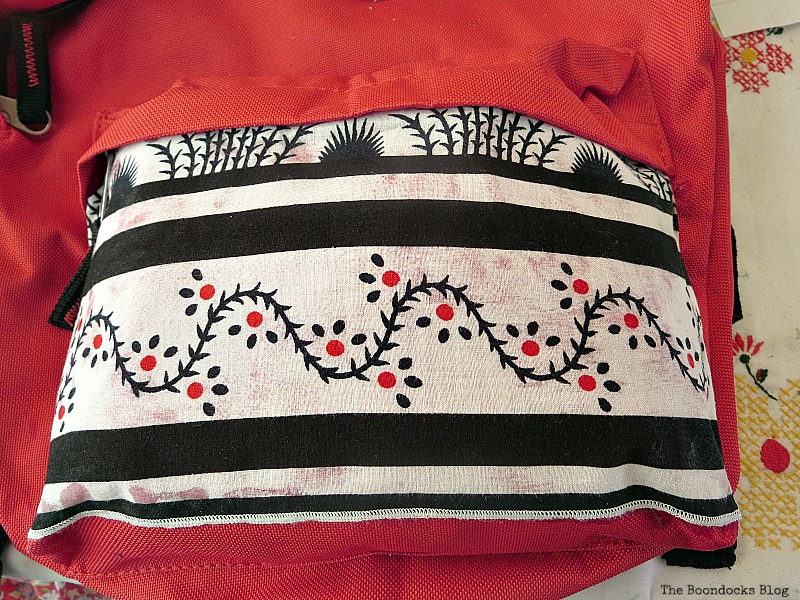
I wanted to create a border on the top section so I just traced over the border with a permanent marker.
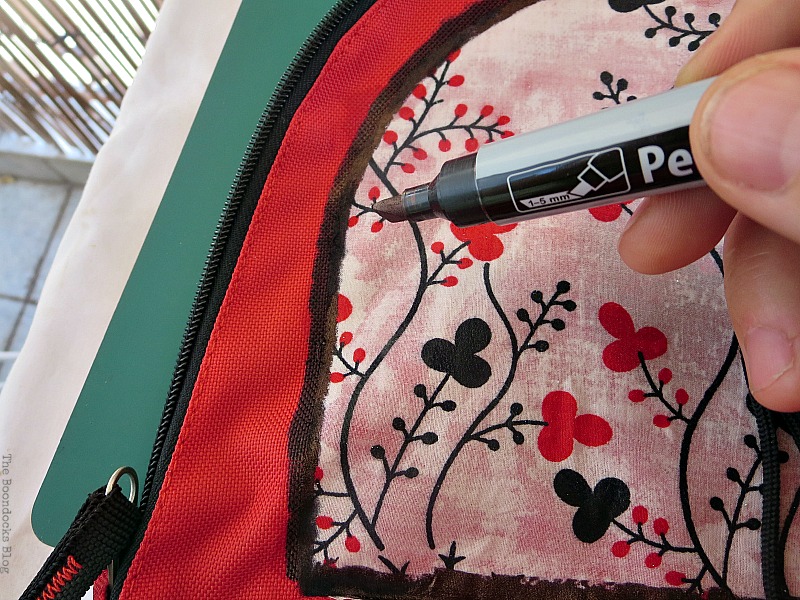
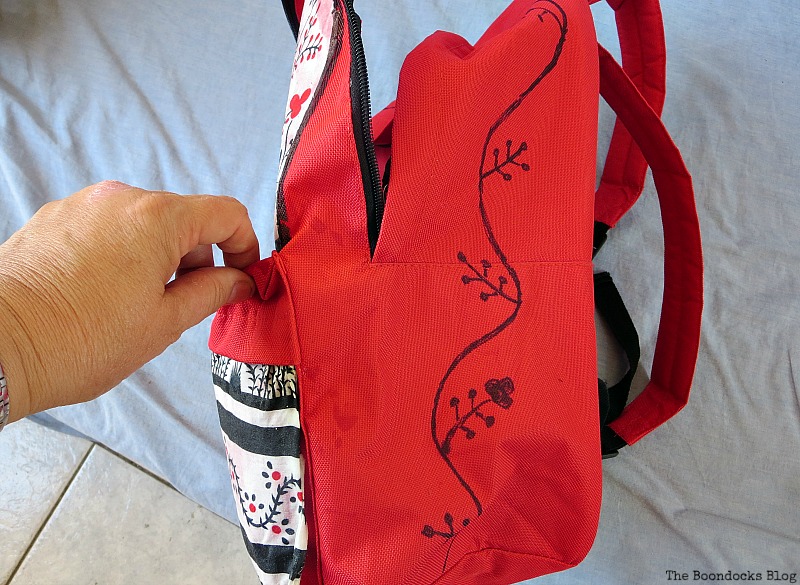
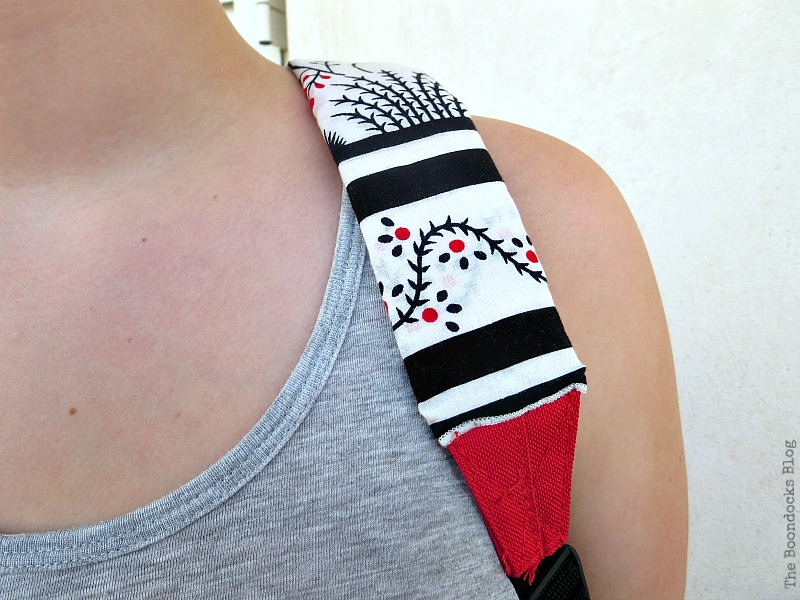
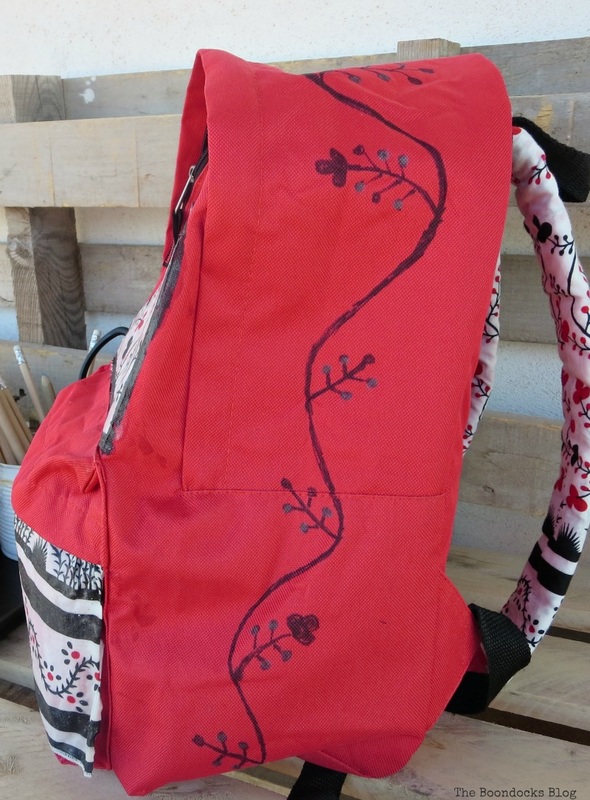
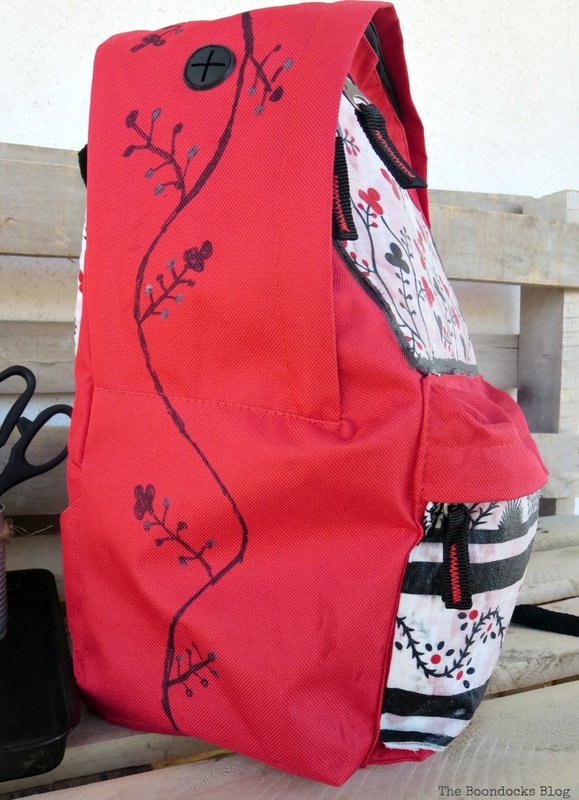
My girl wanted some interest on the side, I drew these to mimic the design on the fabric.
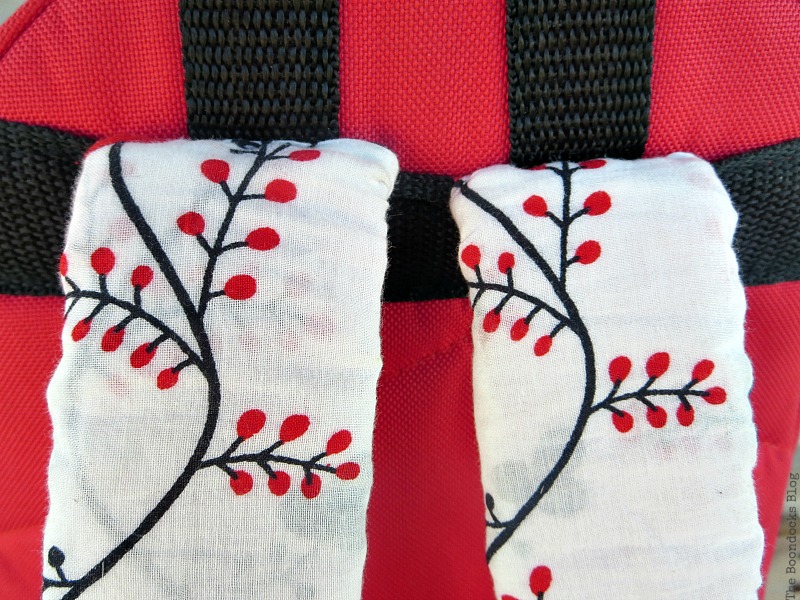
And then she asked me to cover the straps in the same fabric. I sewed them on. But of course you can just as easily use glue.


Isn’t that fabric just lovely?
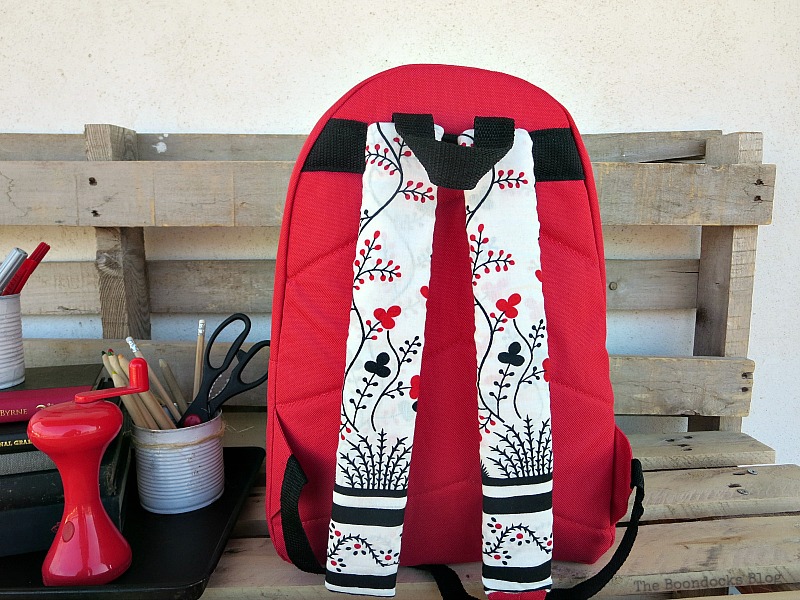
The straps look so nice in the front when she is wearing it.
I added a metallic grey marker to the flower design to give it more interest.
Related: If you’d like to sew your own backpack, check out this DIY rucksack sewing pattern at Sustain my Craft Habit.
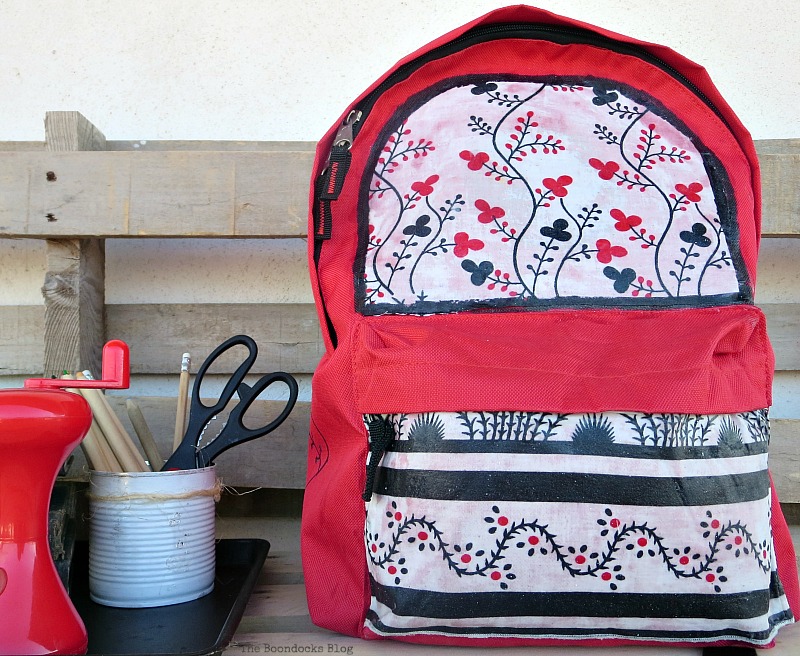
The old backpack makeover is finished just in time for the beginning of the school year. It looks nothing like the before, it is pretty and feminine with the choice of this lovely fabric. And most importantly you cannot see that childish sticker that is hiding underneath.
I believe I went above and beyond with this DIY backpack makeover using old clothes, not just covering the sticker but also adding so much more to make it truly unique. My girl loves her “new” bag and that’s all that matters. What would you have done with this childish bag?


If you like what you see, share it with your friends, or save it on Pinterest. If you really like what you see subscribe to my blog and get my adventures twice a week in your mailbox.


What a transformation. From boring to all grown up and groovy. I love how feminine this school bag is now and there’s no mistaking it for someone else’s either.
That is exactly what I was after Stella. Something totally unique just for her.
Aww Mary it’s beautiful! I just bought a new bag for my daughter, her old one was broken….maybe I should have bought a plain one and made it look pretty with fabric like you did. What a cool idea and the fabric matches that backpack so perfectly, it really turned out so pretty! No wonder your daughter loves it now!
Katrin you can always transform it later on if she gets tired of it. That is if it doesn’t fall apart first. That can be a problem too. I have been through so many bags with 4 kids, more than I care to remember.
Wow Mary, you can see the bag was made with so much love and you chose the perfect fabric. It’s stunning, so much better than the before. I hope you’ve got a few more of those plastic bags lying around, the other kids are going to want one too.
That’s what I always try to do Michelle, put lots of love into everything I make. Otherwise there is no point to what we do. The boys are not in school anymore, thank goodness and the other girl paints on her schoolbag. So I’m done …whew!!
No wonder why your girl loves that bag, Mary, it is lovely!! When I saw the after picture I would have never imagined it wasn’t like that before, I thought you bought it in a shop! The dress was perfect for it and I agree with you, it gives the bag a pretty feminine look. Are the girls happy to go back to school?
Words to make me happy Pili. It looks like it came from a shop! Thank you my friend. The younger one is l ooking forward to seeing her friends, and the older one is nervous because she is going to a new school this year, new adventures.
This is adorable Mary!
I love that you used the fabric from a dresser. Now an ordinary backback is delicate and unique.
Great job!
Patricia.
Thank you Patricia. We gave it a whole other life.
I love the bag; it’s so pretty. Great fabric too!
Thank you Carol. Yes the other one would not do for my girl at all.
What a beautiful remake, Mary! The fabric really makes the backpack pop! And I love the added flower design along the sides! How creative!
I too really love that fun fabric Gail. It is perfect for a young lady.
Mary, I love this bag now!! That fabric is so beautiful and perfect for your girl’s backpack! I also love the designs you made on the sides, very talented artist!! What a fantastic repurpose!!
It was pretty awful before Keri. That bus had to go. I am really happy with it and happy that my girl participated in the process too.
It turned out very nice. I would not have considered doing a complete “make over” on the back pack. I probably would have just stuck it in the closet or given it away. This solution was much better and more useful.
You know me Krista, I’m all about reusing old things. I got to repurpose the dress and upcycle the bag. A win-win in my book!
This is so fun, Mary! Can’t believe it’s time for school already.
Larissa, the summer just flew by. At least the kids will be ready for school with bags like these.
You’re most definitely the ‘repurposing Queen’ of blogland Mary. I love how your transformed this backpack into something adorable!
Thank you so much Doreen. It was a labor of love and one that I did with my girl which makes it twice as special.
Mary, you did a fabulous job on the bag. I do believe you went above and beyond, it looks so pretty. I love the fabric, it goes perfect, like it was made for it. It never would of crossed my mind to add fabric.
Your daughter will have a unique and one of the prettiest bags in school.
Linda, I would do anything for my girl. I wanted her to have a special bag that no one else has.
Super cute!! Love how you customized the backpack! It is so feminine and pretty. Good thing you finished in time!
Yes Erin, we still have two more weeks before school starts, and in this girls case it won’t really get under way till October. You see here in Greece we like to take our time.
Great job! Wish this had been one of the examples in my back to school post last week!
Oh.. That is too bad. Because we start school so late, I don’t even worry about school yet.
Well that’s just cute! I love how it turned out, projects like that are so rewarding :o)
Tania
Oh boy are they! In fact my girl took it out for a spin today and got lots of compliments.
Mary, I love this one!! The fabric idea is genius!
And it is also your favorite color, that’s why you love it.
I still use backpacks in my work line and it’s really hard to find one that is stylish as yours! Great makeover!
Well now I’ve got you thinking maybe you can transform one too. Thank you Katerina for dropping by.
Mary, this is such a clever idea! I wish I had been as smart as you when my kids were in school. Could have saved lots $$$ because they aren’t cheap. Pinned to share 🙂
I know just how expensive they are Marie. I had 4 kids in school at one point. And they wear out so fast. I wish I had been as smart years ago to do this too.
I love the bag! It is so creative what you did with the fabric. Of course I just love red, black and white. I am not so creative so I probably would have just stuck a different patch over the original one!
AnnMarie. We really needed a more grown up look for this bag. She is a teen and did not want a school bus on there. Although red is not her favorite color, she does love Black and White, so this was the perfect solution.
So cute! What I like most the personal touch!
Happy Back to School!
Thank you Ilka. Happy Back to School too. You are very creative, I’m sure you could easily do this if you had to.
Lovely makeover, Mary! That backpack is much more appropriate for a teen. I just love that fabric! Your daughter is so lucky to have such a creative mom to help her out. 😉
Celeste you know me, I love a good challenge. And I just could not see myself leaving it like that, it was pretty awful before. Now we are both happy with it.
Mary – this is my featured pick for this week’s Over the Moon Link Party! Thanks for linking up!
Cathy thank you so much for the feature. I am always happy to join your great party.
Mary, I LOVE IT!!! That fabric is so cute…pinning 🙂
Thank you for sharing at TaDa Thursday!!!
Thank you Susanne, it was such a fun project.
So clever and cute!
Thank you so much Andi, gotta keep the kids happy.
I absolutely LOVE this back pack! I love it even more knowing that you repurposed fabric from a pretty dress! This is such a great idea!
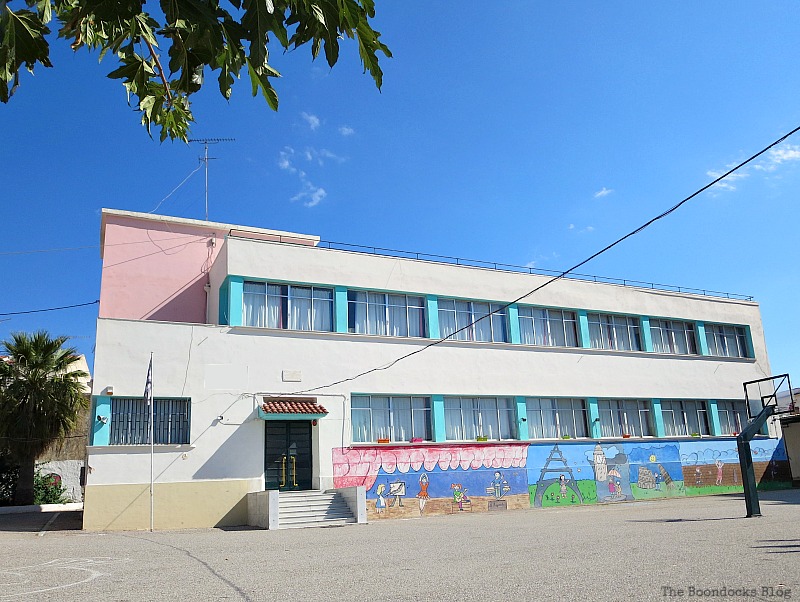
And I also love the picture of the school. The mural is pretty!
I know you can make one of these in your sleep, you are so talented. I hope that I have inspired and that you share with us whatever you make for your little girl.
What a cute backpack! I would never have thought of using an old dress…now that you bring it to my attention that is exactly how my grandmother made my quilt. She used the scraps from the cloths that my mom made my clothes from. Adorable!
There are so many ways we can use old clothes that it is a shame to get rid of them Debbie. I have a real fondness for pretty fabrics and try to use them as much as possible in my crafts.
Love how this all turned out, the fabric is perfect for this backpack, and I am sure your daughter just loves it!
Marjan, my daughter loves it, I love it, her friends love it… the list goes on and on. I am really happy with the way this turned out.
Stopping by to let you know you are a feature this week on TaDa Thursday…love the back pack and your blog!!
Thank you so much Susanne. I will tell my girl about this for sure.
Hi Mary: I love this makeover, you once again have taken a unused article and gave it some love to make it useful again. So much better than having the same old out of the box article as everyone else has. My favorite part was the addition of the fabric to the straps.
Who wants to have the same old out of the box look. I have found that since I started blogging my house looks like no one else’s. That is the beauty of blogging. No one has my table because it has been redone. No one has my.. you get the idea. I love this aspect of blogging Leanna.
I absolutely love this makeover! So creative 🙂
I love the makeover it is always good to make things new, it looks so much more interesting now.
It really needed to grow up a bit! 😉
This is so creative and original, I love it#mondaybloglinky@_karendennis
Thank you Karen I wanted my girl to use the bag but to also be happy with it.
Wow, great repurpose of both a backpack AND a dress. Way to save money and reuse what you have. Visiting from Brag About It party.
Thanks Victoria, you know how picky kids can be! And when they become teens they are even pickier!
What a fantastic backpack! I can’t believe you make it from a dress. Well done!
I had to do something and my girl really liked that fabric pattern.
Super makeover! This is adorable. I’m always so impressed by your creativity and ability to up-cycle materials into ‘new’ creations.
Carol (“Mimi”) from Home with Mimi
Thank you Carol. This one was done to keep my girl happy.
I love the make over! and you show us how to do it!
Thank you for inspiring us at our Back to school link party at #Celebrate365!
Come on over and party any time!
We all want the best for our kids but there is no reason to break the bank. I hope I have inspired.
Looks great Mary, and your daughter likes it which is the main thing after all!
I would probably got a badge or patch to cover the old logo, not very imaginative!
Julie it was pretty pathetic before. It needed to have style and character. After all my girl would need to have something unique. Thanks for your sweet comment. The older they get… well your probably don’t have 18 year olds. …Ahh it only gets better. 😉
Oh my goodness! That turned out so cute! What a great way to carry just a few books and definitely more age appropriate. Thanks so much for sharing with us at Celebrate365.
Thanks Carlee it would not do to have her running around with that sort of bookcase.
This turned out so nicely! We have a few plain color backpacks that adding some color to would be fun. You should drop by the Ultimate Pinterest Party on Friday and share this fun project!
Thanks Ali, I’ll come on by.
The bag looks great and so does your new site! I haven’t visited in ages 🙂
Thank you so much Anna. The bag really does look much better.
What a great makeover! So unique!
Thanks Allison, I try to reuse everything that I have at home.
Love your update of the bag using the dress it is gorgeous Mary
Amber there is never a reason to not try to update something.
I just love customizing things like this! So happy you shared it with us at #FridayFrivolity!
I’m glad you reminded me to pop over. Thanks Lisa.
Hello Mary and Ladies!
Super cute idea with this backpack upcycle, Mary!!! I pinned several of the photos and because I don’t have any kids in school anymore {except some college classes for Amy} I thought I’d share this for others who do. Hopefully a bunch of folks will come over to see it and try it themselves!
Really cute!!! Glad your daughter loves her “new” backpack,
Barb 🙂
Barb you saw the before. No self respecting teen would be caught with something like that. And yet it is a very sturdy bag and it would have been a shame to get rid of it.
Absolutely fabulous makeover!
Michelle that sticker had to go!!
What a cool makeover! I absolutely adore the idea to use old or not used items to decorate another one. Recycling and reusing should be an habits for all of us! And if you have such great taste and sense of aesthetic, the result could really be surprising! Good job! I love it! #Senisal
Thank you Silvia. I really loved the pattern on this dress and just had to find a way to use it somewhere.
This is such a cool project, Mary, and so sustainable too! Thank you for sharing with the Hearth and Soul Link Party. Pinned and shared on the party page!
Thank you April. I really loved that pattern on the dress and was determined to find a place to reuse it.
So very crafty and artistic. The colours also go together extremely well. Great job!
Thank you Deborah, it would have been a crime not to use this pattern.