How to Use A Mood board to Get Results for DIY Projects
This may be the hardest post I’ve ever written. Let’s plunge ahead and see where…
I have never done a mood board before so you will have to bear with me. Now you may say “what business do you have doing mood boards when you are a DIY blogger”. And you would be correct in that statement. But a few posts back when I showed you the shelf makeover I asked if you wanted to see a mood board for the bedroom and I got positive feedback.
So here it is, warts and all. Because in the end it will help us see results for the DIY projects that need to be done in this room.

We have two bedrooms in this home and we opted to let the girls have the larger one since they have more stuff. Did I really think I had less things than the girls, when I came up with this foolish decision?
Anyway it is a small room and it has to function as bedroom, office and craft storage since all that has to go somewhere.
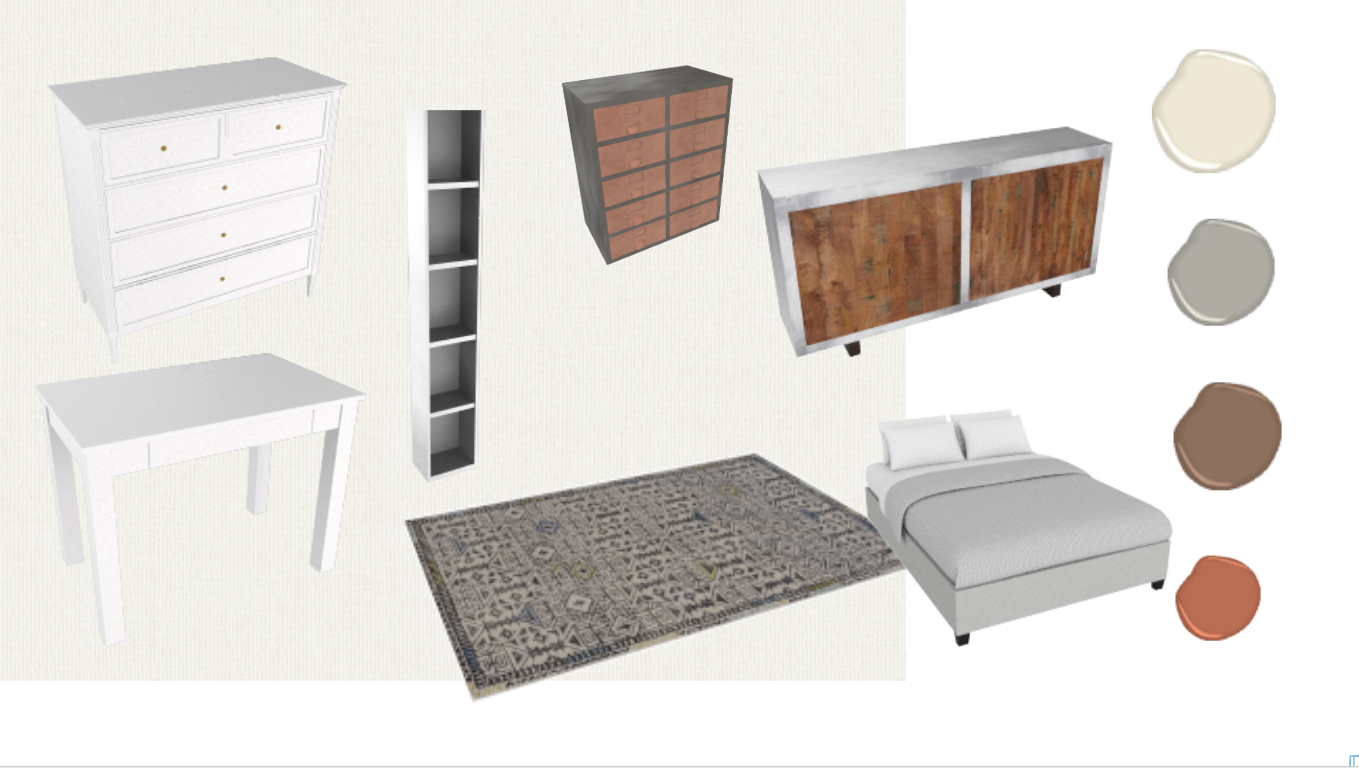

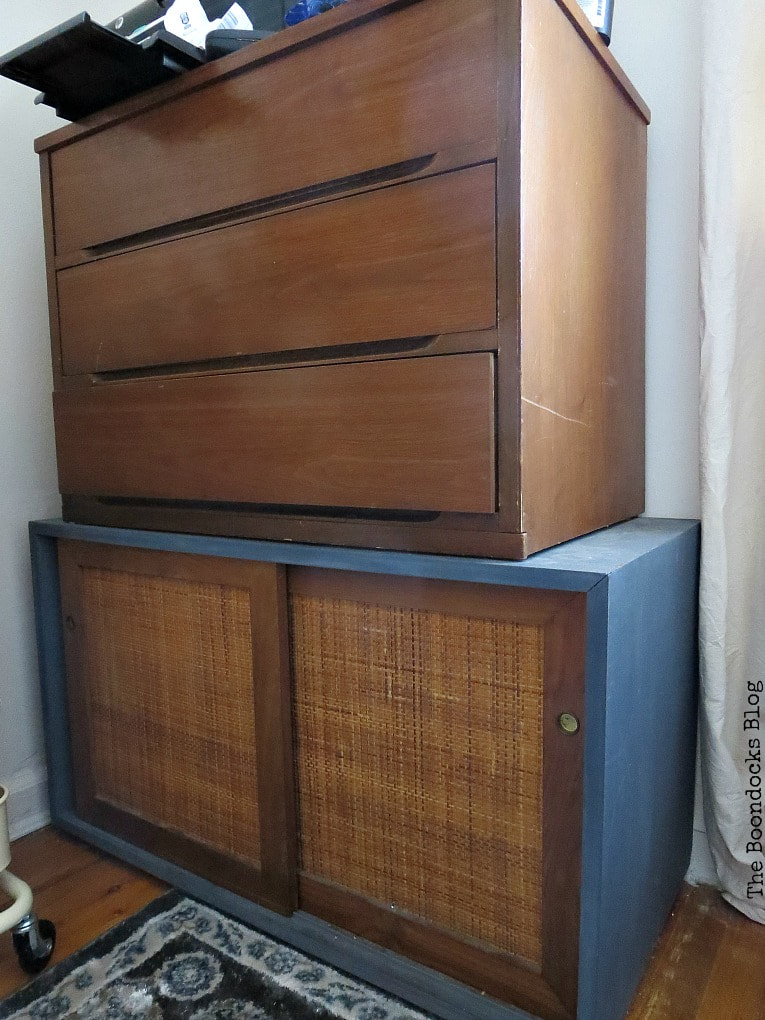
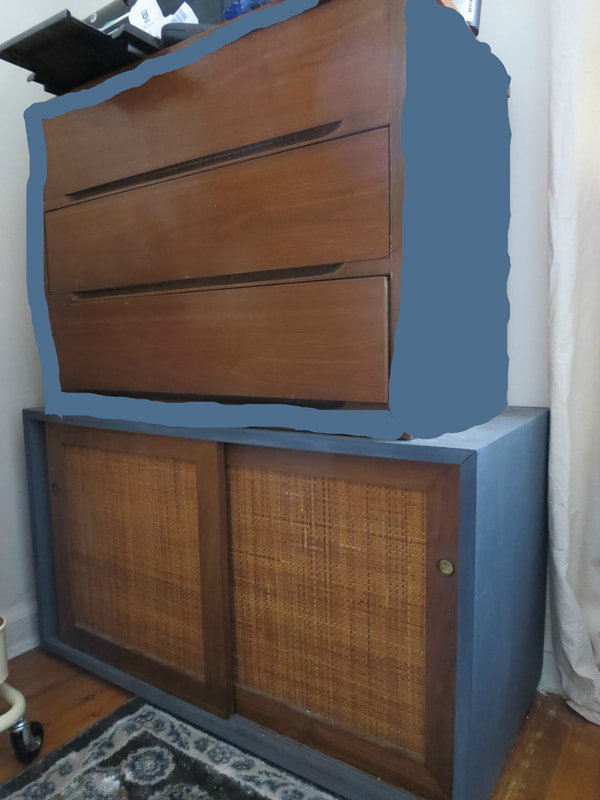
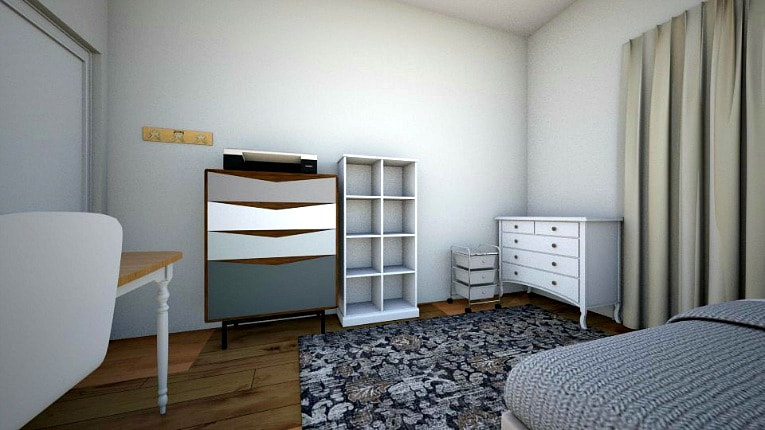
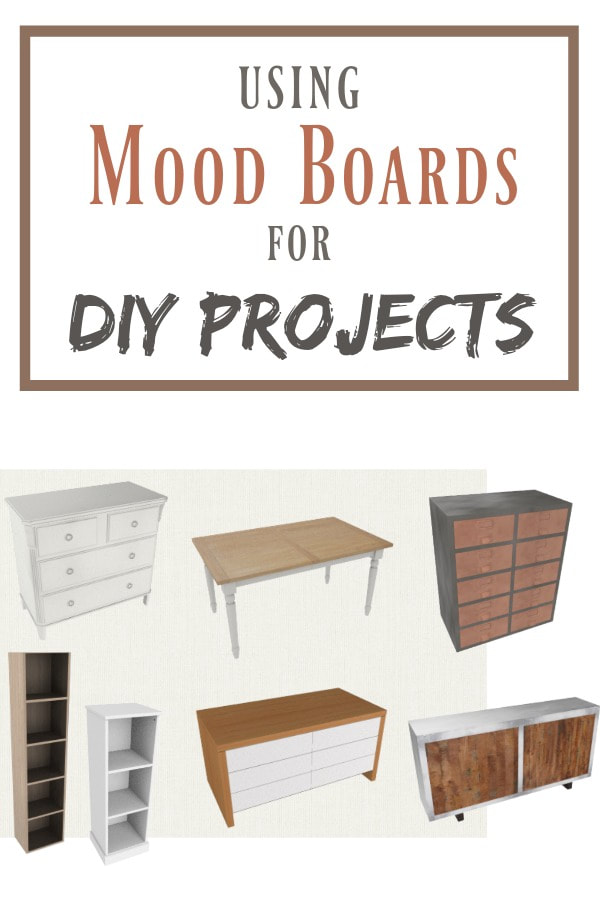
The thinking here is that I don’t have the space to place each piece on the floor so this way by placing them one on top of the other I conserve floor space and also get a piece which is more practical than before. You can see I have my printer on top of this unit.
Disclosure: The items below are affiliate links. If you purchase any of these products through the links, I receive a small commission, that way I can continue to provide you with lovely content. There is no extra charge to you for purchasing through my affiliate links.
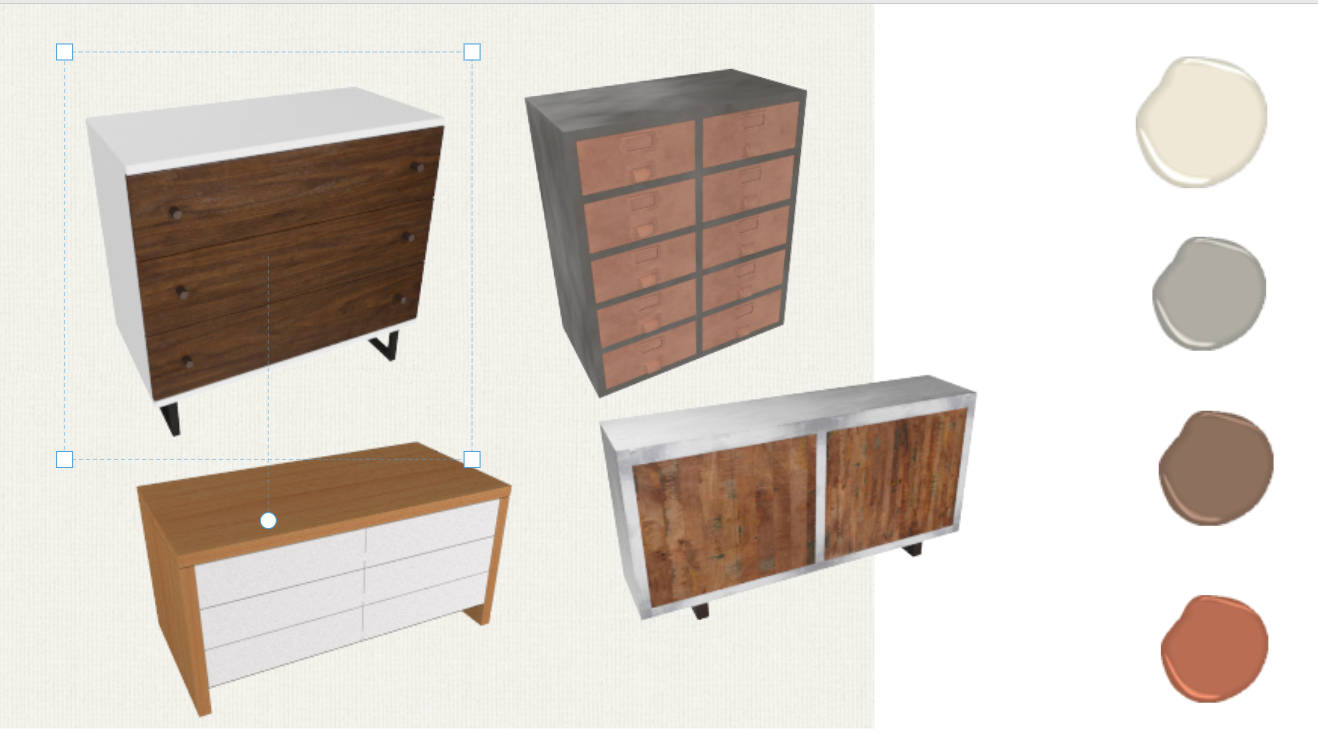

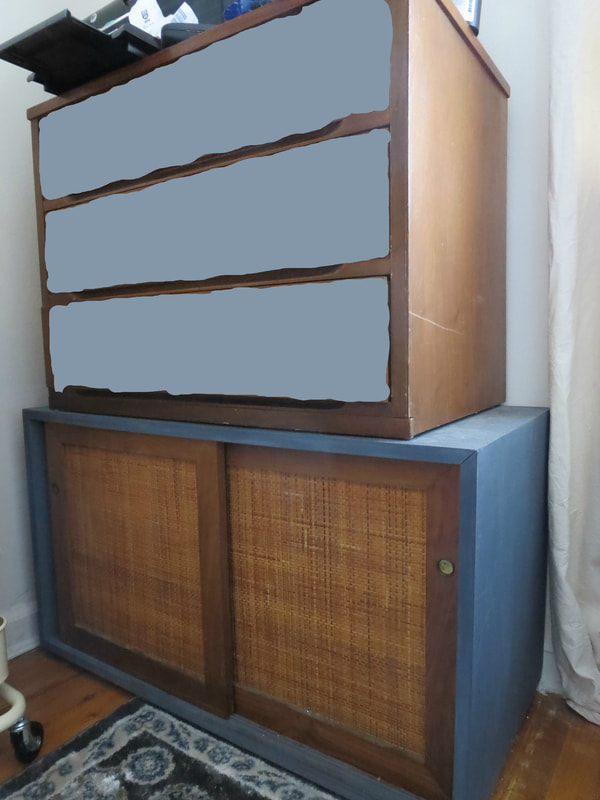
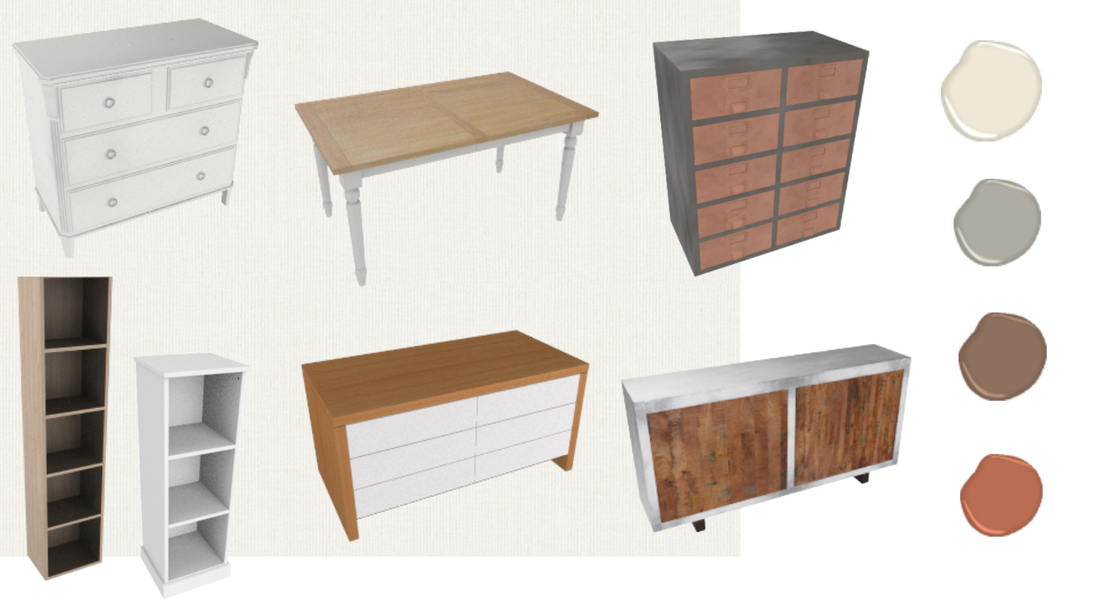
Below are crude mock ups (some days no amounts of coffee will improve your editing skills) of what the pieces would look like.
I could even paint in the openings for the handles in the first one.
|
|
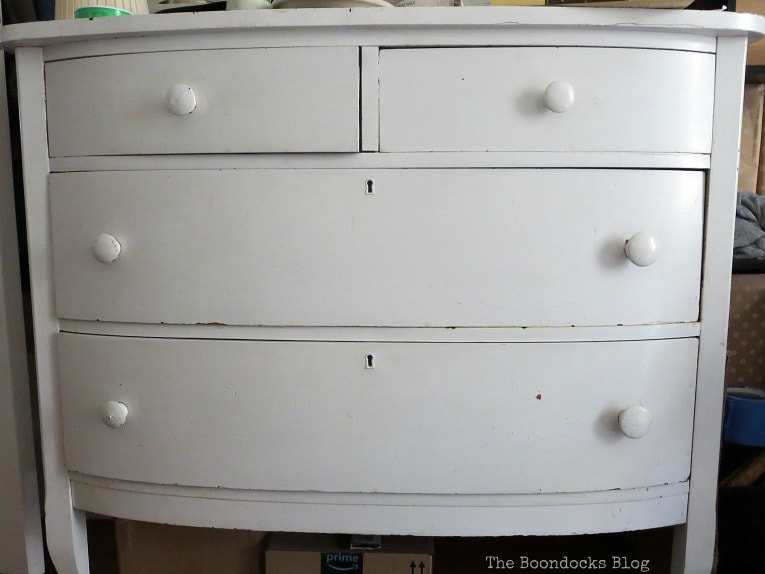
Below is a photo of one of them. As I was adding the watermark to it I found myself thinking “what am I doing, there is no way anyone would want to steal this photo from me. In fact I don’t even want to see it again!”

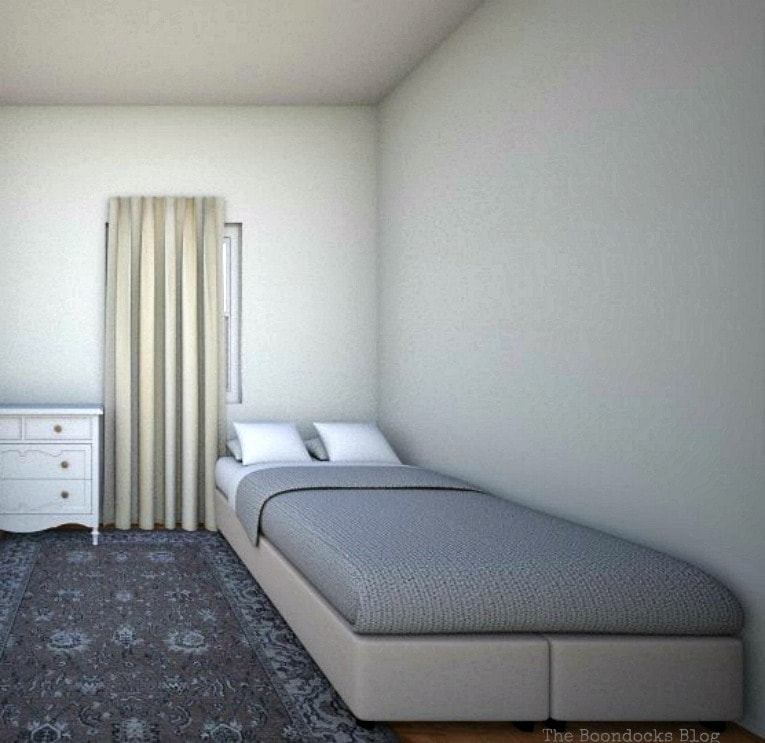
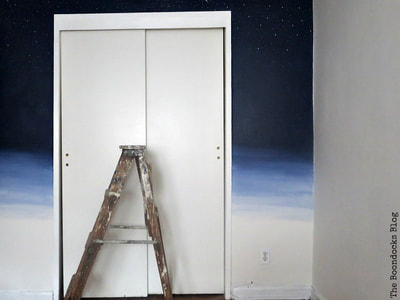
And of course there is a bed in the room. It is just a mattress on a frame at this point and it will be placed in the corner of the room. I am thinking of adding a short headboard that will not collide with the window sill. Yes the room is that small.
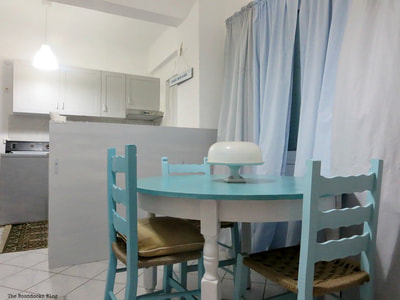
The room will also have the bench and the natural wood chair that I’ve already finished.
I made this room planner from the RoomStyler site. Love it, it let’s you manipulate your furniture all over the room and get 3 D images of it. So much fun, I can spend all day doing this! And I was not paid to say that!
If you’d like to see some more pretty mood boards for bedrooms head on over to Fox Den Road. Doreen has come up with some stunning looks here.

Now I want your opinions on all the above!
The dresser stencils: yes or no?
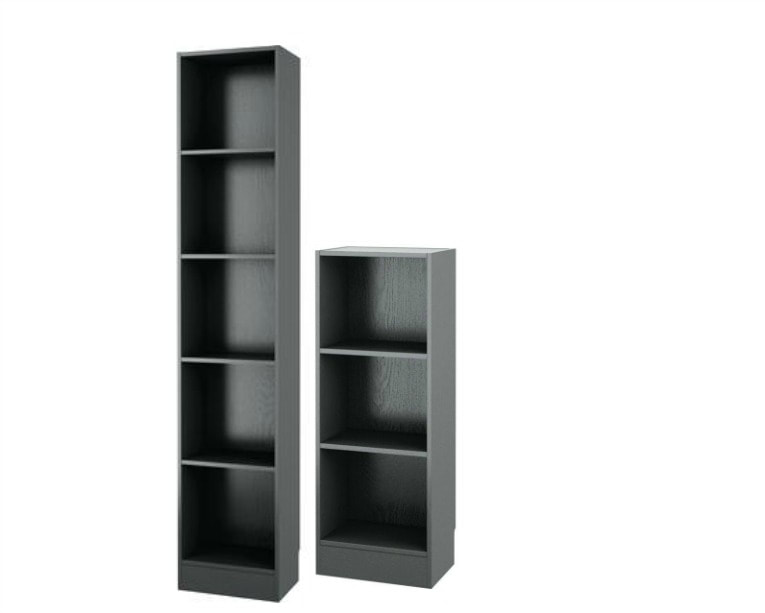
The bookcases: decoupage and white or something else?
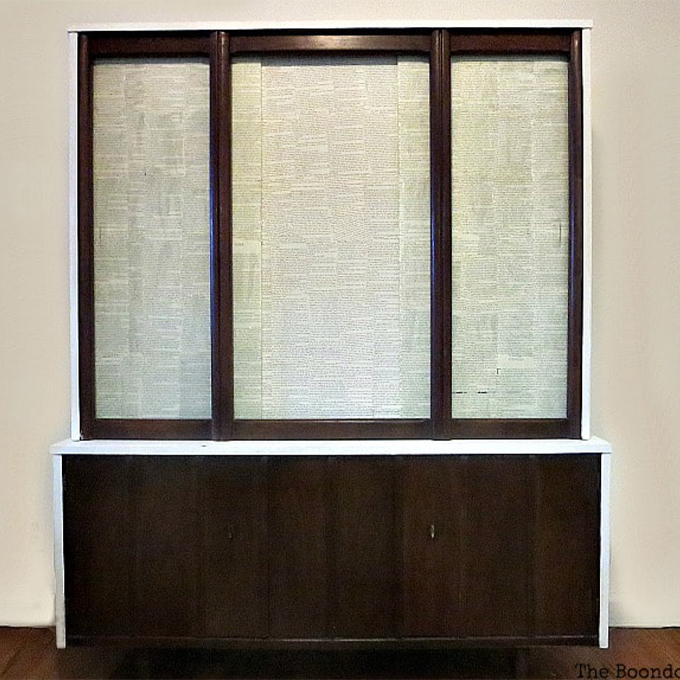
And that MCM thing I put together: grey with wood on the interior or the other way around for the top portion?


This blog is for entertainment purposes only; my DIY tutorials are not professional advice. Read my full disclaimer here.
I love it when I get your comments and I will try to reply to every one of them. Please do not add a hyperlink to your comment, otherwise it cannot be published.

I would paint them all the same, a soothing colour. If you have to choose a motif, use the grass cloth on the cupboard as your inspiration. Remember the primary purposes of a bedroom, to sleep, and one other, so hide clutter away.
Next time you replace your bed, get one with drawers underneath as they can replace one dresser in a small room.
Regards Cath
No amount of drawers will save me Cath! But I really like the idea of using one color.
Just make sure you have on clean drawers when you cross the street, in case you need an ambulance 😉
I live in a mobile home and sleep in the smallest bedroom myself so I understand all about small rooms.
To reduce the look of “clutter and to much furniture” in a room I go with painting furniture all the same color when ever possible.. and many times painting it the same as the wall color so it blends in. Then one piece can have some stencil work like that dresser you showed us. As long as that same accent design is included in other parts of the room in small amounts (such as on the inside back of the bookshelves and a small pillow on the bed…) you are good to go without making things look over cluttered.
I am thinking of painting those narrow bookcases a cream to match the wall. I am really rethinking the stencil at this point, I’m afraid it might be too busy. I guess I’ll be able to envision it as I go along. Thank you Carol!
I like the idea of painting the shelves white and decoupaging the paper to the back.
Is all of this furniture in one room? I would make it basically all one/two colors to be cohesive! If you add stenciling to the dresser also add it to the two dressers that are stacked. It would help to see the whole room and what you have in it and if you are fitting all the above in it.
Cheryl yes all the furniture is in this room. You were right that it is hard to envision without a floor plan so I edited the post to include a floor plan and a mock up of the other wall opposite the bed. I am rethinking the stencil as it may be too busy for the room although I really love that look.
Individually you have some great furniture pieces but they are all different styles. So to pull them together I would suggest painting them all the same color. Maybe whitewash the tabletop and cabinet doors instead of solid white.
Vicki that is the big dilemma. Trying to unify all these different styles is one room. I am definitely going to paint the bookcases a cream color or white but what about those MCM pieces. Do you think they would look good in white? Whitewashing sounds like a great idea.
Hi Mary – what are the dimensions of the room? Do you have a floor plan you can share us that shows where everything is placed now?
I feel like this is just as much an exercise in space planning as it is decor so it’s helpful to get an overall picture before I can weigh in on an opinion 🙂
Sara I just edited the post and added the dimensions and a floor plan. I hope that helps.
I like the idea of the mood board because we can learn so much about the process that comes between inspiration and creation. As for the input, I vote yes for the stencils but I’m a little skeptical for the bookcases as I love black. I guess as you go you’ll get a better picture about them.
Katerina this is quite a process. So much indecision on my part. I also love black but the room is too small to carry it. It just weighs the whole room down. I added a mock up of the wall where all these pieces will go.
When looking at the bookcases, I immediately wondered if they would fit on top of the white dresser to add visual height beside the window. Paint them a unified color with perhaps pretty pops of color on the backs of the shelves and add pretty knobs with the same color on the dresser (Hobby Lobby is your friend). No need to stencil the dresser this way. The bed is always the focal point in a room but with yours shoved in a corner (and I get why), you’d be creating a focal WALL. Add some of the same color (pattern) in your bedding or with pillows to unify it all.
As for the double dresser I would unify them by painting the sides white and leaving the drawers on the top piece stained. On the bottom piece the wood frame around the door looks to be the same color wood. I would leave that alone and whitewash the middle. Then the piece wouldn’t look so heavy, as it does now. I would also center the unit on the wall, offering some white space so the room doesn’t feel too cluttered. Add a pop of color above it with art.
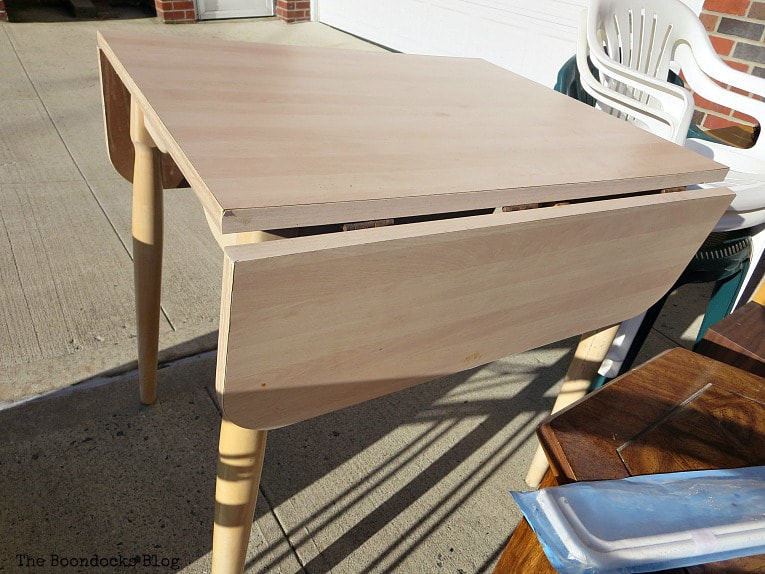
I like your idea of painting the table legs white and perhaps add a cushion onto the white chair to bring some of the color on the focal wall into that vignette.
Just my two cents! Can’t wait to see what you do with the room 🙂
I like the idea of adding the bookcases on top of the dresser but they are way too big. I guess the mockup does not show that very well. I do need new knobs you are right.
Maybe I could also paint the bottom piece white on the sides to create more unity so I wouldn’t have so many colors in the room.
Thanks Marie, you have given me great direction! 🙂
I think the room needs some print. I would go ahead with the stencil. I would also add some print to the bed with pillows or a comforter cover. Make the bed layered with colored or printed fabrics. I would then paint some of the wood things to match each other. A few mismatched wood finished are good, too many make it look like garage sale leftovers. You are on the right track!
I am thinking of adding print in the form of pillows. I already have a busy rug so too much might be well, too much. I certainly have my work cut out for me Michele!
I have two white dressers in my bedroom, one tall for me, and one short for hubby. My tall one needs updating badly, the paint is peeling to reveal that a previous owner had painted it bright red at some point. Two of the ideas that I’ve liked is to use lace as a stencil or to decoupage with printed paper napkins.
I also like to decoupage things and am thinking of doing it here as well! Thank you Josephine.
I have been looking for a room styler like this program! I’m so glad you shared!
I love this program. They have a huge variety of furniture to pick from so you can customize the rooms.
Mary, I need to pick your brain because I need to redo my den and I want to do a mood board to get my thoughts on paper. As for my advice? I know whatever you do it will look fabulous.
Debra the more blogging I do, the more I want to do things right and this for me is a big help in visualizing the room.
What a fabulous program and design tool to use! Thank you for sharing it Mary!
I hope you can get some use out of it Sam, it has been a life saver for me.
Great ideas and tutorial, Mary! I like the new desk… not sure if I would paint the top or not. Hmmmm…
Hmmm… that’s just how I feel Julie!
OK Mary, I’m going to make a few suggestions or give my thoughts. Again, I know your room is small, but just giving you thoughts to ponder. Is there any way you can add short legs to the sideboard? I know you have a printer on top, but maybe have a nearby folding stool to play with the ink, etc. Also, I’m thinking what about painting the chest on top and the sideboard all the same color, but leave the cane and paint the trim around the cane another color that will blend with everything, just to make things pop a bit. I would go with the stenciling, but keep it less busy than what you’ve shown, or paint a very simple design on it, like with flowers or birds or whatever theme you have in mind for this room. Let the color of the stencil or painting be the same color as the trim around the cane. If at some point you can replace the bed, get a frame that will allow you to store some of your craft items under it with something on rollout wheels. I’ve had beds against the wall in the past and it’s not great for trying to make the bed or for the other person to get in and out. Is there anyway you can move the bed to one of the other walls and maybe have your worktable or other chest next to the bed to also use as a nightstand table? With the room being small, I would eliminate either the chair or bench and just use one of them.
Carol you have really given me food for thought here.
I would not add short legs to the sideboard because I think the weight would be two much especially with two cabinets on top.
I am seriously considering going off white with the sideboard and top piece to make it more unified.
As for the stenciling depending on how things progress I may just eliminate it altogether.
As for the placement of the bed, if it is placed any other way it closes up the room too much. Now that I’m looking around I may just play around with it and see how it looks. The only thing that would suffer is the flow of the space.
Thanks so much for all your invaluable input!
My 2 cents – Paint everything one color (gray or white) but to unify them even more, get new knobs for everything, including the mid-century chest. Move the bed away from the wall and put one of the book shelves on the other side. Even if the window isn’t in the middle. Look forward to seeing what you come up with!
I agree with you about the one color. I think I’m going to go with white and make things really calm in the room. As for moving the bed, the room is so small it will take over. Thank you Cindy!
One more thing. To make more floor space, would the long bookshelf lay on it’s side at the end of the bed or on top of the longer chest piece? You could add bins to the cubbies.
I thought about that too Cindy but the problem is it would cut off the flow of the room. I have my work cut out for me.
Hi Mary, haha, we nearly gave our main bedroom to the children, but I’m so glad we didn’t. We did however partician the room so they had their privacy…I’ve heard about mood boards and how helpful they can be, but it’s all too much for brain! I get giddy just thinking about designing a room, which is why our house stays pretty much as it is… However I think the dresser with the au natural sides is better. no stencils on the dresser, but go for it with the decoupage on the bookshelf. But be warned I have no sense of style!
xx
Debbie this is the first time I have done this because I was in such a conundrum. The room is very small and I want to be able to make it relaxing not stressful. I agree here, the simpler the better.
Wow, you’ve got quite a big task ahead of you Mary. One room, 3 uses – bedroom, office and craft storage. Do you have space under the bed for more storage? And I’m not sure if you’ve tried swinging the bed around so it runs left to right instead of down to up (based on your floor plan)? That way you’ll solve your headboard dilemma and you can hang a pretty blind instead of a curtain? It will also make it easier to “demarcate” your resting area from the working area in the room.
I’m not sure how wide the dresser is that you’d like to stencil, but perhaps there’s still be enough usable space for it to stand against the right hand side wall so you can see it from the bed. Plus you would have freed up a lot of wall space on the left. You could use your Mid Century Modern Sideboard as a bedside table in that spot too.
Can you partition the room in some way? Maybe with back to back bookshelves – one that faces towards the “working” area and the other that faces the “bedroom” area? You’ll need it for all those fantasy books of yours 😉
I would also try to stick with one color scheme to bring everything together. No dark colors, just calming whites, greys with some pops of color. Knowing how resourceful you are I’m 100% convinced you’ll do something amazing with the space
Michelle I’m going to get some bed risers so I can store more things under the bed and then create a bed skirt to hide the mess. I like the idea of partitioning the room but it is so small I think the one color scheme will have to suffice. I’m going to try and move the furniture around a bit and see what I come up with based on your suggestions. Thanks Michelle.
I would first paint everything one cohesive color. And if I used a stencil, I would use one that is not very busy. I think this going to be a fun project. Furniture placement after the painting is the next very important step. Is the closet large enough to house one of the dressers?
Clearissa you are so right, the stencil is going out the door and I will use one color most likely the white for unifying the furniture.
Unfortunately the closet is tiny and practically nothing fits in there.
What a fun tool…I would be virtually redecorating every room in the house with this! Need to stay away…and my homes have both been cottages. Very small, tight spaces, but I like drama in my decor. It doesn’t change the square footage and it makes my eye happy. So I would stencil the dresser…a focal piece would be lovely in that room.
I will probably nix the stencil and add it in the living room on a table I just rediscovered. It never ends Kim!
Best of luck with all that you want to tackle. I’m one that just goes for it. 🙂 Thanks for sharing with SYC.
hugs,
Jann
I’m usually like that too Jann but this time I needed to be organized otherwise it is threatening to drown me.
Hi Mary! Wow! You’re mood board is so useful in planning! I used one a while back in my living room and it kept me on track with my decor. Your colors are soothing, love them all! Pinned!
Thanks Wendi, this project is just too complicated to not use one to help me organize my thoughts.
Making a mood board before starting a project is a great idea#ourminilinkyparty@_karendennis
It is really helping for this particular room. Normally I don’t bother but this one is too overwhelming for me.
There is no right or wrong to a mood board! It’s yours to inspire, motivate, clarify! (And yes, I’d go white on the top.)
Thank you Jeanie, it is helping me too see that I have too much clutter.
I really like that stencil pattern. That would definitely add something to the dresser.
That stenciled dresser that Mary made had me swooning. I may not use it here but I know I will have to definitely find a spot for it somewhere in the house.
Unfortunately, I never got the decorator gene. Ha! But if it were me, I would paint the 2 pieces sitting on top of each other one color to unify them. The table with the dropped leaves, I would say leave as is or paint the legs…whichever look pleases you the most. I like the small narrow shelves as they are constructed, but you could paint them a lighter, complimentary color to unify the room. Maybe even put contact paper on them somewhere. I don’t know about the stencils.
Fantastic idea to use a mood board though!
I agree with you about everything Florence. I think you do have the decorator gene after all!
I’m not one for too many colors all over the furniture, so I would paint them in one unified color and maybe add pattern with paper backings in the cubbies and maybe through a runner across the top of the dresser.
I am really liking this idea of paper backing in the cubbies Erlene. Thanks so much!
Oh my God Mary! I laugh so much with your description about the photo … you have a serious problem here. I think you have to go as much lighter colors as you can. Because of the size of the room and because you have to put so many pieces of furniture in there you have to choose light colors so your space does not look overwhelmed. I am sure you will find what is right for you 🙂
Christina it is a hot mess but I will paint everything white or close to it so it doesn’t stand out that much. I really got myself into hot water with this one. And right now it is too hot to do any painting.
Thanks Mary; the floor plan helps a lot! I hope I’m not too late to give my two cents worth 🙂 I’m going to give you advice on space planning.
Despite the small size of the room and the multitude of purposes, your bedroom should still be a sanctuary. But to achieve that, you will have to compromise on some of the pieces your already own. Between the mid century sideboard, the side table and dresser, would you be willing to sell any of those pieces to reinvest the money elsewhere? If so, you can sell them as-is or make them over to sell to get the best price.
Here’s what I suggest. Remove the closet; you said it was too small to function so take down the walls and open up the room. Move your desk into the corner. I would get rid of the shelf above your desk and replace it with closed storage cabinets – or you could even cut down the bookcases (to make them fit better if necessary) and mount them horizontally above the desk as cubby storage ON THE WALL.
The door swings into the room so takes up valuable floor space. Can you reverse it so it swings out into the hall? If not, remove it and replace it either with a sliding door or pocket door so it doesn’t encroach on the space. Beside the desk, you can put the side table with the printer on it. Hopefully it fits between the desk and end of the door entrance. If it doesn’t, and you’re willing to sell it, replace it with another piece that will fit and hold your printer. Alternatively, you could start from scratch and custom-build a new longer desk from the wall where the closet used to be to the edge of the door and hide the printer in a drawer underneath the new desk.
Move the bed to the middle of the long wall opposite the window (where the closet used to be). Now the bed is centred on the longest wall and there’s plenty of space around it. You could wall mount two small shelves to act as side tables so you both have somewhere to place a glass of water and reading lamp etc.
On the window wall where the bed used to be, purchase two narrow wardrobe cabinets to place either side of the window. This will replace your lost closet space and be way more functional. Ikea has some great ones; maximize the storage by purchasing ones that reach the ceiling. Below the window, in between the two wardrobes, place either the mid century sideboard or the dresser. Hopefully one of those will span the gap and fit under the window.
I’m going to e-mail you pictures of a new layout so you can see what I’m talking about.
If you really want to hold onto all your furniture, feel free to send me the dimensions of each piece of furniture, including the bed. I have a 3D program that I can plug it all into to see if we can make it work better for you.
Sara thank you so much for all the advice. I am not planning on selling any of the furniture as they are pieces that are dear to my heart.
The closet cannot be taken down since it is the only closet in the room and right now it is doing a stellar job of holding lots of stuff including winter comforters.
Mostly I want to work with what I have and not replace the things. I think the best way to go is to paint everything white.
The dresser unfortunately is too tall to fit under the window.
There are so many things that limit me Sara. And that long wall has a heat vent which I did not mention but it gets really hot in the winter that’s why the bed has been placed on the opposite wall.
I would love to see what you come up on the 3D program. Thanks for all your advice.