Painting a Vintage Metal Trunk with Old Fashioned Milk Paint
If you have ever consider painting an old metal trunk, you have to see this step-by-step tutorial using Old Fashioned Milk Paint!
After generations of travelling across the Atlantic ocean and back I have acquired a collection of vintage metal trunks! See how simply painting old trunks can give them a whole new life!

Painting Old Trunks
Disclosure: I was compensated for doing this post with product. However, all the opinions stated here are my own.
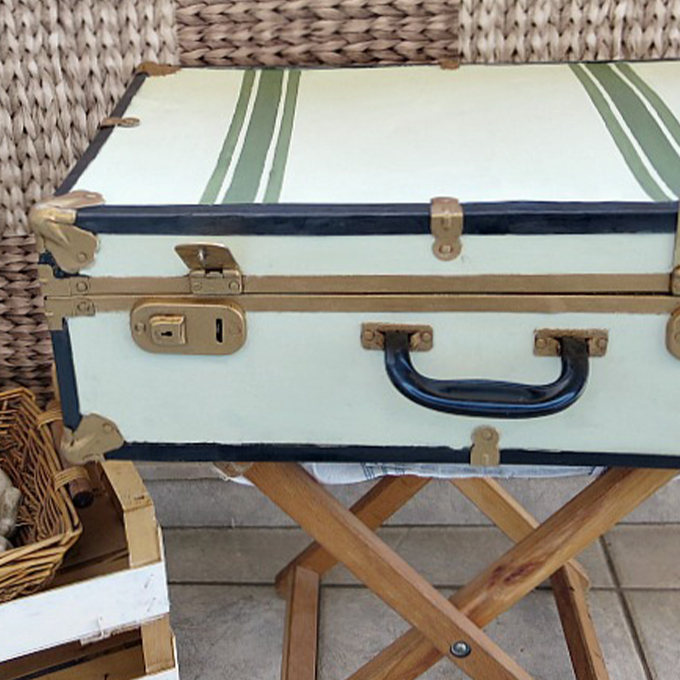
In my trusty old basement we have a whole lot of trunks. Not exactly what most folks have, but then again we are not most folks. We have traveled the Atlantic many times over. My husband’s family and my own have moved to the US and back again. So it should come as no surprise that we have so many trunks.
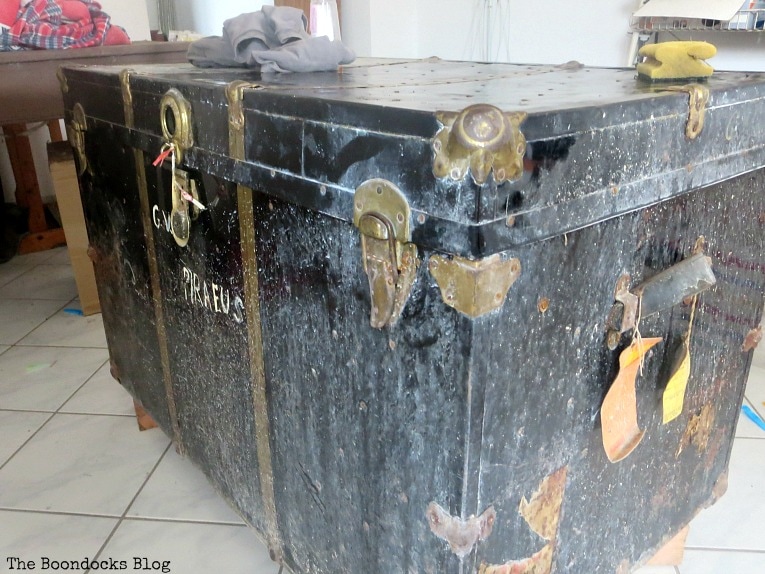
In fact, I counted about five last time I looked. One of them got a makeover a few years ago with decoupage and became the Chivalrous Trunk. But the rest were in pretty bad shape. After years in the basement (where else would they be) it was time for a makeover! I had to drag this one upstairs to work on her.
As you may know I am an Old Fashioned Milk Paint Brand Blogger and I was curious to see if this true milk paint would work on metal. And so today I am going to show you how to revive a metal trunk with Old Fashioned Milk Paint.
How to Revive a Vintage Metal Trunk
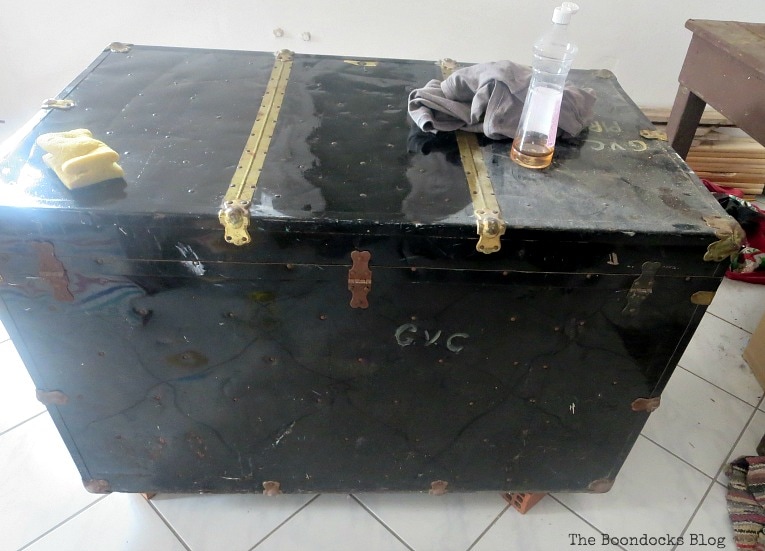
I started by cleaning off years worth of dirt and dust, using a vinegar and water solution.
I was going to paint it myself but instead I got one of my girls to do it. Nothing like having her do a little work for some extra money. My girl is an artist so I was not worried about the results. And Old Fashioned Milk Paint is safe and friendly for the environment.
I should point out here that I used the SafePaint version of Milk Paint. There is also a regular version which allows for chippiness to occur. But in this case we did not want any chips on the trunk. It already had plenty of dents. For a natural time worn look!
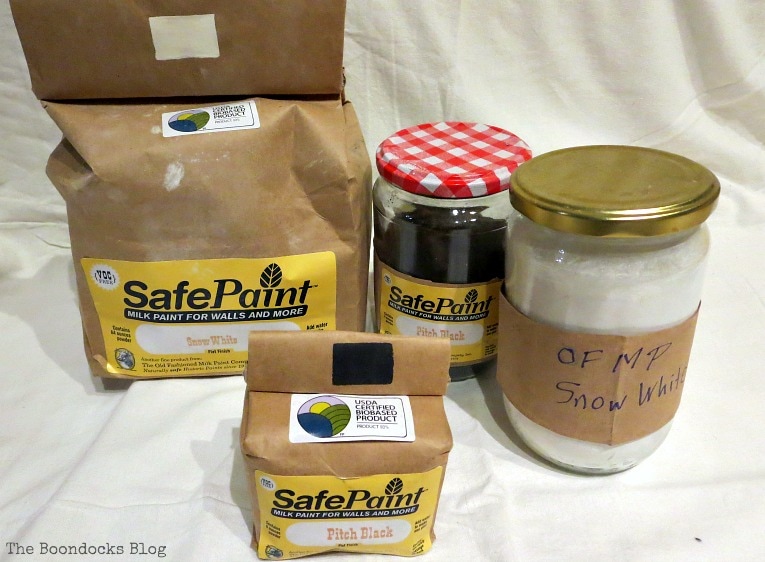
We mixed Pitch Black and Snow White to create a soft grey. This is not rocket science folks. I just added the white in a jar and then just kept on adding the black till I reached the color I wanted. Oh and I added equal parts warm water to the powder. I let it rest for about 20 minutes and I was good to go. It turns into a nice foamy mixture.
You can see just how much I love my milk paint, I ordered a big batch of it. I keep it in jars. In fact you can mix up only the amount you want and store the unused portion for up to 3 days in the fridge.
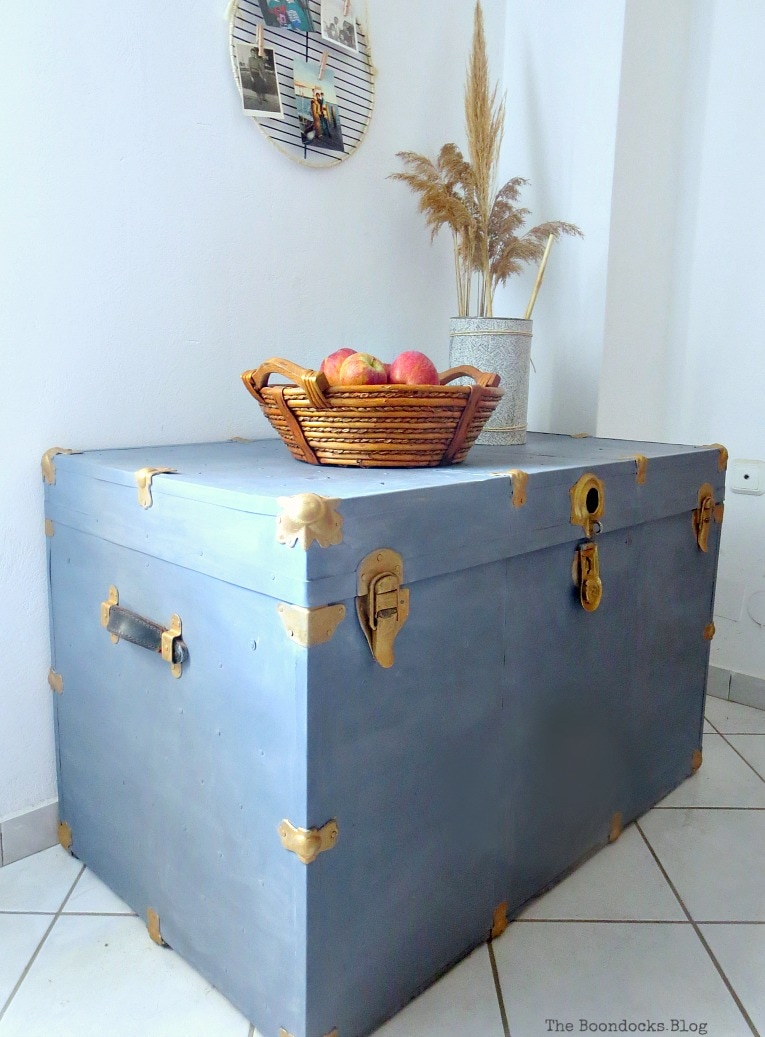
Here we are after a few coats of Old Fashioned Milk Paint. I love that I can just custom mix any color I want so easily!

The final steps were to add wax in order to seal the paint. You can even make your own beeswax furniture polish!
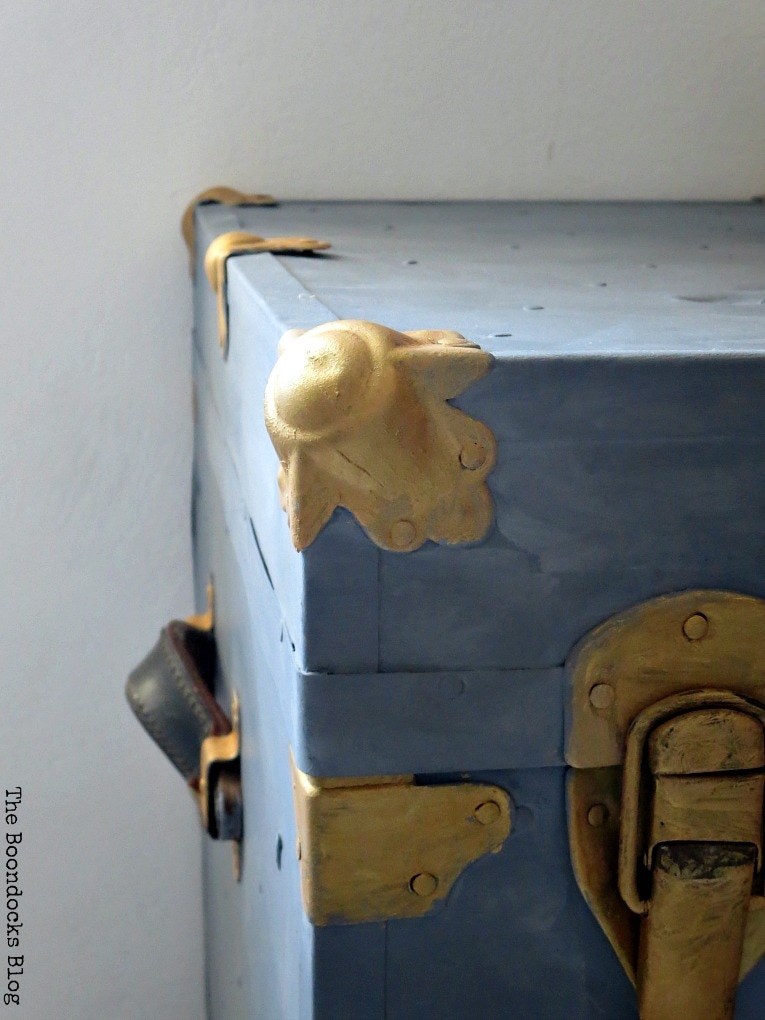
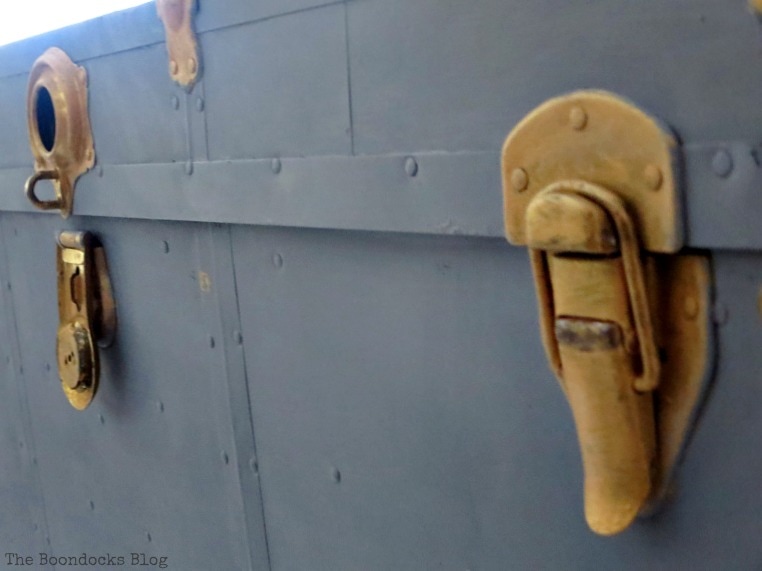
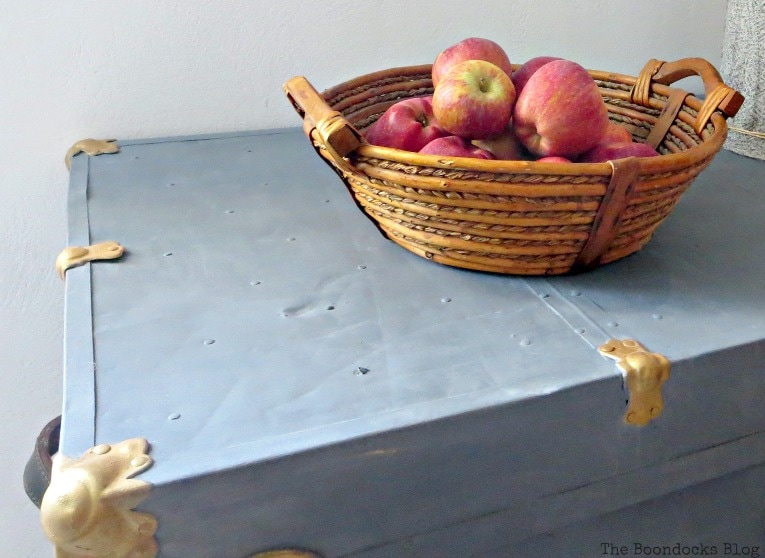
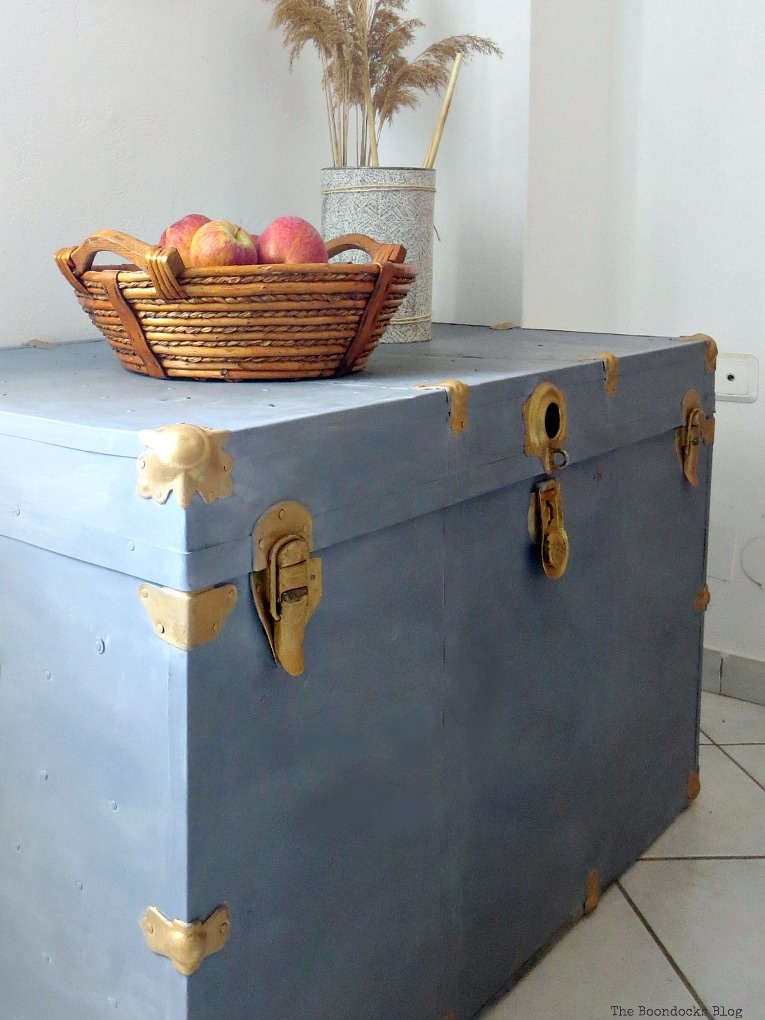
And of course to gussy up the hardware. I even added some wax to the handles.
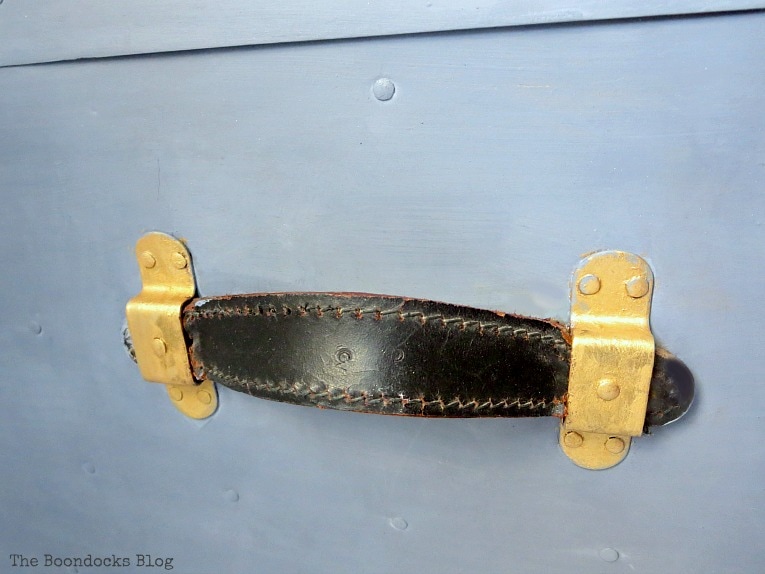
I just love the metallic burnished brass against the soft gray!

My girl only painted some of the hardware. There was also a bunch of metal strips going up and down the trunk but we decided in this case, less is more.

Here you can see all the metal studs and the strip that I was talking about right in front of the basket.
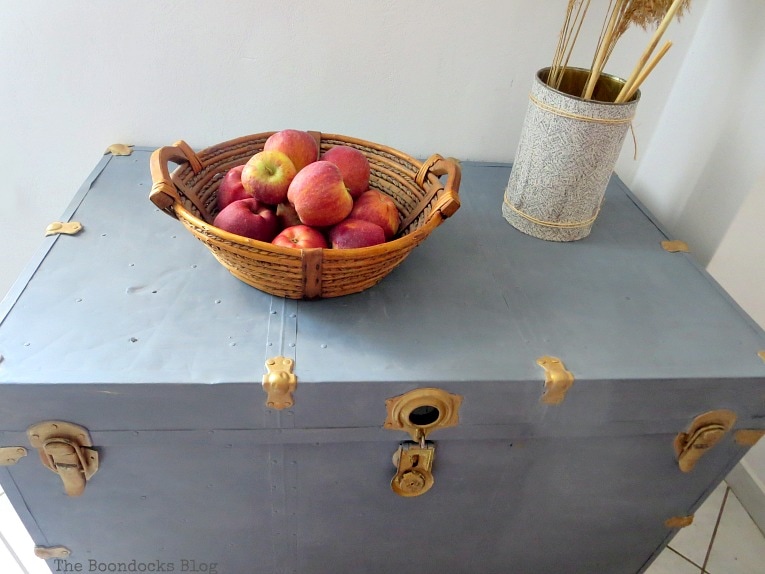
I purposely didn’t mix the powder too much because I wanted this effect of different shades. Can you see it? It almost looks like a cloud effect.
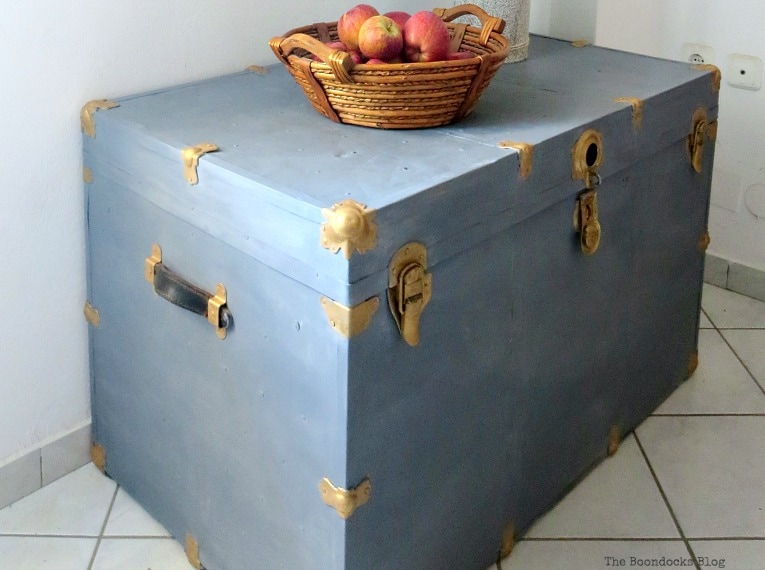
It is finally presentable and can take its place in the house instead of the basement! And I’ll actually be able to use it for storage!
I must admit I’ve had this for a month now and am very impressed with this true milk paint. I had never seen milk paint used on metal before but it was a breeze for painting this old metal trunk.
And that is my how-to on painting old trunks with Old Fashioned Milk Paint. I have a gorgeous “new” trunk and my kid has a few extra bucks in her pocket! A win-win for sure.
Now tell me, what should I do with the other trunks?

If you like what you see, share it with your friends, or save it on Pinterest. Above is a Pinterest worthy image!
If you really like what you see subscribe to my blog and get my adventures twice a week in your mailbox. The form is on the sidebar and on top. Your e-mail will never be shared with a third party.

I cannot believe you’ve got so many trunks in that basement of yours! Incredible!! Well, this one turned out really pretty Mary, I love the grey colour on it and you’re right, the brass looks great with it too! You could maybe put wheels on another one and give it an industrial look… and put some cushions on another one to make a seating spot out of it… not sure if they’re strong enough to hold for that… Anyways, I’m sure you’ll come up with a fantastic idea as usual!
The brass is like the bling in an outfit Katrin. At least that;s how I see it. No plain Jane here! I like the idea of wheels. That would be fun!
What a beautiful transformation on the trunk. Love how it turned out. I have a big red one. I need to drag it out! Hugs and blessings, Cindy
Ohh Red! I can see that as a centerpiece for a room Cindy! Go for it!!
Your basement must be a treasure trove of goodies Mary! You really cleaned her up all nice and spiffy and it looks fabulous!
(I’m not sure if you’re aware, but the social media icons on the left of your blog block the some of the text. I think here’s a way to resize them to avoid that).
xxx
Doreen I have so many and so many ideas for them all. I just need to find the right spots for them.
Thanks for mentioning that about the sm icons. I think it has to do with what you are reading this on. If it is a tablet it might be that. I will look into making it smaller, Thanks again!
I love the way it turned out!!!! I have a old hump back trunk that I need to redo…….totally wondering what to do with it. Not working on it soon as we are in the process of moving, but every time I look at it I wonder – LOL!! I brought my grandfather’s sea trunk back to life in black and silver – looks awesome!!
Jan don’t feel bad. I’ve been looking at these trunks for years and years. But now there is no avoiding it. I need more storage and they are great for that.
Black and silver sounds great! I always love black but in this case, it was going into a room which needed a different aesthetic.
I adore this trunk Mary it is a gorgeous transformation and the new hardware looks great on it
Amber would you believe me if I told you the hardware is the original, I just spruced it up with the metallic lustre. Gotta love the power of paint.
It is a beautiful transformation So many trunks! I probably have that many in my attic. They do offer great storage…what are you going to put in it?
They are excellent for storage of bulky things. I’m gong to put winter blankets and comforters in there. They take up so much space.
I have several of these old trunks. I like them and have kept them for future use. I need to figure out where I want to put them or what I want to use them for before i try to restore them. I like the idea of using milk paint.
I think they are so useful. I’m using this one to store blankets and comforters, those bulky items that will not fit anywhere else. And the paint was a breeze to use.
Mary, it doesn’t seem the same trunk. The poor thing was so damaged and now it shines in new glory. Your daughter did a great job with it, and waxing the handles nourish them and look so nice. It is ready to travel to the US again.
Now that she’s turned it into a beauty we are going to keep her here to store the blankets and comforters. Anyway I don’t know where the key is. Maybe it is hanging from the lighting fixture.
What a difference to the trunk, Mary! I love the color and the patina the paint gave. Pinned
I really am loving this milk paint Marie. It is so different from chalky type paint. It seems to have depth and layers, and they unfold as you paint. Thanks for the pin!
Your trunk looks great! Sheila
Thank you Sheila! It could only get better!
Such a lovely color Mary, it almost looks blue in the photos and you’re right it does look amazing against the metallic bits. You’re daughter did a great job. Now about those other trunks in that endless basement of yours….. mmmm I think you need to ship them to South Africa so I can copy some of your ideas 😉
That’s what I really love about these colors Michelle. Depending on the light they can look different almost a soft grey/blue. And I’ll be sure to put a couple of trunks in an envelope and ship them right over! 😉
What a great piece, Mary. Must admit, I’ve never used milk paint before, but might give it a try.
Marilyn I was a bit intimidated at first. But it was all for nothing since it’s very easy to use and you have such a huge range of colors you can create.
How did you clean the inside?
The inside is covered in paper so all it really needed was a good vacuum. Had the paper been in worst shape, I would have decoupaged a new paper.
Nice work! You and your girl gave it a new life and it looks great. I like the brass accents, too.
The brass accents are what make it special otherwise it would just be a grey box! Thanks Jolena!
It really looks great! Enjoy using it.
Thank you for stopping by my blog.
I will be having lots of fun with this one. Thank you!
Mary the truck looks wonderful. I love how you made the custom color. I think most people believe milk paint only gives a chippy look but you show how the coverage is good and that you can acheive many different looks.
Yes, I really have come to love this paint after my initial fear. I use it everywhere and am not at all afraid. It gives such a nice modern look to furniture.
You can’t go wrong with a trunk for storage and function! Love the new look you gave it, Mary. It’s so refreshed!
Thanks Larissa. It was pretty scary before. Now I’ll use it to store the blankets and comforters.
We have a trunk at the end of our bed that I thrifted many years ago.
It’s black, so I just painted the bad areas with more black—but this? What a great idea!!
Jodie
http://www.jtouchofstyle.com
I had done that years ago too but now with all this fun paint out there I like to be daring! 😉
Love how your trunk turned out. I have a metal trunk very similar to yours. Need to update it.
Hugs,
Bev
This is so much fun Beverly. To watch it become beautiful after being so dull all these years.
WOW! That trunk has become a beauty! Wouldn’t mind this kind of storage in my studio even if you hadn’t painted it in one of my favourite colours – just imagine how much yarn I could hoard in there…
Have a great weekend,
Marjan
Haha! Right! That’s why trunks are so handy and practical! I too love that color it looks like a smokey blue to me.
Mary, you are on a roll with such brilliant ideas!!! I love how your trunk turned out…it looks awesome!!!
Thank you so much Michelle!
Wow your daughter did a great job and I love the custom color you mixed. I never worked with milk paint but might give it a try after seeing how beautiful your trunk turned out. The brass really stands out and compliments the trunk!
Pinning!
Julie @ Love My Simple Home
Julie milk paint is so easy to work with I was really surprised! And the best part is that you can mix colors to come up with the one you want. I am really happy with my girl and the great job she did!
Your truck turned our beautiful Mary! Your daughter did and awesome job in it! Takes after her mama! I really like the cloud effect with the paint. I need to look into getting some milk paint. I really like the idea of mixing the paint as needed so that it doesn’t dry up like some of my older acrylic paints have.
Can’t wait to see what you do with the other trunks!
The best things about milk paint is that you can create your own custom colors and because they come in powder form you can keep them and make batches as needed. I really love this stuff.
Hi Mary, I do like what you’ve done with the trunk and the colour is very nice too. If I were you and had several trunks, I’d probably end up with them in various colours situated in bedrooms, the bathroom and of course, one on the balcony. A lovely piece of furniture and storage space too!… I couldn’t help but imagine what the scene around the photo looked like!
x
What a fun thought to put one out on the balcony. I’m sure it would survive too. Haha! You don;t want to know what was on the other side of that trunk. I am in the process of painting some bookcases so they threw up all the stuff on the floor. 😉
Wow, Mary you have trunks like we have cardboard boxes!
This one looks amazing now, what a great job your daughter did.
Julie I am so proud of her and she is happy for her pocket money!
Great makeover Mary, first time I’ve seen OFMP over a metal trunk! I adore vintage trunks, great for storage and decor, yours came out great! Thanks for sharing your project at Fridays Furniture Fix!
I’m feeling very brave Brenda, and using it in ways not traditionally associated with milk paint. Thanks!
I love how this turned out. The color is almost just like a chalk painted trunk I did a while back. I’ve never used milk paint but have been wanting to try it. Do you know if milk paint would work directly over chalk paint with a little sanding first? Thanks for sharing at the Family Joy Blog Link Party this week!!
I think it should not be a problem if you use the milk paint that has a bonding agent in it. I use this particular type which already has the bonding agent in it. It’s called OFMP SafePaint. The normal Milk Paint is designed to chip so there you would have a problem. You would need to add the bonding agent, which helps the paint to adhere. And yes I would also recommend sanding to give it some bite.
I am sure you will let us know if the paint stays on the metal? It looks very pretty in the gray blue color.
I will definitely keep you posted. It’s been over a month now and we have been putting objects on it, lots of them, and it looks great!
Mary, I love the new look of this trunk, the cloudy blue is beautiful and dreamy. Your daughter did a wonderful job, so nice she’s taking after her mom. Amazing transformation on this piece!!
Thank you Keri! She will surpass me I think. She is already so talented at painting I pale in comparison. And that is just fine with me. #proudmama
That turned out beautifully! Thank you for sharing this! I think we have an old trunk somewhere around here… 🙂
Thank you Pam. They are such a great thing to have around for storage. Go find yours now! 😉
Mary,
This turned out absolutely amazing. The brass hardware looks gorgeous against the grey finish. Love, love, love!!!! I am pretty obsessed with those handles as well.
Much Love,
Erica
And to think Erica that it has traveled all over the world and has to be at least 50 years old. They are pretty sturdy these trunks!
I love what you did with the trunk, Mary. It reminds me of the ones that my kids used for summer camp. I got rid of them years ago, but now I wish I had one. Will Pin for future.
Carol, you never know when you might find another one. Good luck.
It has a new lease on life!
Oh boy does it. So much nicer then the black! Thank you Sandra.
Mary, Your daughter did a nice job on the trunk and your not rocket science paint mixture color is perfect. I too love it with the brass hardware. Great makeover! Pinned.
Thank you Laurie. I am really proud of her.
Loved the trunk, loved the color, loved everything!
Thank you. Katerina don’t we all have one of these hidden somewhere? I found a few in my friends’ houses too.
I love how your trunk looks now. It’s a wonderful piece to have and you did a great job with its makeover. We’ll be featuring this at Brag About It this week.
Thank you Beverly. I am very proud of my girl who did this one and what a great job she did.
This trunk is very pretty now. Not sure why but their is something romantic about old trunks from a time gone by. Love them. After this makeover your trunk will be the prettiest one in the storage compartments.
Thank you Leanna, I still have a couple of more to do but all in time.
That’s quite a transformation! I really like the blue-grey tone of the color.
It also helps to camouflage all those defects and scratches. Thank you Goedele.
I love the transformation! In fact as I am typing this, my feet are propped up on a similar trunk and now the wheels are turning!
Carlee, you definitely have to give it a makeover. Paint is such a simple way to do that.
I love old trunks, they are so expensive now and not nearly as well made. If I run into one I’m going to grab it up and use your techniques. The color is perfect and the brass hardware just pops against the grey. The photo of it in your home is just gorgeous and I’m sure that the storage is welcome. Great job to you both~
Thank you so much Nikki. I have to admit I was surprised by how nice this one turned out. It must be that contrast with the hardware, or my girl’s talents.
I love this color. It looks great with the hardware. Please share your posts on my Sunday’s Best linkup. I love upcycles and the inspiration. Thanks for sharing your knowledge.
Thank you Rhonda! I am on my way to visit and link up.
So pretty! Beautiful job!
Thank you Colleen, I would not have believed this was possible with milk paint till I tried it.
Mary, you did a great job on this trunk! We see these trunks as we go to auctions often – I will have to keep my eye out for one in the future! Thanks for the inspiration 🙂
Cindy I have done three of these trunks. It seems we have an abundance. One with decoupaged book pages and also one with a stencil. You can find them on the top under furniture. Good luck on your trunk hunt.
What a great idea! I can see a trunk like this in my living room, now I just need to find one.
I’m sure there must be plenty at yard sales or even Craigs List Claudia. Good luck. I wish I had another one!
What a great makeover – very pretty! Thanks for sharing with us at The Blogger’s Pit Stop!
Big improvement, Mary! Love that you can easily mis colors with the paint, too! Thanks for sharing on Homestyle Gathering.
When I first did this Julie I was so surprised that it worked on the metal and came out so nice too!
Such a pretty color! It’s hard to believe that it’s the same trunk. You and your “artist” did a great job.
xo Kathleen|Our Hopeful Home
Thank you so much Kathleen. Anything was better than that mess of a trunk.
I love this, Mary! I could definitely use a couple of trunks like this. Now that I know how to make one over, I won’t be afraid to grab one that needs some love. Thanks!
I was afraid too Amy before I tried it but I figured the trunk looked so bad I really had nothing to lose!
This piece turned out lovely. Thank you for sharing at Dishing it and Digging it link party. You are one of this Sunday features. Have a great week.
Thank you so much Vanessa, it is always an honor to be featured!
This is gorgeous! What a perfect transformation! I love old trunks and the color you chose! thank you for sharing at Celebrate it!
Thank you so much. I was so happy it turned out good, I was a bit worried in the beginning but the paint covered perfectly!
Mary, this turned out so pretty! I’m featuring you on Sweet Inspiration this week 🙂
Yay!! Thanks so much Eileen!
Que maravilla, me gustó mucho el cambio. Ya me hice seguidora de su blog y de su instagram creo compartimos la misma aficción y no quiero perderme nada. Un saludo.
Muchas gracias. Sí, nuestros blogs tienen muchas cosas en común y ¡ustedes hacen proyectos tan maravillosos!
How did you apply the milk paint ??? With a brush??