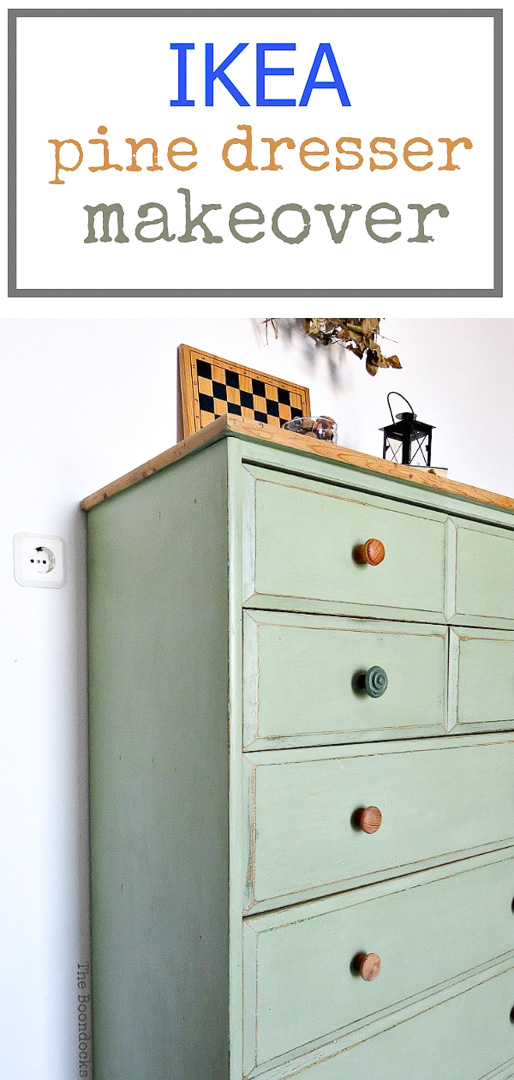
How to Save an Ikea Pine Dresser
Just a little bit of time and paint are needed to makeover an IKEA pine dresser such as the Tarva, Rast or Lesvik into a beautiful farmhouse style piece.
Have you ever felt that a piece of furniture can become a part of your family? Last year at around this time I had written a story about another dresser. Well, this year it’s time to take on this downtrodden mess. This old fellow is an Ikea pine dresser. And like the other one, it too has traveled across the Atlantic to spend most of its’ formative years here in Greece. But in this case I would say they were deformative. Now, I am going to show you how to save an Ikea pine dresser.
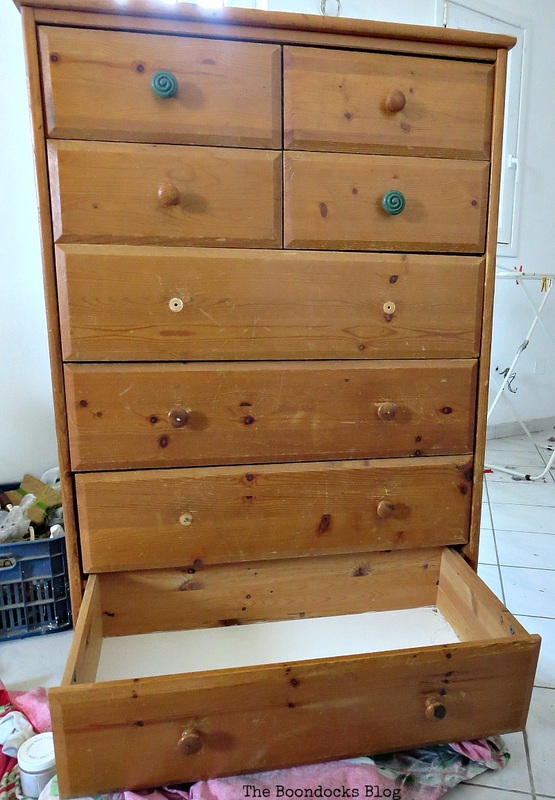
The dresser was used by two rowdy boys… and you know what that means. They used it as a playground, climbing onto it, and diving off of it and all sorts of other creative activities. Boys will be boys, as the saying goes. And here is the proof.
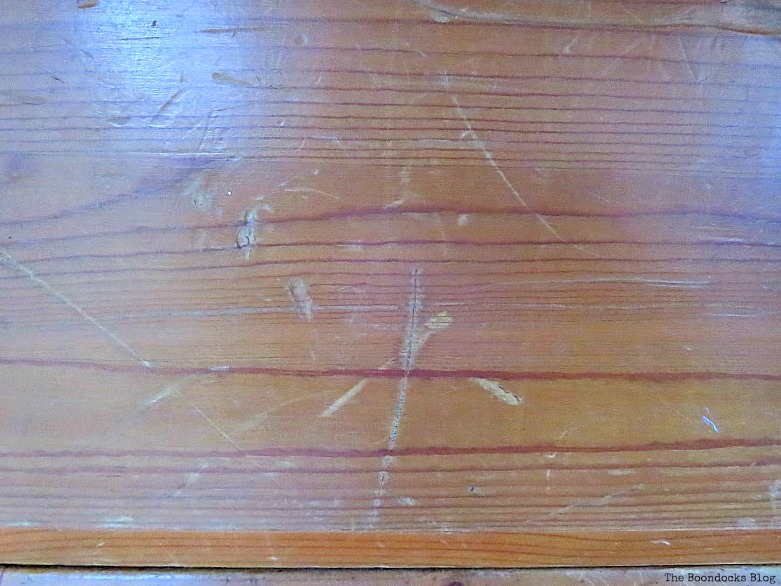
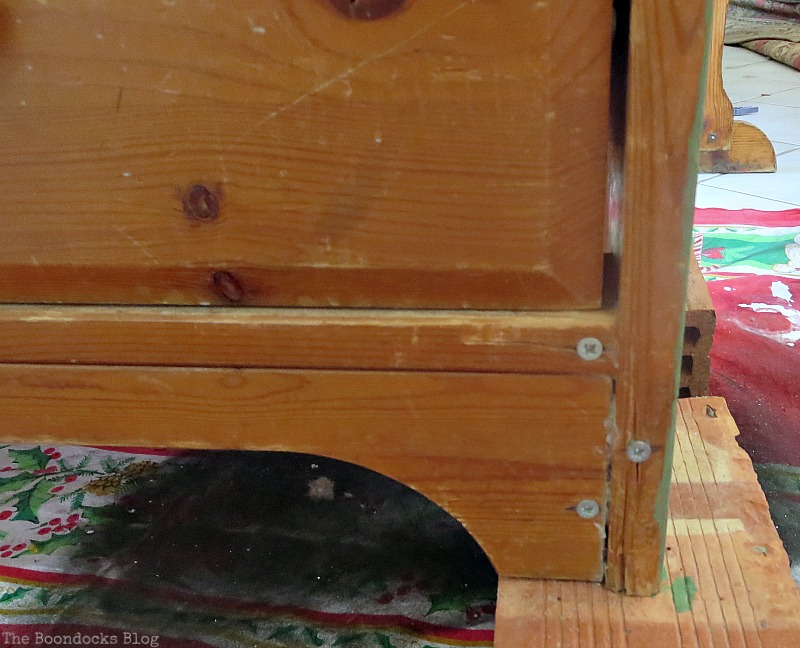
And here is more proof. We had to put it back together with screws. Of course, we all know that Ikea furniture is not the sturdiest in the world but it was solid pine and deserved a new life … even if it was looking awful. Here we are to the present and we had to decided what to do with this old thing. Were we going to keep it or use it as firewood? The saving grace was that it was solid pine for the most part. We just needed to realign the drawers as best as we could.
I had on hand this lovely shade of green and decided to paint it. It’s the hubs favorite sports color.
It’s called Enchanted by Americana Decor Chalky Finish Paint from DecoArt. Originally I was thinking of doing it as an ombre with each drawer darker as we went down. (If you would like to buy this product I have included Amazon links at the bottom of the post.)
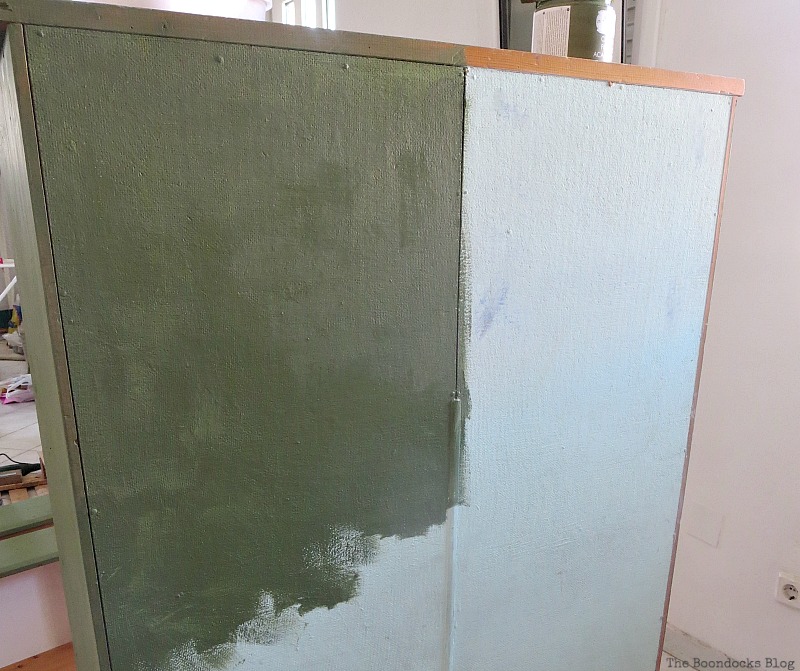
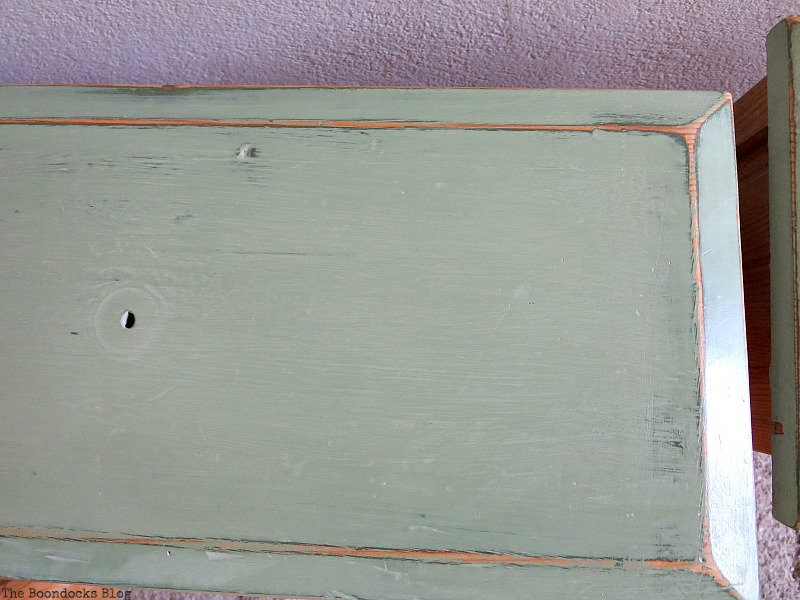
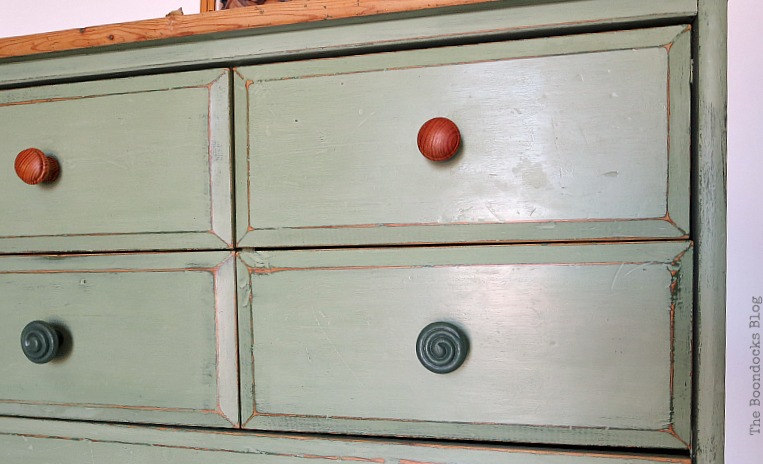
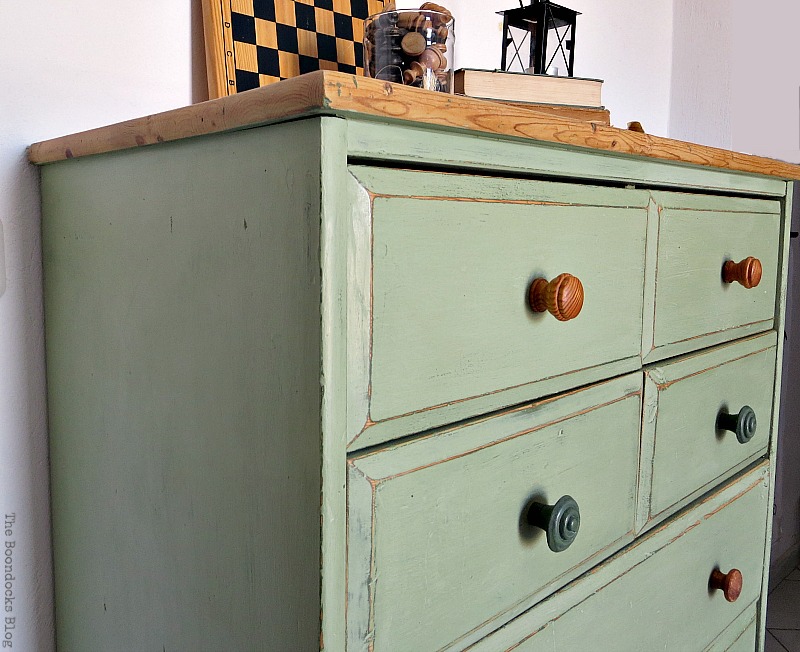
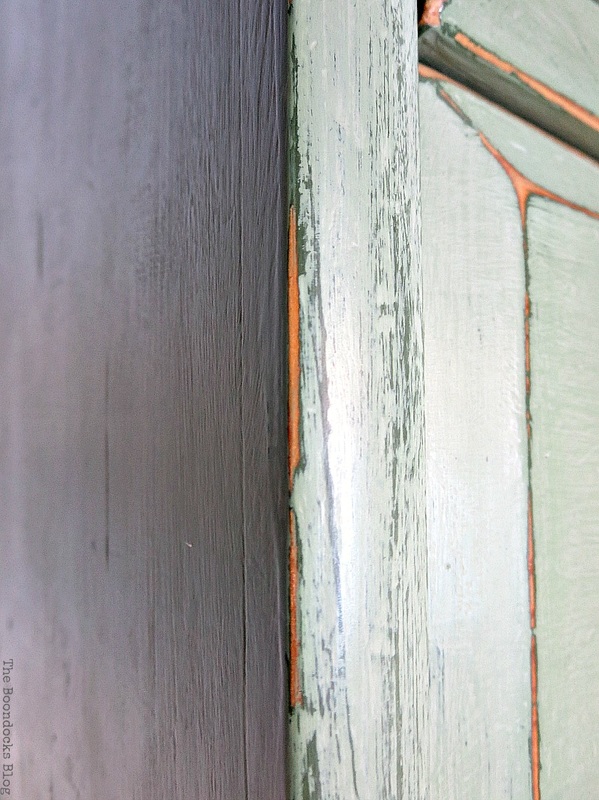
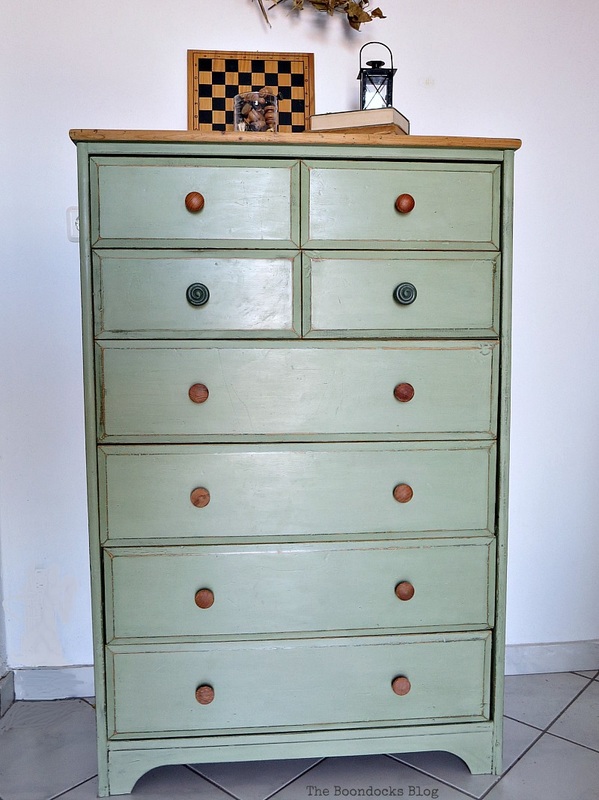
But once I painted the whole thing, it looked really dark so I decided to distress it just to get an idea of what it would look like with the contrasting wood. I even added the knobs back on. I had wanted to get new knobs originally, but when I added the old ones back on I liked the look.
But here is what happened next. When I put the drawers in the whole thing looked way too dark. So I added some white paint to the Enchanted color and lightened it up a bit. When I distressed I also sanded the whole thing. This really gave a soft smooth feel to the whole thing. I was really impressed by this finish. I did this on the whole dresser.
The bottom half here is waxed with Americana Decor Cream Wax. You can see how it darkens it a bit. (If you would like to buy this product I have included Amazon links at the bottom of the post.)
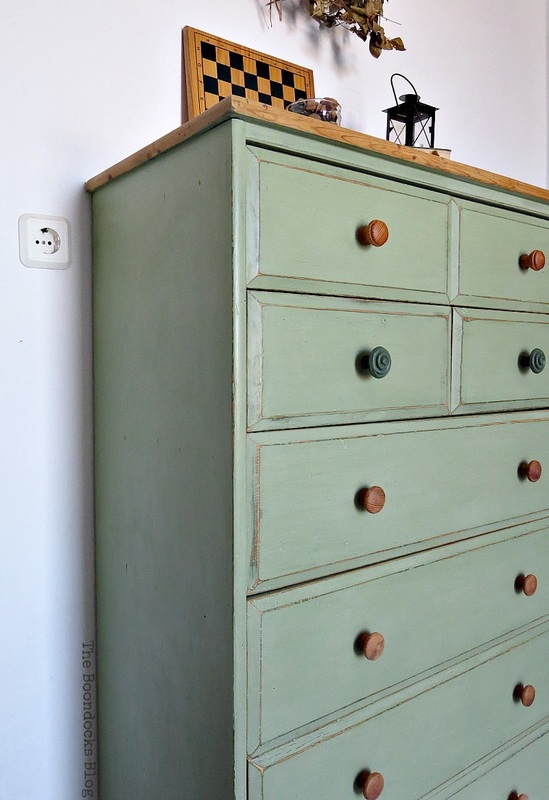
The finished job with wax and distressing. It now has a beautiful sheen and it is protected.
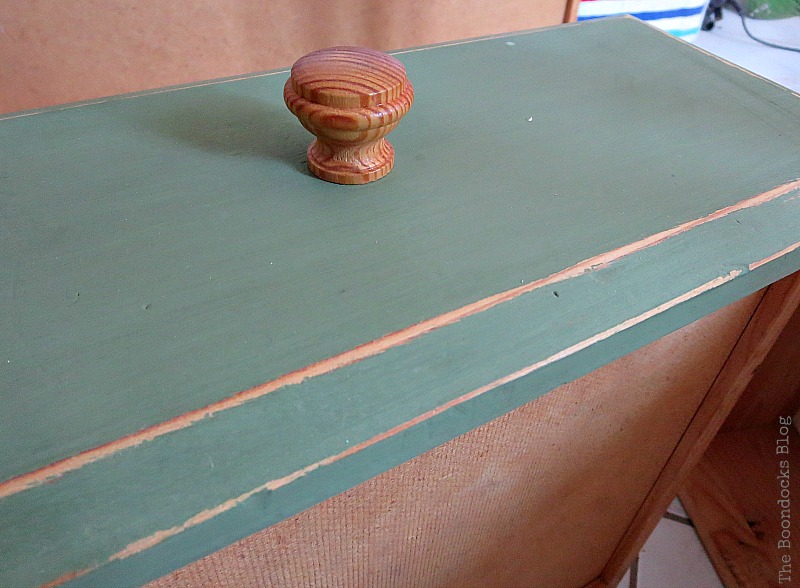
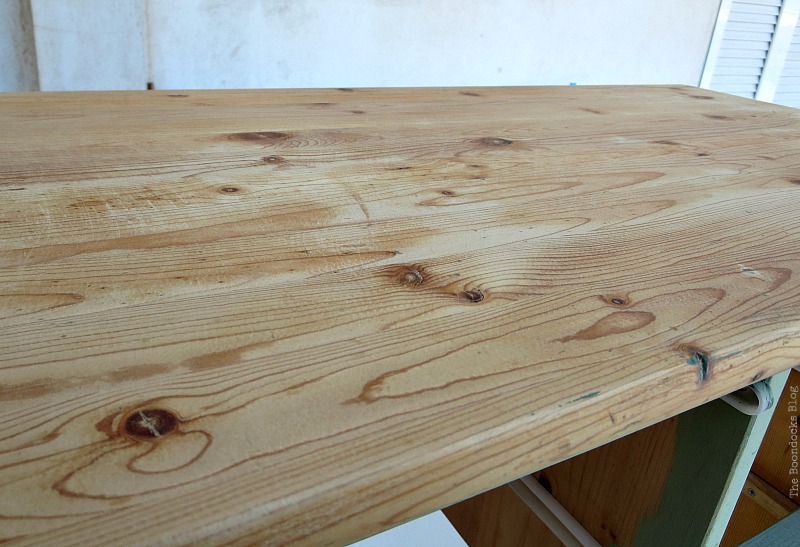
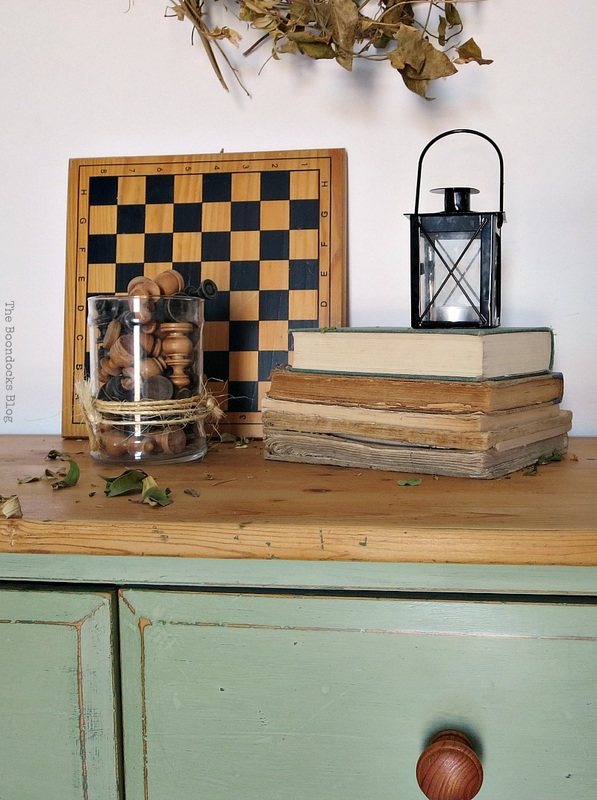
As for the top it was just sanded down and finally gave it a coat of wax.
When using chalk paint the big plus is that you don’t have to sand before. No prep work. But I did sand after I finished painting when I was distressing the piece. Not only did it make a huge difference in the appearance but it became as smooth as butter, paving the way for the wax.
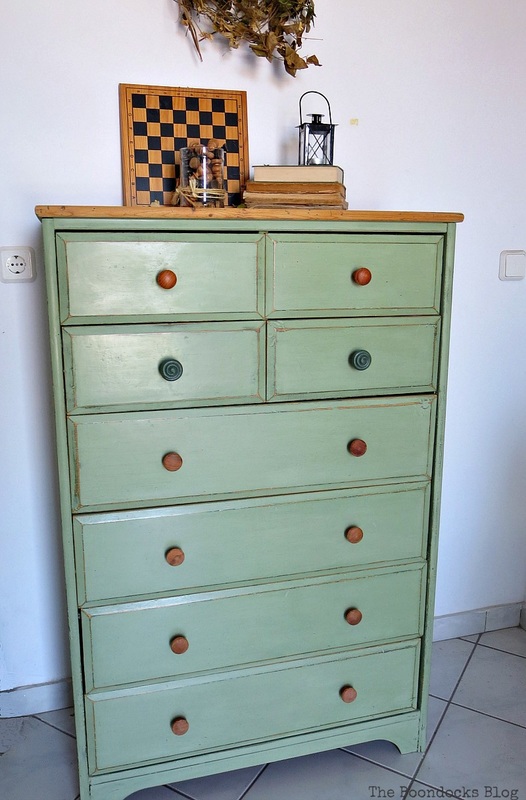
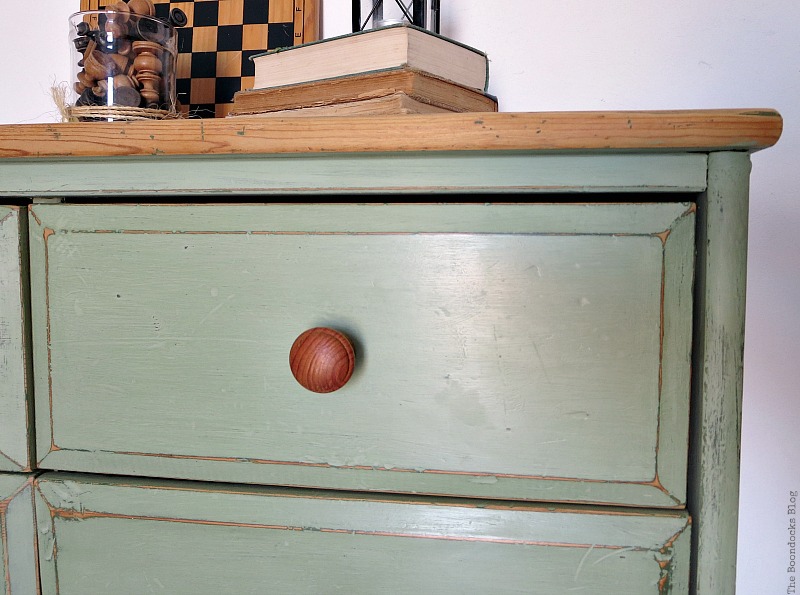
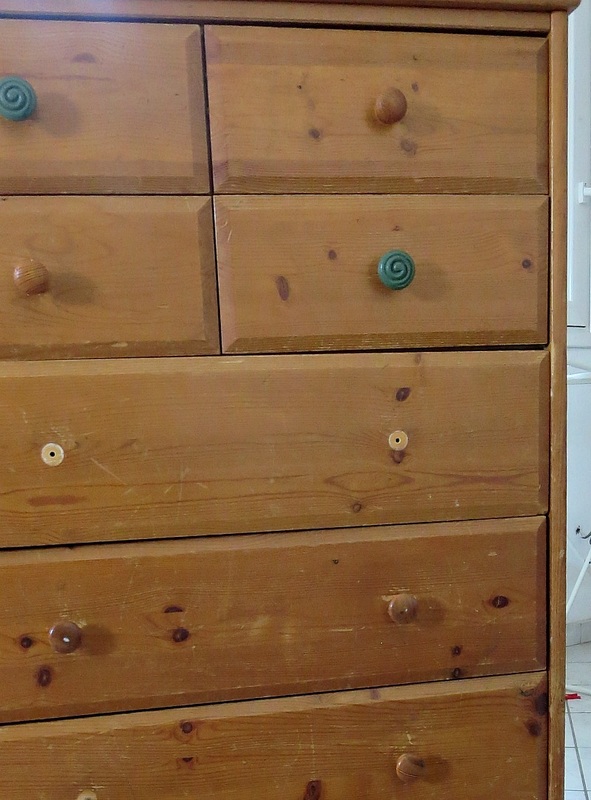
I reapplied the knobs that I had from before; they look great and really stand out now.
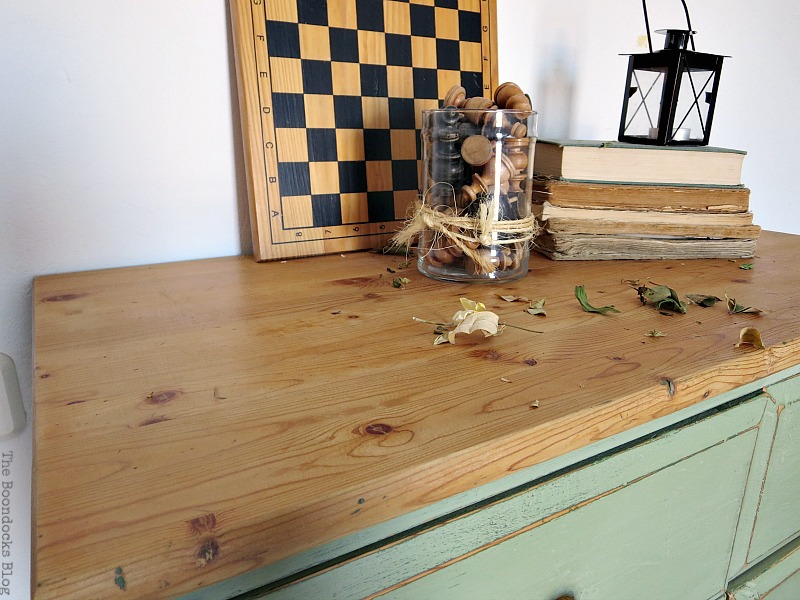
You can see the nicks and scratches on the top and some dark green color but that’s okay as it adds to the charm of the piece.
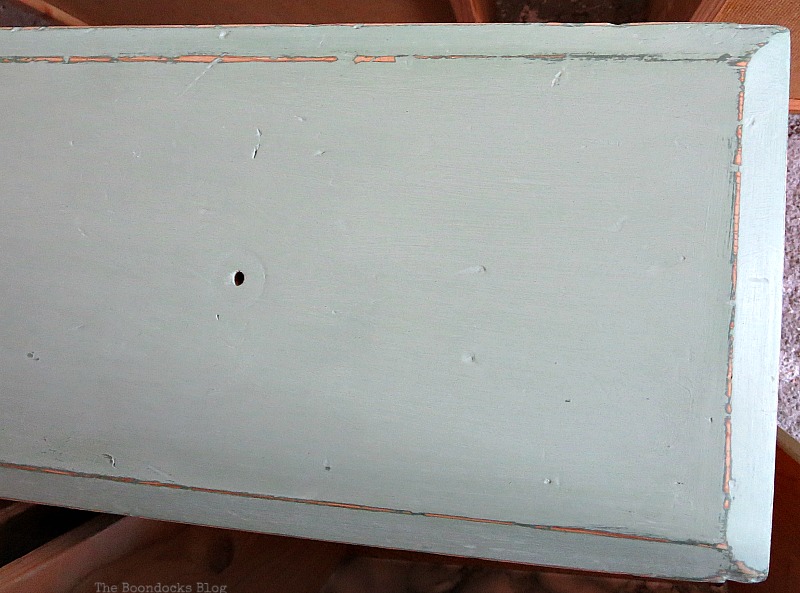
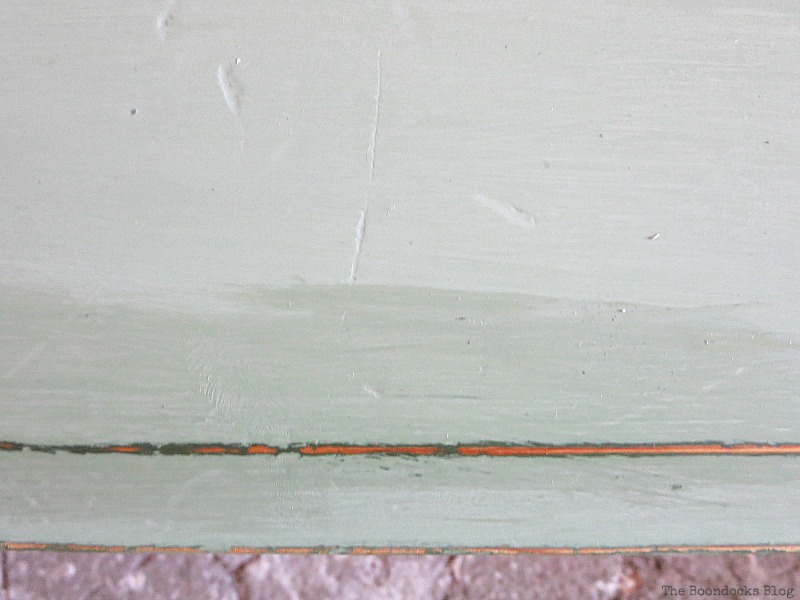
Here you can see how the distressing shows just the green in some places…

Can you see the subtle sheen? Now every time I walk by it, I just have to run my hand over it.
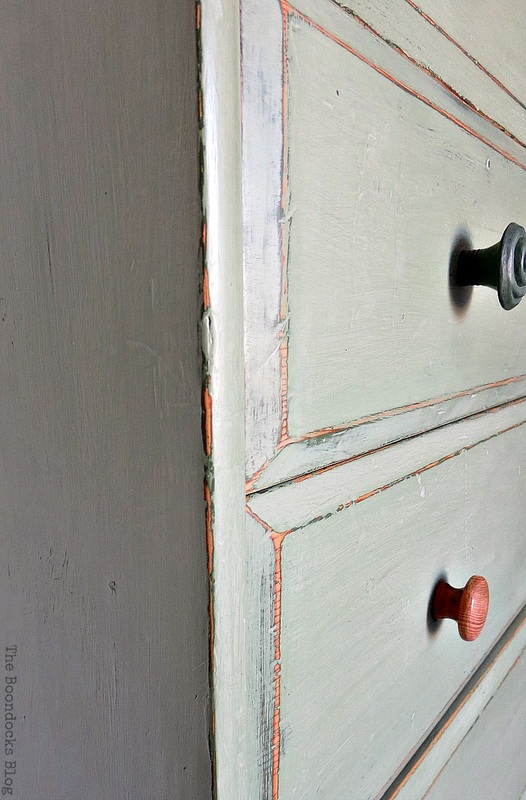
… and in others the green and the wood, giving it more dimension.
It’s far from perfect. You can still see that there are some gaps where the drawers close, and it is full of nicks and indentations but it is a huge improvement from before. And it is full of character, even the hubs loves it.
Everyone goes on vacation in the summer and I go to work, but it was well worth it. And now that I have shown you how to save an Ikea Pine Dresser I am off to my basement. I do believe I have an old bed that I can paint to match this dresser. Would you have bothered to save this old thing or would you just have sent it to wood heaven?

Addition Furniture Painting Ideas you Might Like:

IKEA Malm Dresser Makeover 
If you like what you see, share it with your friends, or save it on Pinterest. If you really like what you see subscribe to my blog and get my adventures twice a week in your mailbox.
This blog is for entertainment purposes only; my DIY tutorials are not professional advice. Read my full disclaimer here.
I love it when I get your comments and I will reply to each and every one of them.
You did a fantastic job of making it look great, again!
Thank you Carol. Now my husband has decided to keep it for himself.
What a great dresser make-over, Mary! I love the paint color you chose. I restored one of our dressers in a similar color and really love it! Great work!
Thank you so much Ilka. I really love this color too, and the way the darker one peeks out underneath.
Mary, WOW! It is gorgeous, I love that colour and yes, the before green would have been too dark for my taste, but this is just perfect! You really really made a beautiful piece out of this dresser! The top looks amazing with the rest of the dresser and the knobs as well! Great job my friend!
That green really was too dark, I am so happy with how it turned out. It was really in bad shape before. Thank you Katrin.
Oh that looks so pretty. (I actually said that out load when I was reading the post, lol!! Our fur babies thought I was nuts) The dresser is definitely not deformative anymore Mary.
Yes Michelle, it was in really bad shape before and I was so reluctant to get rid of it. I think the more I blog the more I want to find creative solutions instead of throwing things out. Say hi to the fur babies for me. <3
Honestly, I am always a little happy when someone restores old Ikea-Furniture. I think they get a bad rep unfairly, many pieces are solid pine and really only need a few screws. I have saved a couple of pieces that really only needed sanding and paint. Though I let my son do the distressing. 🙂
Throwing them out is such a waste of resources.
Dalia this was a very solid piece but it had to suffer thru four rowdy kids. No one can blame it for falling apart after 25 years. Do you have any pictures on your blog of the ones you restored? I’d love to see them .
Mary, you did an amazing job on this dresser!! Love the color you mixed for the top coat and all the layers showing through!! I really like the original hardware. That’s awesome that you run your hand over it when you pass by it; I do the same thing to one of my dresser makeovers too. Don’t you just love a smooth furniture surface?! 🙂 Once again, amazing job on this dresser!!
Keri I am so proud of this one. I love the smooth finish. It is such a thrill to bring back something from the abyss. You know exactly what I mean because you do it all the time.
Mary, you nailed it with this dresser makeover!! It is just perfect, the dark green showing subtle below the light green you achieved mixing paints, contrasting with the wood on top. Congratulations, you did an amazing job with it. What do your sons told you about it? I imagine they loved it too and have great memories
Thank you Pili. When I showed them the post they were impressed they didn’t think it would survive. And yes they certainly remember it especially when they had taken it apart. haha.
It’s absolutely beautiful Mary! Total new lease of life! And I love that green – really lovely.
Exactly Anna, a new lease of life. That sums it up perfectly.
This is beautiful, but everything you do is beautiful. I have an old desk that I was going to throw out but I starting to think I should try my hand at repurposing.
I hope you do Celeste. There is nothing so satisfying as taking an old piece and breathing new life into it.
The dresser looks wonderful. I love how you kept the wood knobs that match the top. I love it.
I like the contrast of the wood to the color. But what I like the best was the deeper green that peeks out underneath here and there. Thanks Debra!
Fabulous job bringing your son’s dresser back to life! You nailed it by adding white to the the dark green – it pairs beautifully with the natural pine wood. Love how you added a couple of black knobs to the mix. Pinning to share 🙂
Thank you so much Marie. I used the darker color and then when I added the white and distressed the darker showed thru. That was the pleasant surprise for me.
love this redo! now this poor dresser will be loved again! I love the subtle distressing so the layers show through! Enjoy the week!
Yes Millie this dresser is the most loved of all since we went through all that trouble to screw it back together.
Well, you’ve convinced me that upon our return to the Stone House on the Hill, I will tackle my pine dresser that I inherited with the house purchase and see if I can make it a bit more presentable!
I am so happy to hear that Jackie. Make sure you take some chalk paint with you when you leave the States because there is no chalk paint in Mani. haha!
Wow! That’s beautiful Mary! What a transformation! I can see why your husband likes it. I would definitely have tried to save it too. Chests are worth it, & that looks like it has lots of storage.
Florence my husband loves it so much he is keeping it for himself. And it is an old model. Ikea doesn’t make them with eight drawers any more.
I love the color you ended up settling on. It reminds me a little bit of a color I used to bring to life a pine cabinet I picked up at an antique fair. It wasn’t antique really, just a junky cabinet, but now it’s one of my fav pieces and I think this dresser will be one of your favs too. At least it should be! lol
To answer your question, I definitely would have saved it, but I doubt the results would have been nearly as stunning as what you did Mary! You’re so talented!
This was really in bad shape. At least now with the paint we can hide some of it’s flaws. As for t hat last comment Doreen, I seriously doubt it. You have made some pretty amazing things on your blog.
Love how you transformed this piece! It looks completely different, but keeps all the character from before. Great job!
Vineta thank you for saying that. I believe you hit the nail on the head. It does look different but still looks like it’s been through the ringer.
Personally, I love furniture that has dings and scratches. To me those are just character.
I love this how this turned out. 🙂
I have to agree with you Lisa, give me an old piece with scratches any old da y.
Mary, hard to believe it’s the same piece of furniture. You did a lovely job and I know you’re happy to have rescued this useful piece.
Happy Monday!
Hugs, Lynn
Oh boy was I happy to have rescued it Lynn. It had become quite the eyesore. I love this new color and to think that Green is my favorite color and yet I had never used it before.
You’ve waived your magic wand again. I can’t wait to see the bed!
Thank you Stella. The bed will have to wait a bit till the weather cools down a bit. It’s hard to sand in this heat.
Amazing difference!
It looked terrible before and now it looks so professionally finished.
I love the gentle green color you chose and that you left the top unpainted.
I can relate with you “fondling” it, lol. I did the same when I painted our living room, hahah. 😀
It is a beautiful dresser Mary, great job! 🙂
Thank you, I walk by it and run my hand over it… it is just so smooth. I was really surprised. I guess I finally learned how to work the chalk paint the correct way.
You did a fantastic job on the dresser Mary! I’m glad that you decided to give it a make over instead of using as firewood. I love the color with the contrast of the wood top. Lovely piece!
Thank you so much Linda, I guess I’ll have to find my firewood elsewhere.
Hi Mary, I like what you’ve done with the dresser, but I would have loved to have seen how an ombre effect would have looked.
As for saving dressers. my daughter still uses an old chest of drawers that I had as a child and we also have a really tatty old set of drawers that we store bits and piece in on our back balcony. It’s only made of chipboard, but I also had that in my room as a child. All refurbishing is done by my husband as I wouldn’t know one end of a paint brush from the other and as for sanding???
xx
Debbie when I had decided to redo this dresser I told my husband I would do it for him, so when I showed him what ombre looked like he was turned off by it. He didn’t even want it distressed until I actually did it and then he was pleasantly surprised.
Now as for you knowing one end of a paint brush from the other, well, you are lucky that you have your husband. Mine only dones the nailing and wood cutting , he likes to use those power tools, which I am all too happy to let him handle.
SUCH gorgeous work!
Thank you Sarah, after this it should stick around another 25 years.
Mary, I would have saved it too. The warn look is what helps add the charm to your finished piece. It’s Fabulous! Love seeing old furniture get a reprieve from wood heaven 🙂 Thanks so much for sharing with us at Brag About It! Hope you are staying cool!
~Laurie
Yes Laurie, if you look close enough there is a whole life written on it by way of scratches and knicks. I am so happy I was able to finish it. Thank you for your sweet words.
Mary, I love the re-do. You did a fantastic job with it. I think you’re right the original knobs look really good. I would have saved this one too! Thank you so much for sharing with us at #SimplifyWednesdays. Have a beautiful week! Pinned, Tweeted, Shared, Stumbled
xo,
Carla a.k.a Mrs. R @ SimplifyLifeWithMrsR.com
Thank you so much Carla. It would have been a shame to get rid of it given that it has such a long history with us.
It turned out wonderful. I also raised boys and put many things back together with screws. Sigh. I also like Ikea furniture despite what many grumblers have to say about it. 🙂
Krista it gets the job done and in this case it has lasted 25 years so no complaints on my part.
Very nice makeover. It’s now very charming and quaint. I enjoy your blog immensely because you re-purpose items on a budget
That was the best comment for my ears/eyes Leanne. I always try to do things on a budget because I like many of you cannot afford to have fancy machines or craft supplies. Even the chalk paint I use is reasonably priced. Thank you for taking the time to comment.
What an incredible before and after. This is just the inspiration I needed – I am about to give a makeover to a side table!
I am so happy to hear that Kit. I would love to see it when it is finished on your blog. I love furniture transformations.
Mary, the idea that it is far from perfect fits with the weathered look! I love how you transformed something that many people would give away into such a handsome piece! The distressing you did is spectacular. You should be very pleased with your hard work. It was certainly time and effort well spent
Thank you so much Debbie for your kind words. I am really happy with it and feel with this particular piece that I have finally mastered chalk paint.
That turned out so well!! I really like how the wood and the dark green paint peeks through the top coat.
That was a happy accident! I didn’t think that the green would peek out and when I saw it I was so pleasantly surprised.
I love this dresser makeover! As soon as I saw it on your home page I had to track down the post. Hands down this is my favorite furniture makeover you’ve done! Perfect color and perfect distressing. What a show piece it is now pinned and sharing on my FB page. Bravo!! XO Wendi@H2OBungalow
Thank you so much Wendi. It is my favorite too. And with this project I finally feel comfortable using chalk paint. The finish is so smooth to the point that it really surprised me.
This turned out really beautiful! Great work!
You made some changes on your blog design? It seems really clean and fresh!
Thank you Katerina. Yes, I cleaned it up a bit. I wanted the photos to shine and not have so much clutter.
Mary, this looks fabulous! What a great transformation. The color is lovely and the distressing adds tons of character to the dresser. Thanks for sharing with us at Snickerdoodle Sunday!
Beverly the distressing makes all the difference. Without it, it would have been a boring dresser and it would not have made any difference had I painted it or not.
I love the way your dresser turned out! Old things seem to have so much more character and meaning to us. I hope you find the bed!
Teresa this is so true. There is no way to duplicate the character on this piece. I was able to find the bed, and I hope to make it a matching set with the dresser, as soon as the weather cools down a bit.
I love the Americana Decor chalky finish paint. It goes on great! The color looks so good. Thanks for linking up Mary!
It really does go on great Crystal and it is reasonably priced.
Love how your dresser turned out Mary! Also that colour green looks amazing with the wood top! It’s also sooo lovely that it has a special story to it all so!
I love that green. You know green is my favorite color and until now I had been shy to use it. What a mistake that was Sam.
I love this so much. I love seeing how furniture can go from beatup to refreshed. Thank you for sharing these great tips!
I have to agree Kayla, there is no greater satisfaction that to make over something that is ready for the landfill or in this case wood heaven.
Love how this turned out, Mary! Ikea furniture is always fun to makeover and upcycle. A piece like this that is solid wood is perfect for that kind of project, and a new coat of paint is just what it needed. This looks really great! Those swirly knobs are really neat, too!
Thank you Celeste. This particular piece was solid pine so it was really nice to be able to save it. And the paint is buttery smooth!
What a gorgeous transformation! I love the colors you picked, too. Thanks for sharing your project with us at Funtastic Friday.
Thanks Sherry. I like the color combination of the dark and then the light on top. It adds depth to the whole piece.
What a stunning makeover! I absolutely love the color you chose. It looks so professional, and the antique look is brilliant!
Thank you Angie I am loving the two tone look with the natural wood.
Mary,
Love this chest so much. It’s one of your best saves and one of my favs. Thanks so much for linking to Friday’s Furniture Fix. We are so thrilled to have you share with us. Susie
Thanks Susie, this one was a bit of work with all the coats of paint, but well worth it when I saw how much depth it acquired in the process.
I need this dresser! I love it! And green is my favorite color! you did such a wonderful job painting it, and I love the knobs as well. 🙂
I worked so hard on this but it was worth every stinkin minute. Now I walk by it and caress it, that is now soft it came out. Thanks T’onna.
I had a similar dresser and chest of drawers and painted them recently a soft white leaving the top wood color. Love the look! Your dresser is lovely, too!
That is also a lovely combination Zenda the white and natural on top. I think anything combined with natural is beautiful to look at.
Mary, it looks fabulous! I really have to go at it with a dresser I have at the lake here. If it turns out half as well, I’ll consider it a success!
Using chalk paint on this one made it a snap. I only took care to sand in between the layers because at this point I go for a super smooth finish not just a pretty color. Good luck and I hope to see your project on your blog soon.
You need to fly from Greece and help me with all future painting projects.
Swimming across the pond right now!! 😉
The color is beautiful, what a transformation! Better than new!
Maria
Thank you Maria, it is one of my favorite furniture makeovers.
Mary, wow! What a transformation! It looks terrific. You done an awesome job. I worked on a little tiny bench I hope to show next week and girl, I thought about you while working on it. I thought, If Mary were here she would whip this thing out in 2 seconds! LOL! Took me half a day! LOL! Hugs and blessings, Cindy
Hi Mary!
I like what you did to the chest – such a difference. I especially like the color green you used to paint it. Thanks for sharing at Homestyle Gathering!
>>> Kim
Thank you Kim. I am glad I mistakenly ordered the wrong color. This is so much more interesting than white.
Lovely makeover, Mary! Saw you got to spend some time with Katrin this past week. So fun! Thanks for sharing at TTA!
Thanks Julie. It was on our bucket list for a long time, to finally be able to meet in person!