As I’ve mentioned before we are downsizing from a large apartment to a smaller one which is located right below the one we are in now. Today I’ll be sharing the balcony with you. The one that I’ve been working on these past few weeks and how I’ve decorated it frugally with repurposed treasures. Because that is what they become with a little care. With this small tour of this balcony you’ll be able see just how everything comes together and how everything gets used over and over again, in one form or another.
This balcony is right below the Balcony that I shared with you last year. In fact if you take a peek you can see the same exact scenery
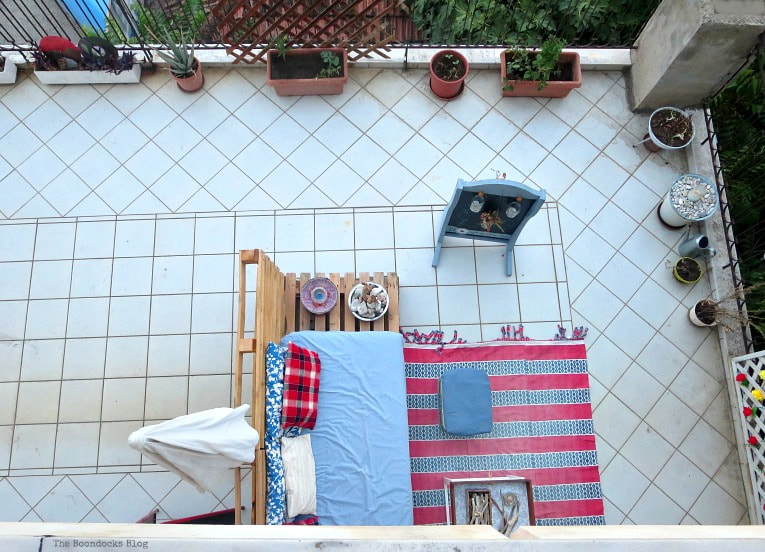
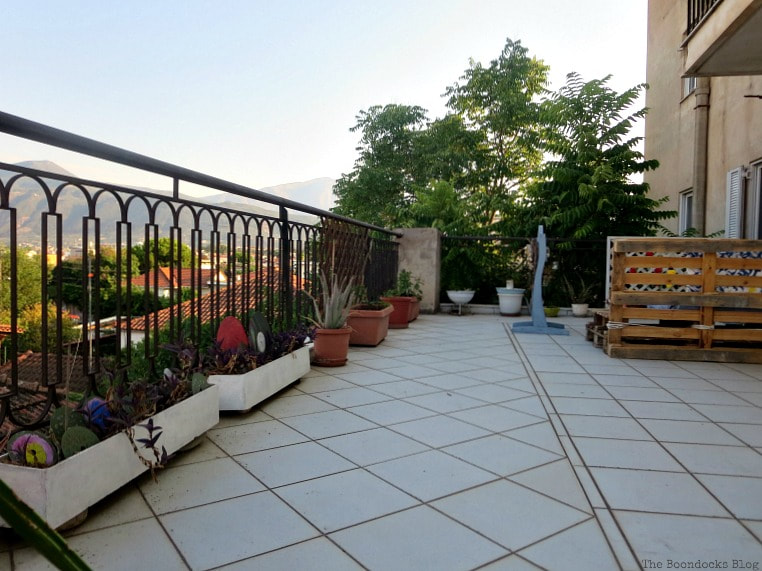
This is how it looks from the top balcony. It is actually much larger than the third floor balcony. And it also wraps around three sides of the building but we are only using this small portion. You see the other sides look directly onto busy streets and we do value our peace and quiet and privacy.
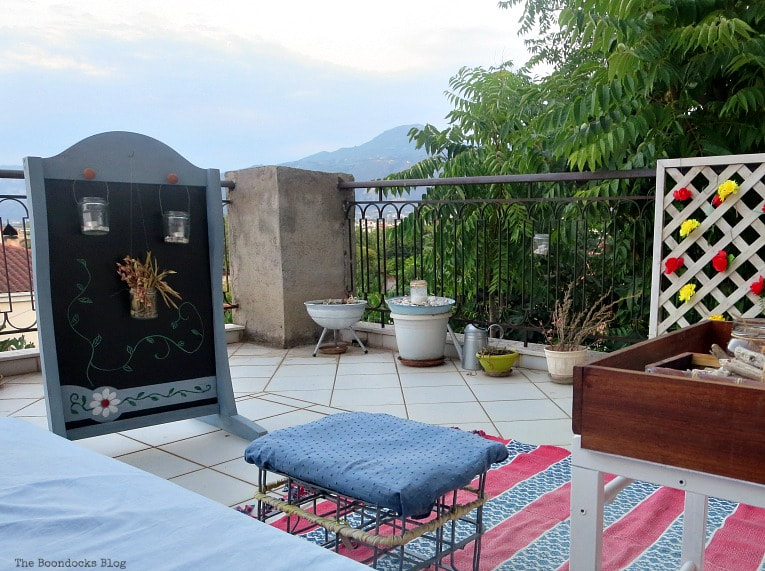
Let’s start with th end facing the back of the building. You all remember my colorful fence. As you may have guessed by now, the branches I had originally added dried out and I was going to add some more but then I remembered the yellow faux flowers I had from last years wreath. Not wanting anything to go to waste, I reused them to fill out the spaces and add even more color.
Next to the colorful fence is my failed attempt to save the succulents (we won’t talk about that now), the nautical lantern, and the space ship planter. Both of these were made using parts of a barbecue grill.
Here is the view from the other end of the balcony. You can see I’ve got plenty of room and lots of things in my planters that aren’t plants. But to give due credit, my husband is growing tomatoes at the other end of the balcony.
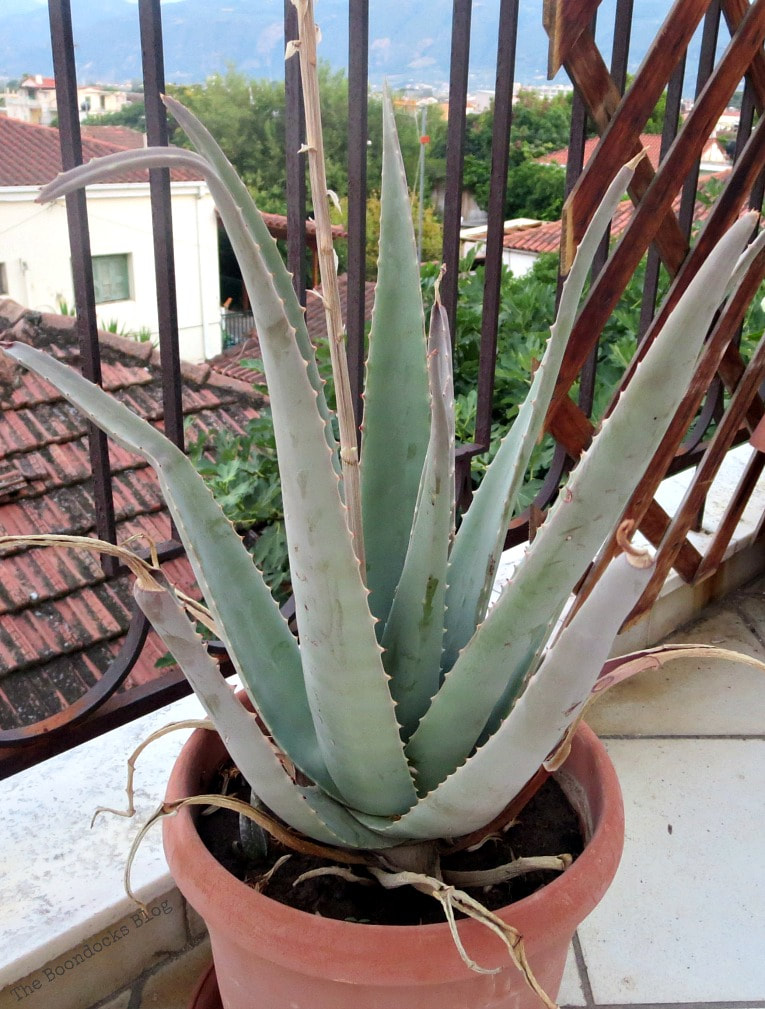
Why there are even a few aloe vera plants which always come in handy with sun burns and such. I do believe this one is due for a trimming.
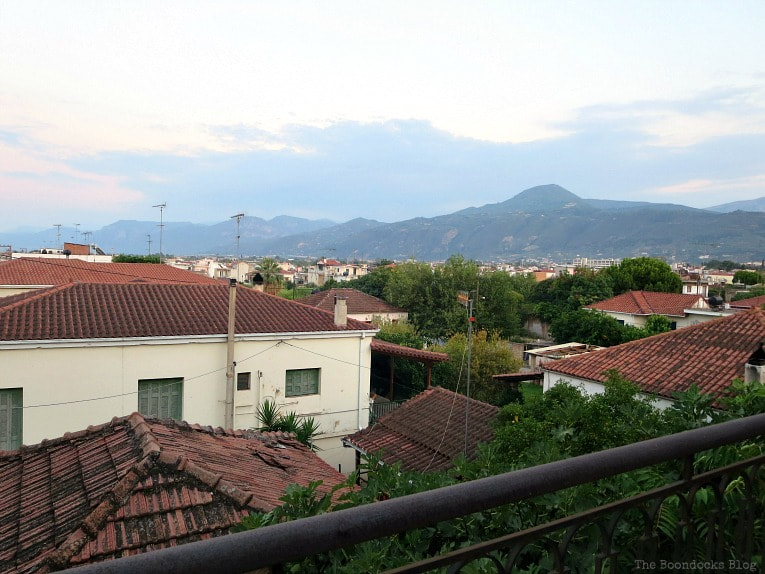
The view from the balcony.
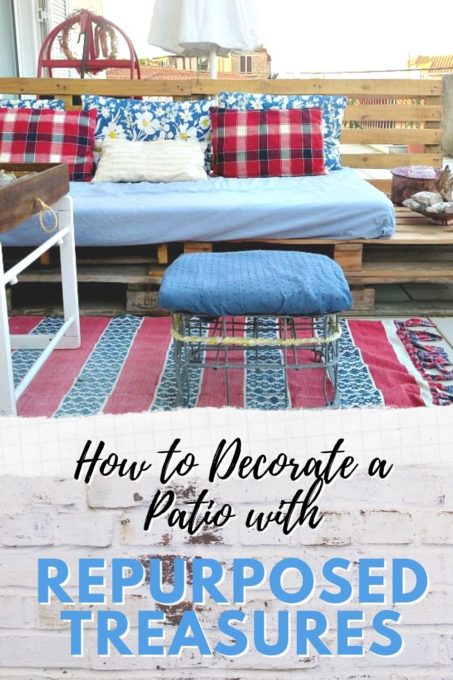
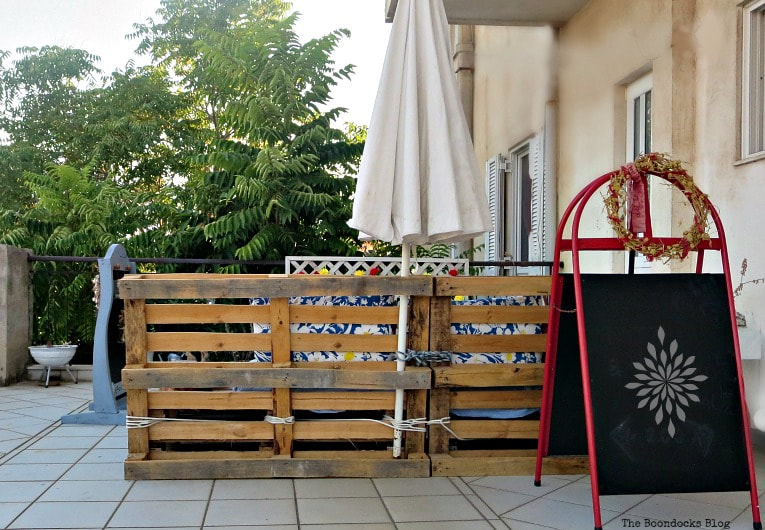
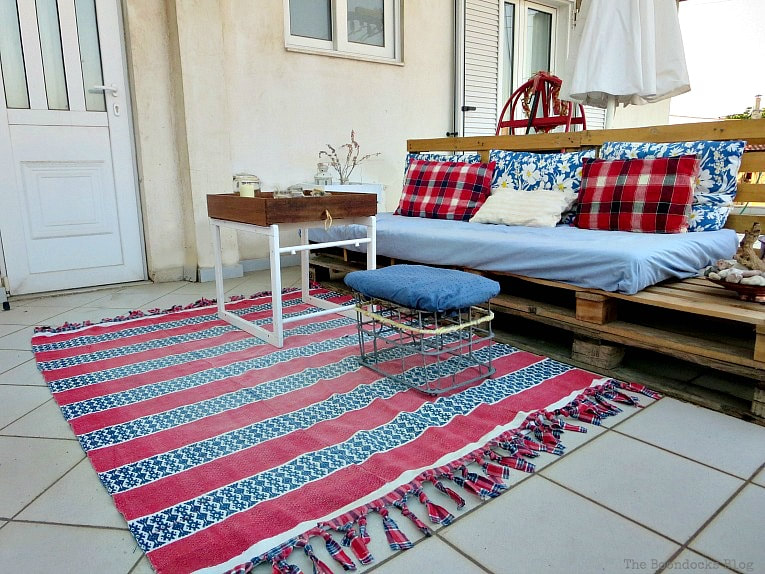
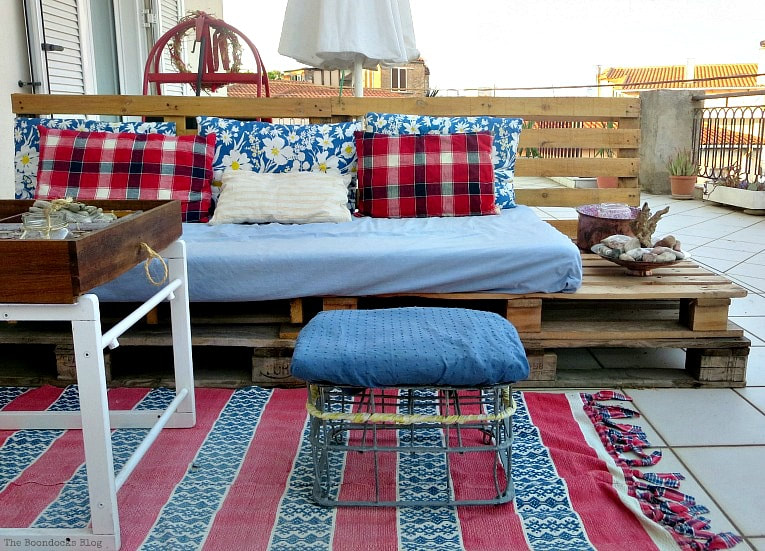
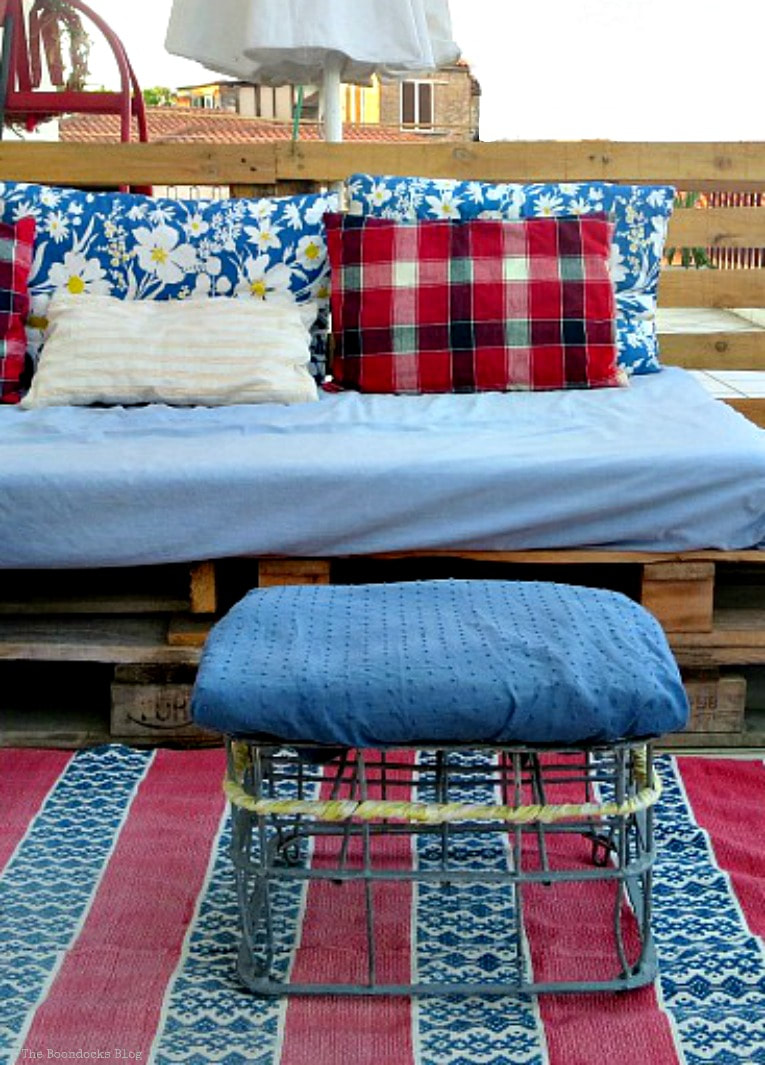
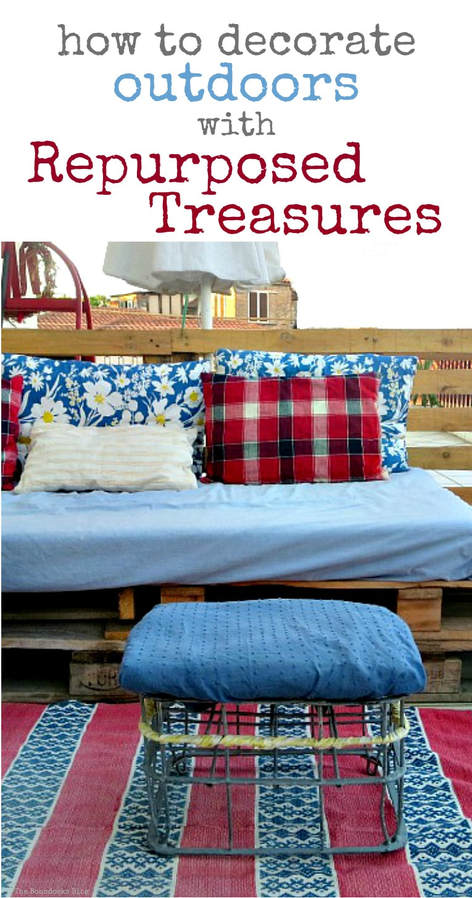
Now back to the tour. Here you can see the back of the pallet couch. It looks like a hot mess but I really don’t care since it only took me 15 minutes to put together. What’s important is that I enjoy my space and get lots of rest.
We even added an umbrella for extra shade during the day. But truth be told, we have never sat out there during the day. We only use it after 5 pm when the sun has gone over to the other side of the building.
The front of the couch has been modified a bit. Instead of many cushions I have replaced them with a mattress from a portable fold-up bed. It is so much easier to work with. And of course the numerous pillows. The mattress does not extend the length of the pallet couch but that is okay because at the end I have space to add things and use it as a side table of sorts.
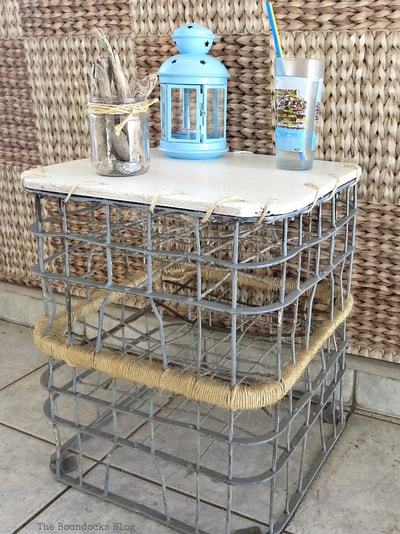
In front you can see one of my treasures, a table that was made from the base of a baby high chair topped with a dresser drawer that has now been repurposed into a table top. Another treasure, my beloved vintage milk carton stool is front and center and has been recovered with new fabric.
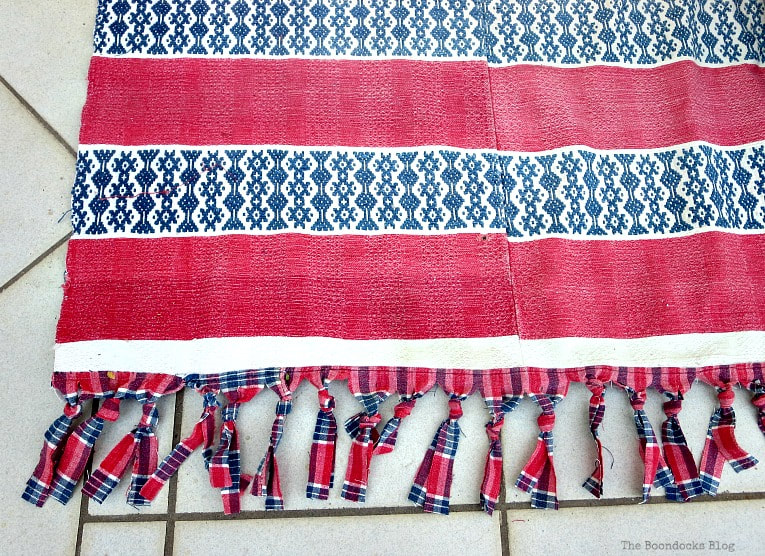
Now a little bit about the rug which is not a rug at all. It is an old piece of heavy duty fabric which we have had in our home for years. Many of my Greek readers may recognize it as being characteristic of vintage fabric which was woven in a loom. I added a different fabric at the edges and simply cut them up to create a fringe. I think it adds a nice pop of color to the balcony!
The pillows are also of a complimentary fabric. We do like our reds in this house.
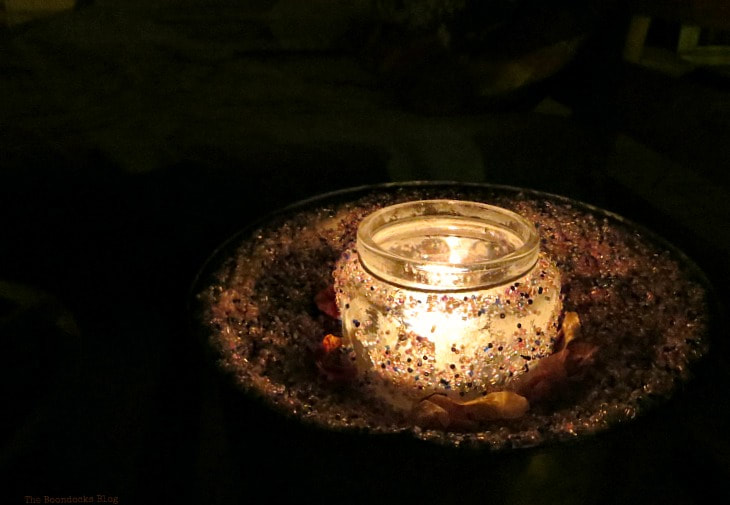
You can also see the area next to the seating which holds my masterpiece abstract art and the beaded lantern both made using vintage copper pots.
The other side…
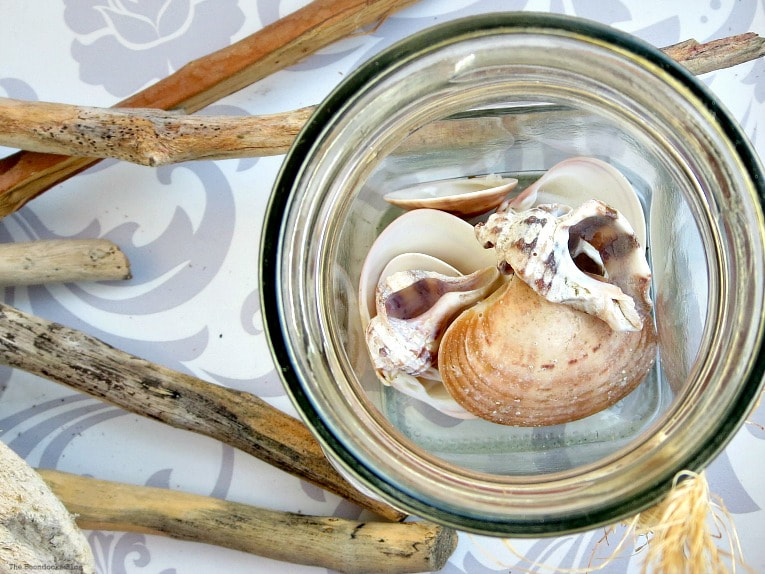
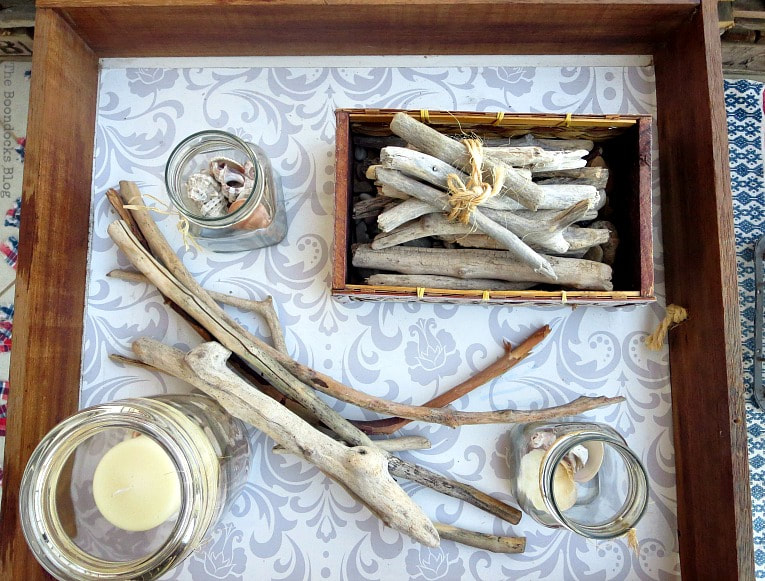
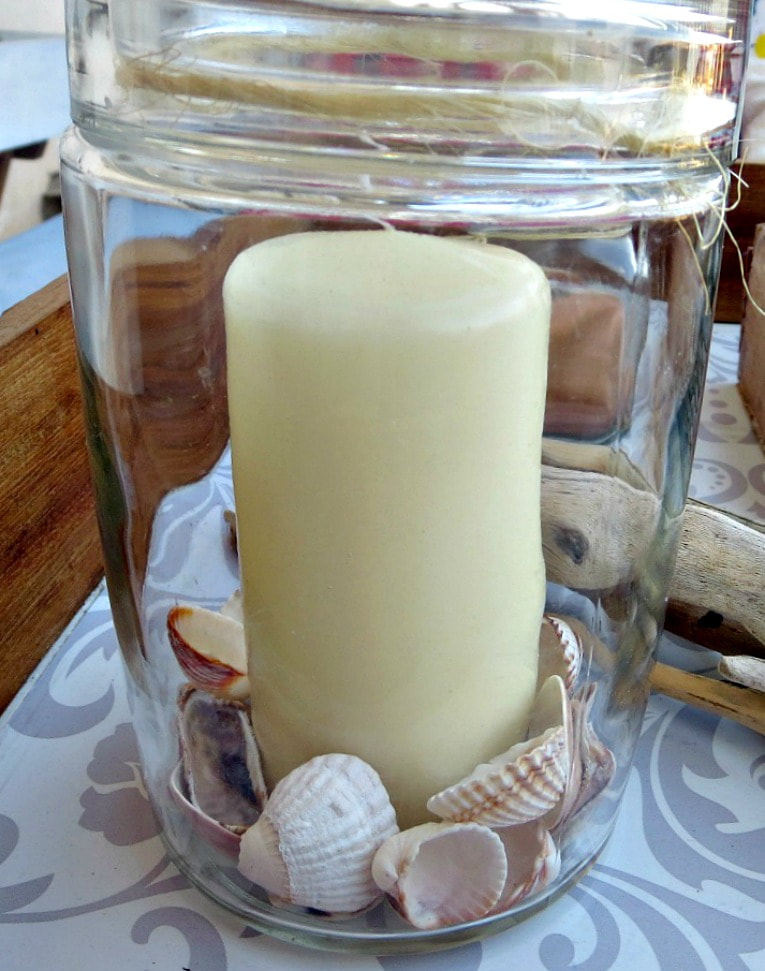
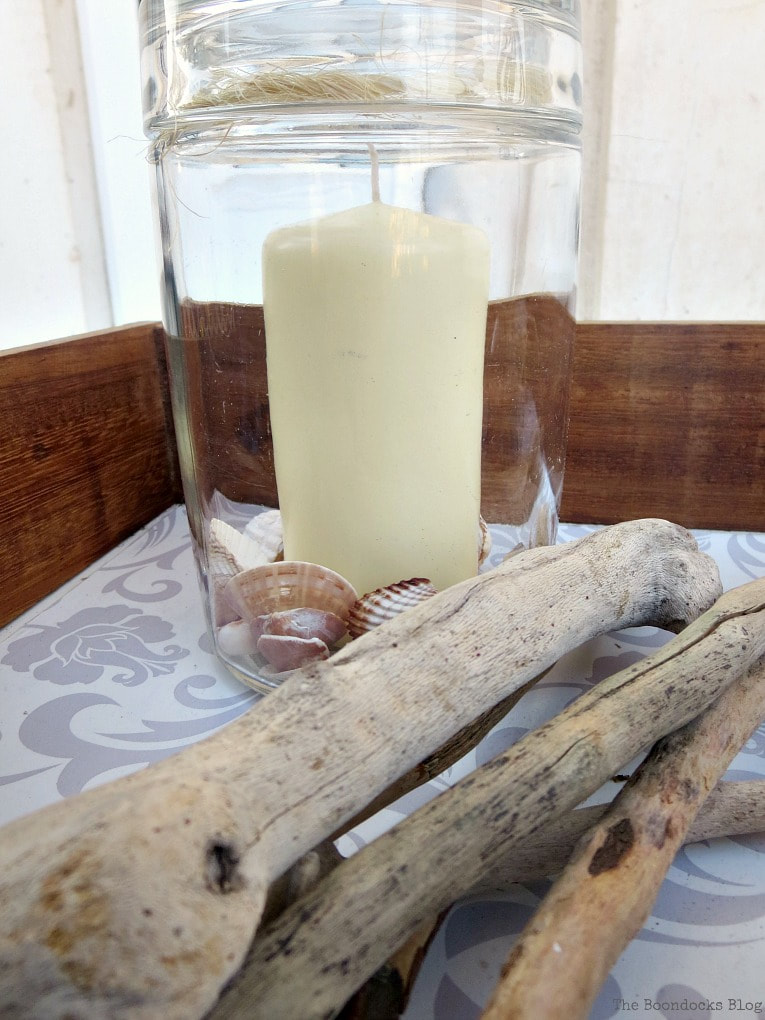
The dresser drawer as table top is usually full of food and wine, but when not in use it is nice to decorate it and bring a bit of the beach to our balcony. Very simple things, a few pieces of driftwood, some marmalade jars with shells and a container with a candle in it.
I got this idea of placing the candle in this glass container from my friend Sheila of My Kentucky Living. Sheila recommends keeping the container covered when the candle is not lit, this way it stays nice and clean. She has added sand and shells to hers.
Go over to her blog and admire her jar which is much nicer than mine. Sheila is the Queen of vignettes and she really knows how to decorate too.
Disclosure: The items below are affiliate links and link to Amazon.com. If you purchase any of these products through the links, I receive a small commission, that way I can continue to provide you with lovely content. There is no extra charge to you for purchasing through my affiliate links.
Not only is Sheila’s idea practical but it looks so pretty!
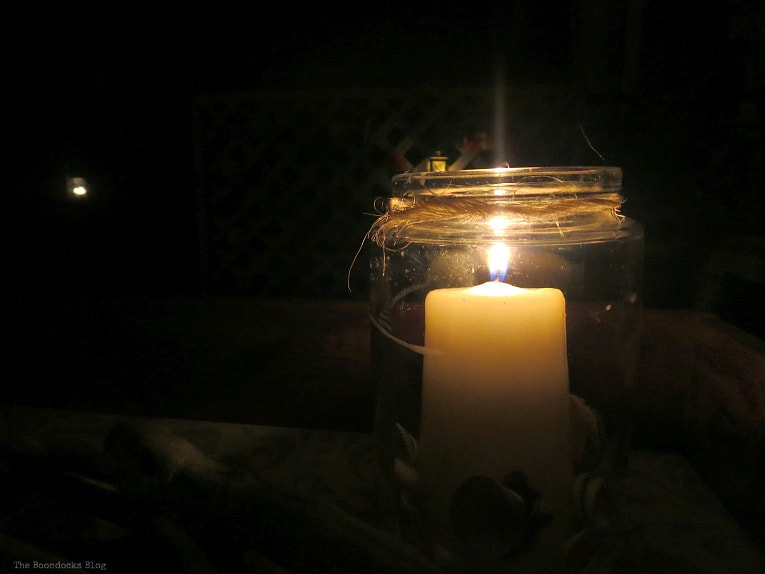
And when the sun goes down the atmosphere changes with the lighting of the candles and all those tea lights. I must have about 10 of them out there.
One final look at my copper lid turned lantern which is actually not so bad when I look at it in this light.
As you can see I was able to put this space together using left over items that I managed to repurpose and upcycle. You don’t need to spend money to decorate when your house is full of treasures waiting to be discovered. One of the best things I found was the drawers that I’ve been able to use as trays and table tops.
And that was my balcony tour. It is easy to decorate your space when you look at things in a fresh way and instead of junk you see the makings of a repurposed treasures. Now I have a warm, inviting area where I can relax in the evenings.
Make sure you drop by Sheila’s blog, My Kentucky Living. She is such an inspiration to me and such a sweet lady. And you can thank me below!
If you like what you see, share it with your friends, or save it on Pinterest. Above is a Pinterest worthy image!
If you really like what you see subscribe to my blog and get my adventures twice a week in your mailbox. The form is on the sidebar and your e-mail will never be shared with a third party.
More Summer Projects:


I’ve been following the creation of your family spot on the balcony from the very beginning and I must say you did a spectacular job of it! The rug is a fantastic addition!
I am sure it’s a real pleasure lounging here after the heat dies down and late into the night!
That rug I think really pulls the space together. Thanks Maya!
I just love everything about your balcony, Mary. Every element of it is stunning! It looks like a wonderful place to work, relax, and enjoy!
And take a nap or two! 😉
Your balcony area is lovely, you did a fabulous job decorating it. Very inviting, plenty of colors, and privacy with your pretty chalkboard sign, and pallet fence. Love the drift wood, shells and all the candles. Does give one that beachy feel.
Love you aloe Vera, wish I could get mine to grow, it’s just there. Doesn’t do anything.
Thanks for the tour Mary, everything’s beautiful, you have a real knack for upcyling! 😊
I hardly ever water mine. And it has to have a big enough pot to grow into. That is all I know. Nothing else. 😉
I love how it all came together. It is a very relaxing space, an oasis. The bed is even better now with the mattress. It looks great.
The bed is sooo much better with this mattress Debra. Before with the cushions it was a bit lumpy! 😉
It looks so colorful and creative Mary, and I especially love the reuse of the fabric for a rug. You have an amazing view too!
xxx
That view is going to be the end of me. It’s what keeps me here even though I have other fish to fry!
Mary your balcony looks like such a fun spot to be! I wish I had so much outdoor room to work with, you did a great job! I really love that rug, it is perfect for the spot and all the colours really go so well with it!
Katrin I honestly don’t know what to do with all that space. It is too much for us now. Maybe later when we are settled we can add a table for outdoor eating.
What a nice balcony! You’ve made it so homey with all your little touches. You are an incredible inspiration in using what you have and being frugal. I appreciate that b/c that is my background. Seeing your “junk” with new eyes is a good lesson to remember too. I love the rug that’s not a rug! So pretty and a wonderful pop of color! I can well believe your balcony gets no action till after 5! I remember that Greek sun! Are you all moved in now?
We are half way there… We still have to put the kitchen together . We got a small one from Ikea. DIY never ends in my house! Lol!!
Mary!
I LOVE your new balcony!!! Yes, since it looks like you and your hubby live outside much of the time, moving to this apartment was a great idea. I can see potted trees living here along with other plants ~ really pretty!
The red in the pillows and rug really add a nice touch. Maybe you can get some red geraniums and put them in some round pots? They would look wonderful tucked in here and there. Your view is lovely of the mountain range… sigh! Missing my mountains. 🙂
Happily pinned a bunch; going out via Tailwind,
Barb 🙂
Thanks Barbara! I am so happy with how the whole space turned out. I will probably try to timidly add a few more flowers here and there but I cannot promise that they will be real.
Mary your balcony is lovely. I can imagine you there, surrounded by your creative treasures, comfy on your couch enjoying that outstanding view! What I’d really like to know is how do you trim an aloe plant?
Haha Kim you need nice big scissors for that. I think what I need to do is maybe take it out of the pot and pull off all those dead leaves.
The size of your balcony sounds incredible, Mary! I bet your husband’s tomatoes do really well in the sun up there. Love all the color and ambiance of your new balcony space and would love to sit and have a good chat over a bottle of wine on your pallet couch. Pinned
Oh I truly dream of that day Marie. We have to put it in a bucket list for sure. I’ll be stockpiling the wine from now!
Hi Mary, I don’t blame you for making such a homely outdoor space with views like that. It looks really lovely and I can imagine you enjoying the coolness of the evening sat out there.
xx
It is perfection out there Debbie. You know that the summer nights are the best in Greece.
Looks great! I love your red and blue colors and your collection of up-cycled objects to create a comfortable and attractive seating area. It just looks like a magical place to sit in the evening with candlelight and starlight and your breathtaking view.
Carol (“Mimi”) from Home with Mimi
You have described it perfectly Carol. Once the sun goes down it is just the perfect spot for a small feast among family and friends.
Looks so cozy, Mary! I love the reds too and I’m glad you’re coming back to it. I remember the time you said you’re trying to get rid of the reds in your house. It goes great with the beach blue 🙂
So is this the new balcony or did you take the photo from the neighbors above you, or do you have two-level balcony? I’m confused, lol…
The above is the apartment we live in now, but we are in the process of downsizing to the one that is below, where this balcony is. You see we have no neighbors in the building, we are a bit spoiled that way.
Now it makes sense. 🙂 A whole building to yourself and you’re downsizing! But I’m loving the size of that balcony. Hope it’s high enough for those amazing views.
Looks like a great place to relax!
It can be so great that you have to peel yourself off the couch at the end of the evening.
I love your home in Greece, that open patio overlooking everything is gorgeous. Just beautiful.
Thanks so much Maria it makes it hard to want to live anywhere else. Even with the noisy street below.
Thank you for showing us your balcony, dear Mary. I’m sure you’re happy this one is bagger than the last. Most probably you wouldn’t mind when living near the north pole, but I guess you do spend a lot of time out on the balcony in Greece.
Have a lovely day,
Marjan
The north pole sounds just about right on most days Marjan. Haha!! But at least things cool down in the evening and I can enjoy the balcony.
I love everything you’ve done on the balcony and that rug – wow, it just brings the whole space together so beautifully. I bet you guys have spend so many lovely evening out there, listening to world settle down and dreaming about new things to re-purpose. We often forget to see the new in the old and tend to go out and buy something instead, which is just nuts. Thanks for the tour and inspiration Mary. Hope you have a happy week and that the weather cools down a bit
The universe came together perfectly Michelle. Things have cooled down and I am so enjoying being out there in the evenings. I try hard to pay attention to all the old things and yes it is a shame the way we waste so much. But I know you get me.
Mary, You have created a nice little summer haven on your balcony and with a beautiful view to boot! Looks like a great space for the family to gather and relax.
Thank you Laurie, I am so happy to have done this. Now I can relax a bit and really enjoy it.
I do love your balcony and the view! And your pallet couch is awesome. I’d love to try it out.
🙂 gwingal
Come on over Nikki. You won’t believe how comfy it is!!
Mary, this outdoor space is so cozy and comfy! I imagine it’s the perfect place for those summer evening gatherings. I love how you’ve repurposed everything and it all coordinates so we’ll with the reds and blues. I love how you chose to fringe the rug, good call. It turned out so great!! I’m hopping on the next plane so I can hang out with you on your beautiful balcony. 😉
Yay! I would love that so much. To be able to hang out with you anywhere at all. But this balcony sure is comfy.
Your balcony is beautiful! I love that pallet couch, and that was so smart to use a small mattress on it. I’m sure it’s much more comfortable than cushions too. Your view is amazing too. I think I would be out on the balcony all day if I lived there.
I would too Rebecca if it weren’t for that killer sun during the day, but after 5 you most definitely will find me there.
The balcony looks big. You decorated it beautifully. Greece looks amazing. I’ve always wanted to visit Greece. I tweeted this post!
Thanks so much Doreen! Now hop on the next place and come on over. The feta and wine are waiting.
Great job Mary. Like the look and charm.
Thanks Carol, the best thing is that it is oh so comfortable!
I really love all the natural elements you have introduced to your beautiful patio/balcony. What a gorgeous view. I don’t think I would spend anytime indoors at all! Thanks for sharing! Sandi
Thank you Sandi. It really is incredible out there in the evenings.
That is a fabulous balcony. It is so roomy and decorated in such a lovely way.
Thank you Elise, it is my little bit of paradise!
You’ve created a wonderful little retreat. I love the sitting area and rug!! Thanks for sharing with SYC.
hugs,
Jann
Thanks Jann for your sweet comment. It was the smartest idea I’ve ever had!
Super nice job. I love the tour. I really like your comfy seating area. I too make a pallet chair ( a small one person one) in my back yard. I love using trash to treasure. Your ideas are all awesome! So happy to visit today from the Sew it cook It Craft it
Thank you so much Suzie. I too love taking trash and giving it a new life. There are few things that are more satisfying that doing good for the environment.
How lovely to see it all pulled together (I LOVE that arial shot from above!)
The rug/not rug is so pretty, what fabulous colours.
Thanks Julie. It was fun photographing it too.
So lucky to have an apartment with such a fabulous large patio space Mary. Decorating outdoors is so much fun with possibilities, enjoying watching yours come together. Thanks for sharing your project at #fridaysfurniturefix
Brenda I think it is just a bit too big but I’m not complaining! The view is incredible.
Mary, You know this repurposer loves it!!! Great job!
(BTW- Thanks for linking to the Waste Not Wednesday Linky Party)
Thank you Deborah and all on a zero budget!
I love your driftwood and sea shell decor and the rug. Thanks for sharing at Sew It Cook It Craft It.
Thanks Lina for dropping by.
I love everything about this 🙂 Thanks for sharing with us at the To Grandma’s house we go link party – I will be featuring this at tomorrow’s party!
Thanks Tarah for the feature.
I love your balcony Mary and love your “not a rug” rug it is lovely
That was was a last minute addition but it really pulled the “room” together.
You managed to create a beachy outdoor feel in the middle of a busy city. How amazing is that. I am surprised at how big the balcony is, it certainly adds lots of beautiful living space. I expect in Greece your able to use the balcony year around?? Its all so lovely manner, casual and unique and pretty.
Well done.
Believe it or not we start eating outdoors from early May and we use it till early October. So yes we get lots of use of our outdoor spaces. The only time we cannot go outside is during the high heat hours between 12 to 4 or 5 depending on the side.
Mary you and your family must LOVE hanging out on your balcony!! What a beautiful view and the way you have decorated just makes it so homey and welcoming! Enjoy every minute!!
Sam it was the best place to hang out in the evenings when the sun went down and we would light up the tea light lanterns.