How To Upcycle Vintage Copper Pots the Wrong Way
Upcycle vintage copper pots that you found in a thrift store or your basement. An easy DIY and learn from my mistakes on what NOT do to.
Sometimes you are so excited to get started on a project. In your mind you have it all planned out and you imagine these perfect results. But in reality it doesn’t always work out the way you want it. Hence the title of this project. Because there is definitely a wrong way to upcycle vintage copper pots, and I am going to show you!
This month I was challenged by my blogger friends to come up with a project using a thrift store find. The only problem is that there are no thrift stores in my town. Nada! Zero! Nothing! So I asked the ladies if I could find something from my basement which is really the best thrift store around! But you all know that!!
At the end of this project you’ll be able to see what my friends did with their thrift store finds. So make sure you go all the way to the end and read my hard earned lessons too!

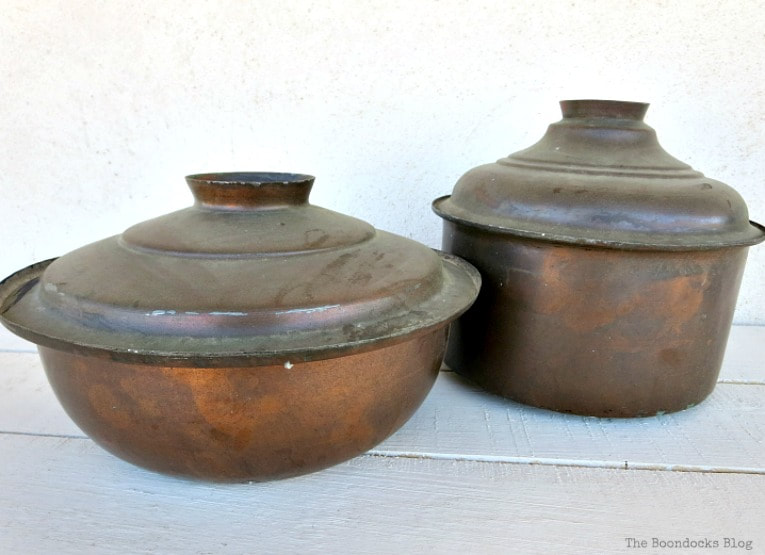
Off I went to the basement where I found these two vintage cooper pot bowl dishes with strange looking lids. After a bit of sleuthing I found out that they are vintage copper pots from the 1950’s and were selling for about $36 for a set of two.
What I didn’t find out was why the lids were such a strange shape. Anyone have a clue?
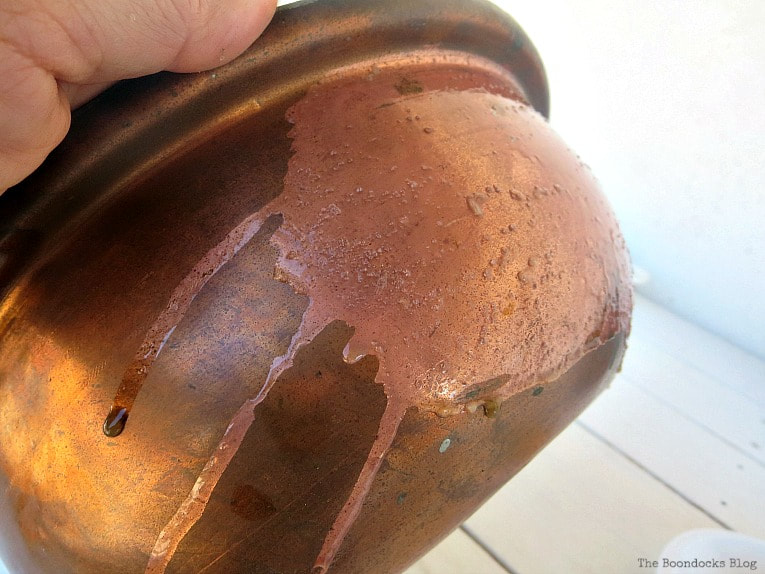
The first step was to clean them up. That was very easy to do. I cut a lemon in two and poured some salt onto the lemon halves.
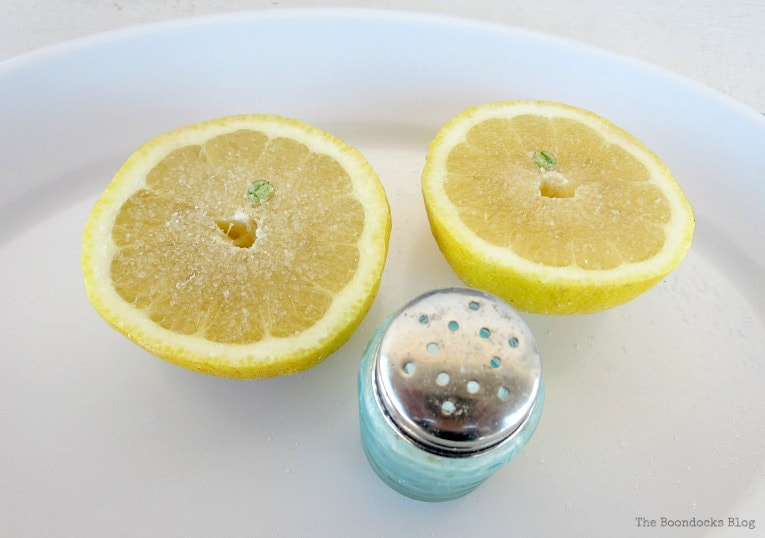
Next I rubbed the salted lemon onto the bowls. As you can see below the result was instant. You can even see the lemon juice dripping and how clean the copper became.
I was so happy and excited! Now I would just fill them up and make a pretty vignette!
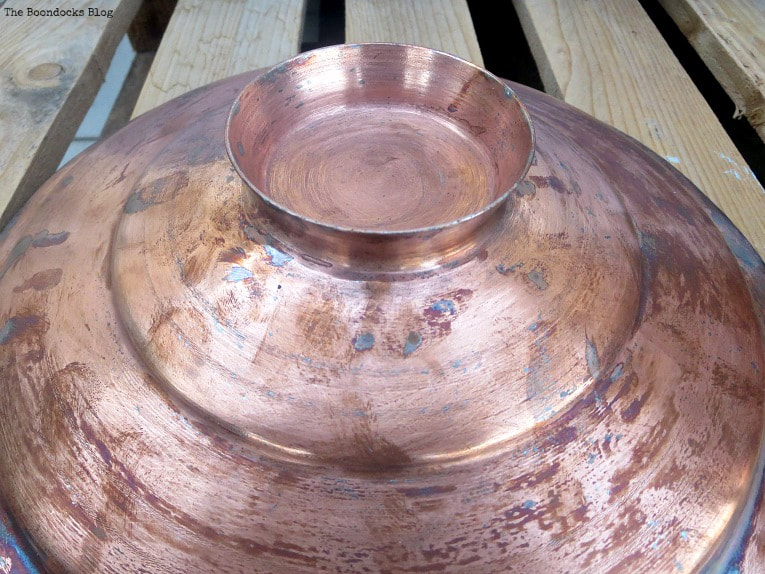
Here is the vintage copper pot lid all shiny. Do you know what that is used for? The million dollar question!
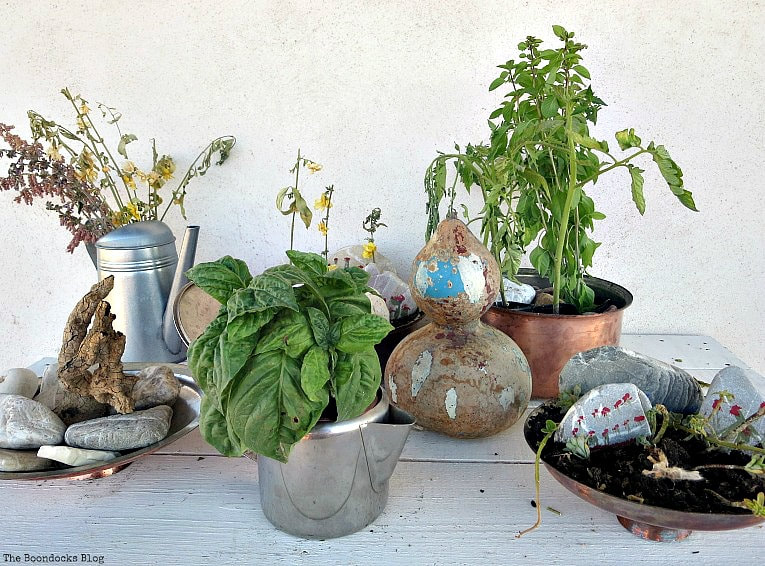
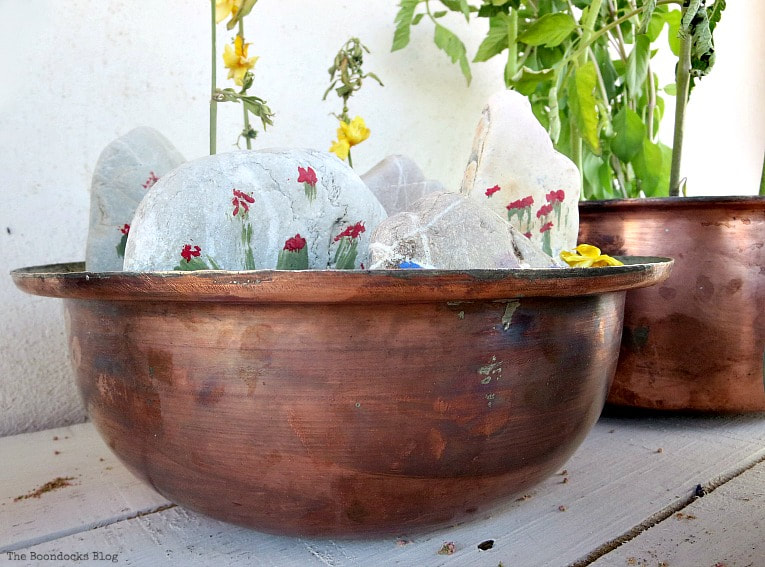
For that perfect vignette I had in my mind that I would use some plants my husband had bought home. And then I would add some rocks and some dried flowers. And I would use a dried squash which had been painted and a milk pourer and so on.
And then I filled them up like this.
But you know what? I hated the vignette!
I mean, what is this supposed to be anyway? A lid with rocks and a … I don’t even know what that is. I’ve had it in the house for as long as I can remember.
I had to ask the hubs, and he said that it was a piece of wood we found in the river many, many years ago, and I’d liked it so much I bought it back home with us. I guess I was hunting for junk even back then.
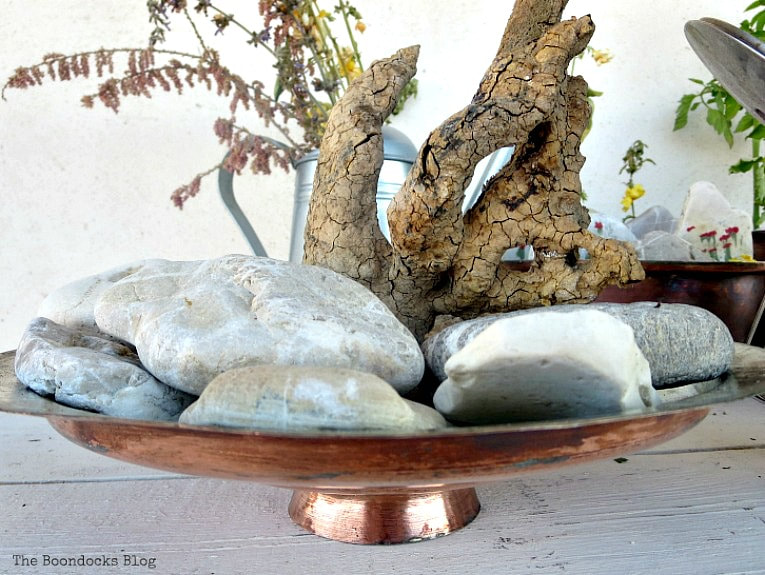
Sentimentality aside, it does nothing for me. And why am I showing it to you? Cause it makes for a cool photo. “wink”
Let’s stretch the truth a bit and call it abstract art!
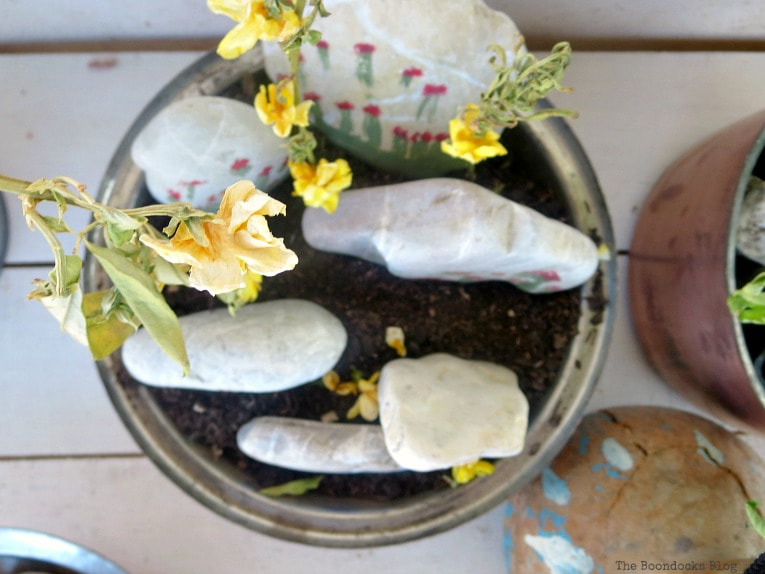
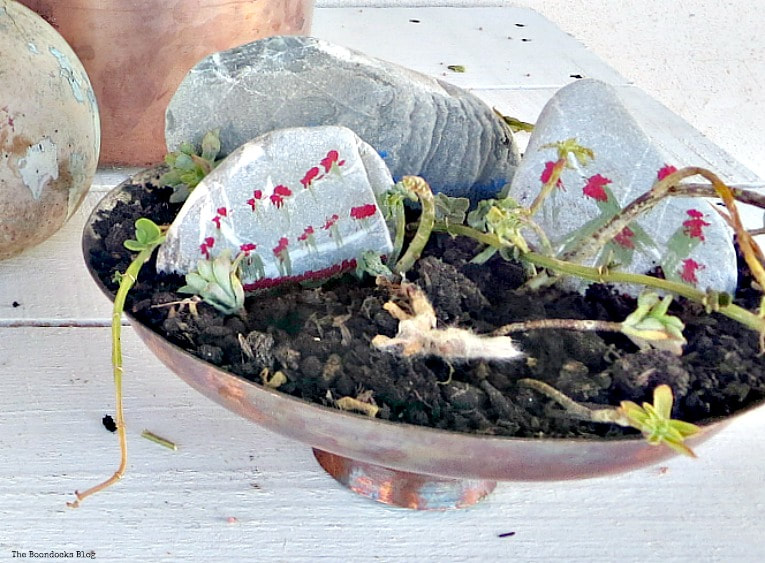
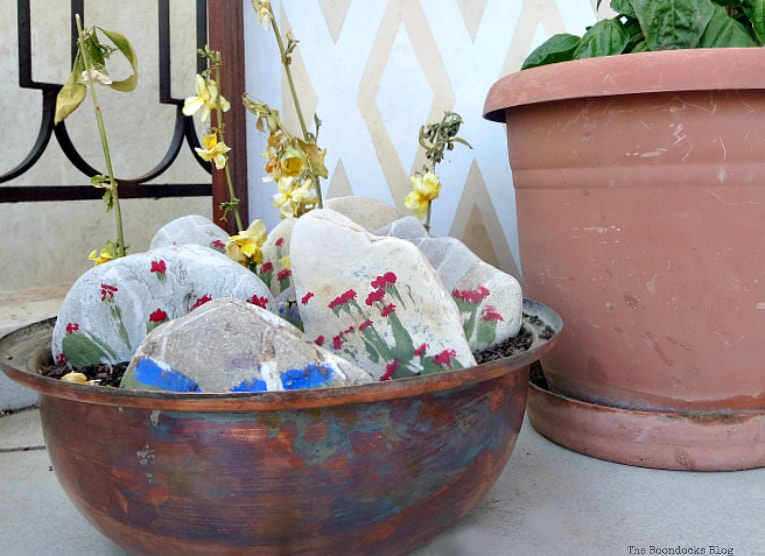
The bottom portion of the bowl was turned into a rock garden, which in my opinion is an epic fail. I always drool over everyone else’s fairy gardens but I am so bad at these things.
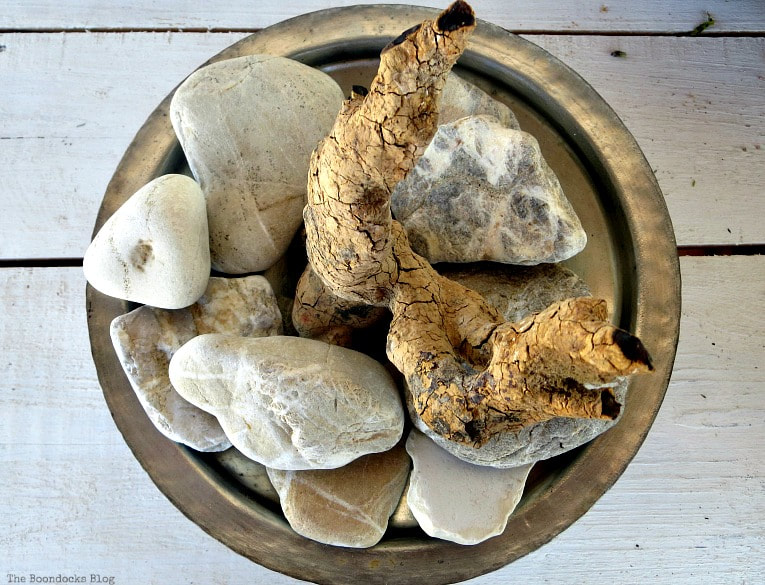
I had painted these rocks last year. You can see them on the balcony tour here.
Maybe if we look at it overhead it won’t be so bad?! Of course that defeats the purpose of upcycling the vintage copper pots.
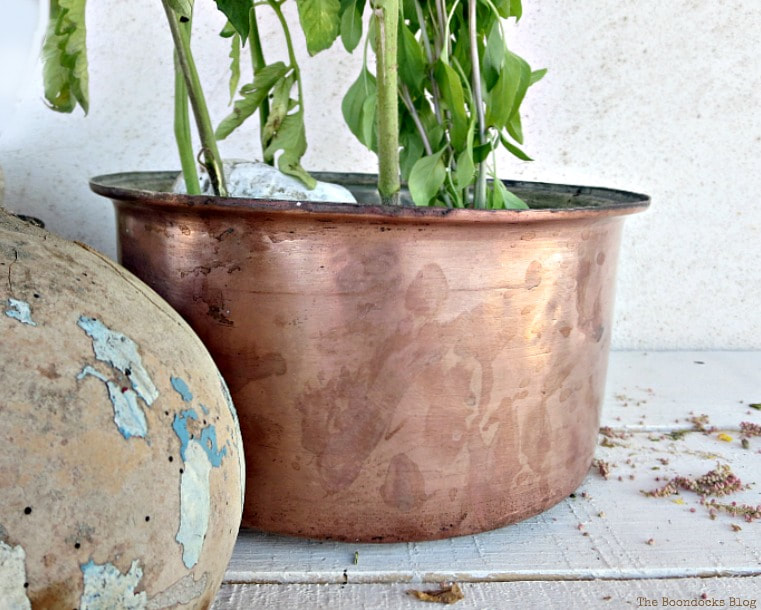
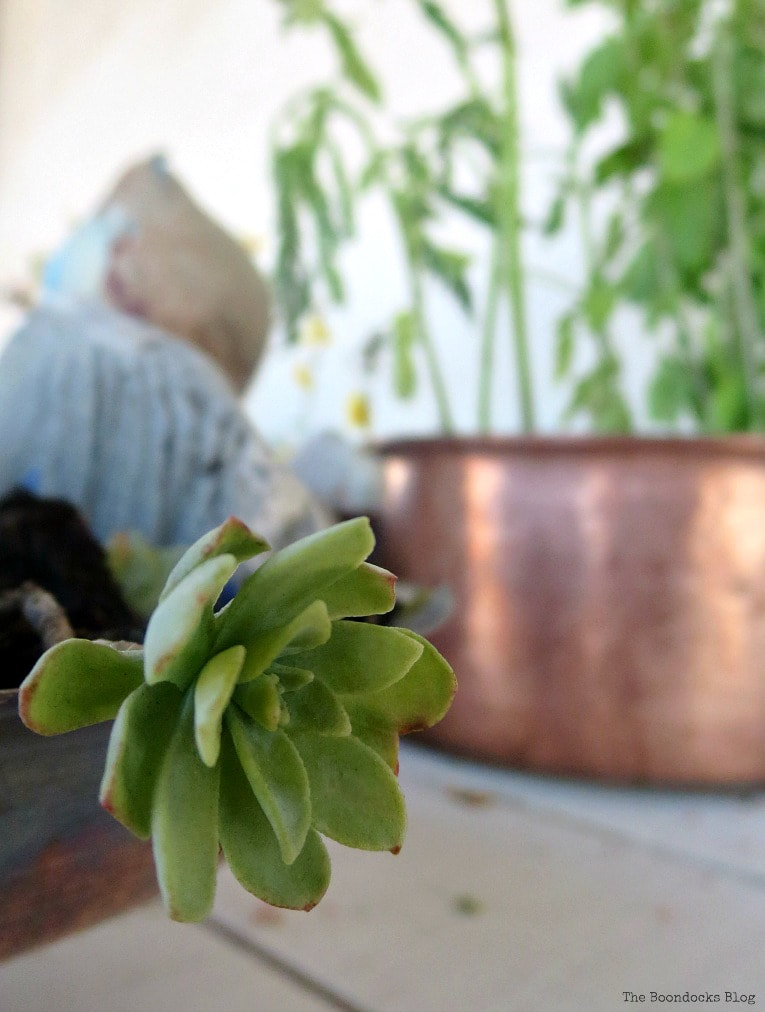
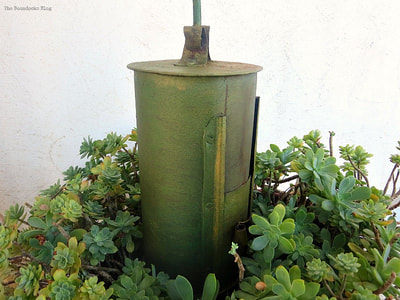
The big copper pot was used as a very bad planter for the tomato plants.
Now I have a confession to make. As you all know I am no gardener but even I can grow succulents. However this year I have been so busy fixing up the new space that I have neglected my meager succulents. And so when I went to add some to my other lid, this was the result.
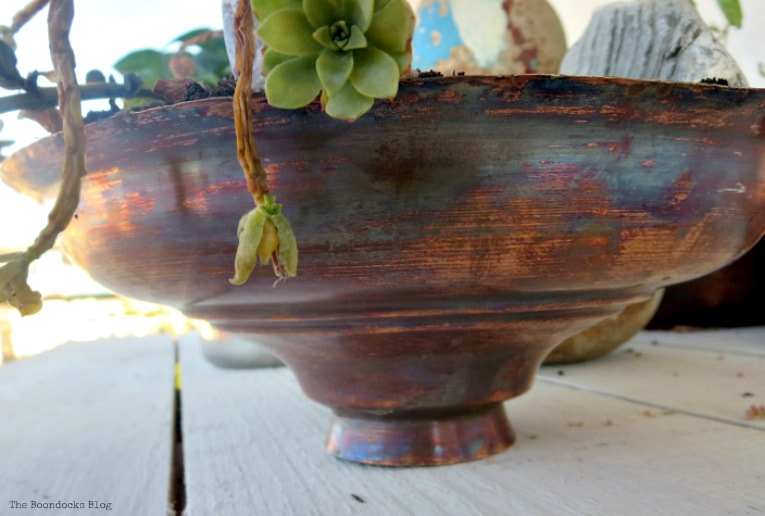
It is pitiful and I am embarrassed to show it to you, but I think that we can be truthful here. After all, we are among friends.
I hated it so much that I just took everything out, cleaned it up and started again.
Upcycling my Vintage Copper Pots
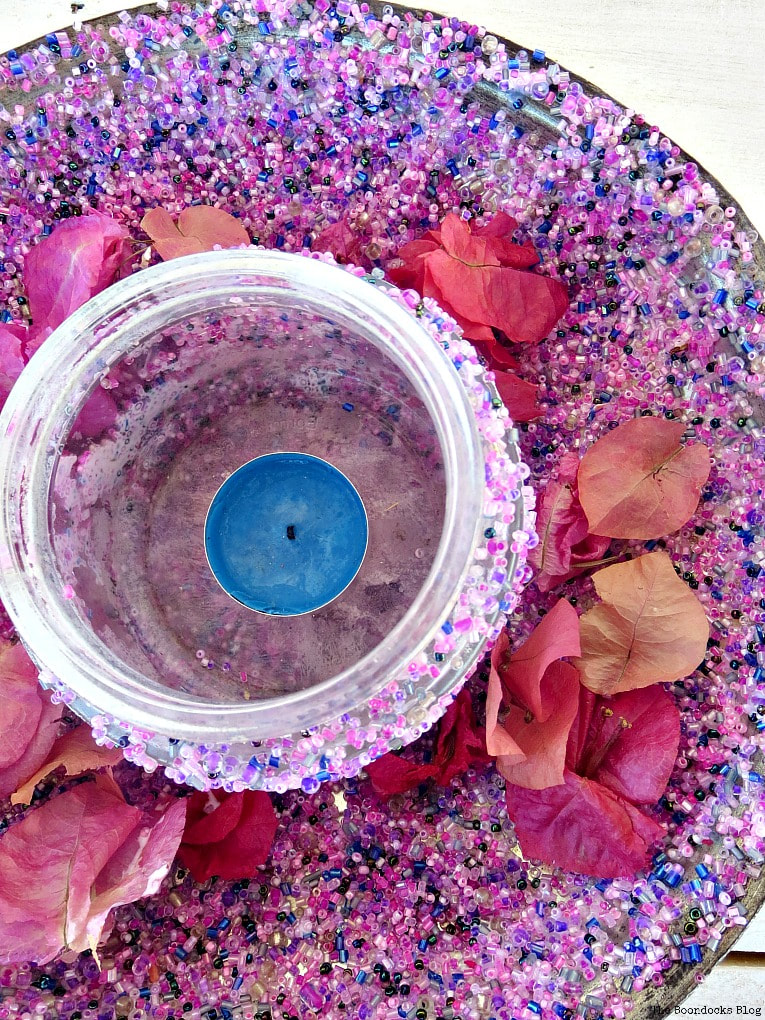
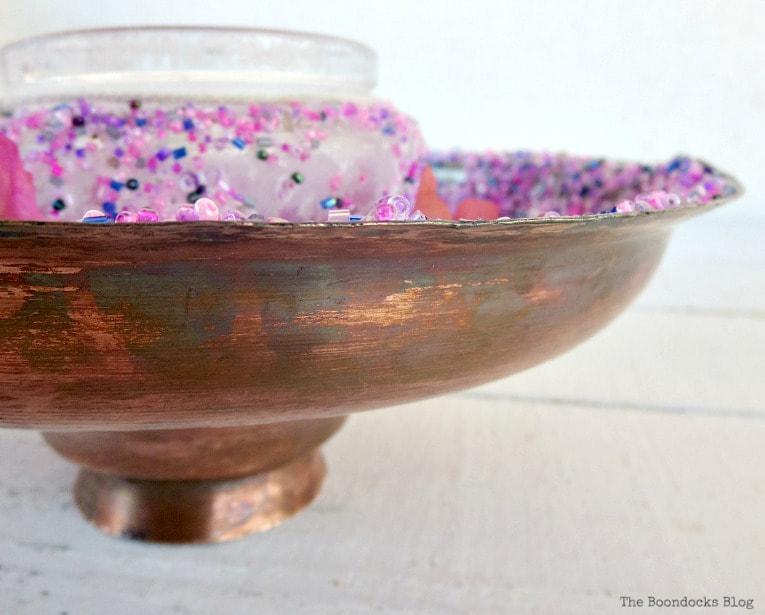
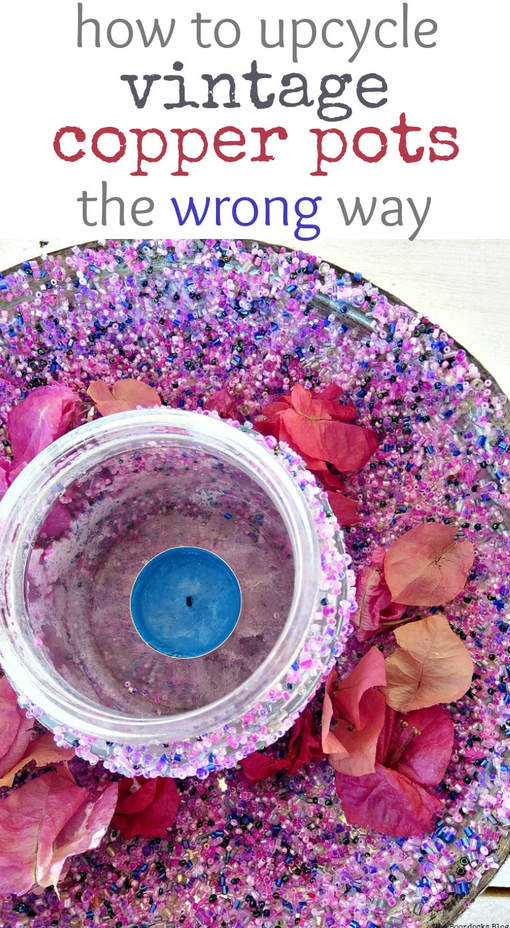
While I was decluttering the other day, I had found a container full of tiny beads. They belonged to my girls who liked to make bracelets and other crafts when they were younger, much younger. But these beads had been abandoned to their useless fate. It was a chance for me to use them so I grabbed them and tossed some watery glue on the inside of the lid and added them on top.
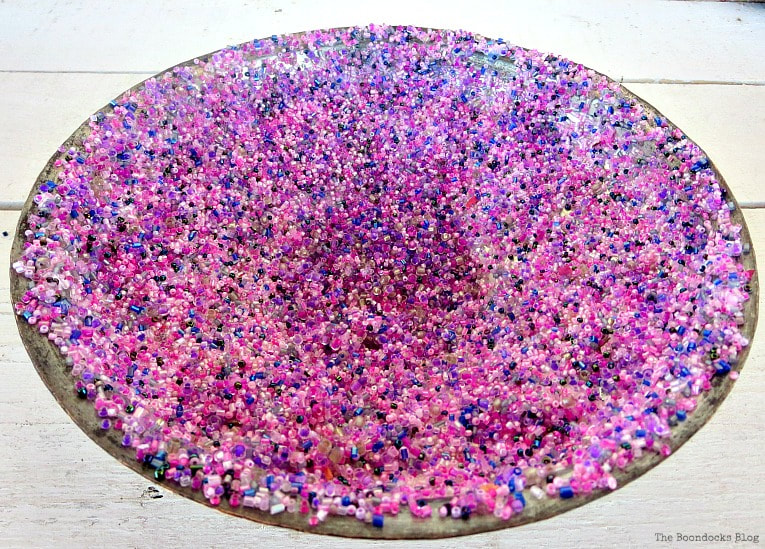
Then I randomly threw some more glue onto a jar and added more beads. Once they were dry I simply placed the jar on top of the beaded lid.
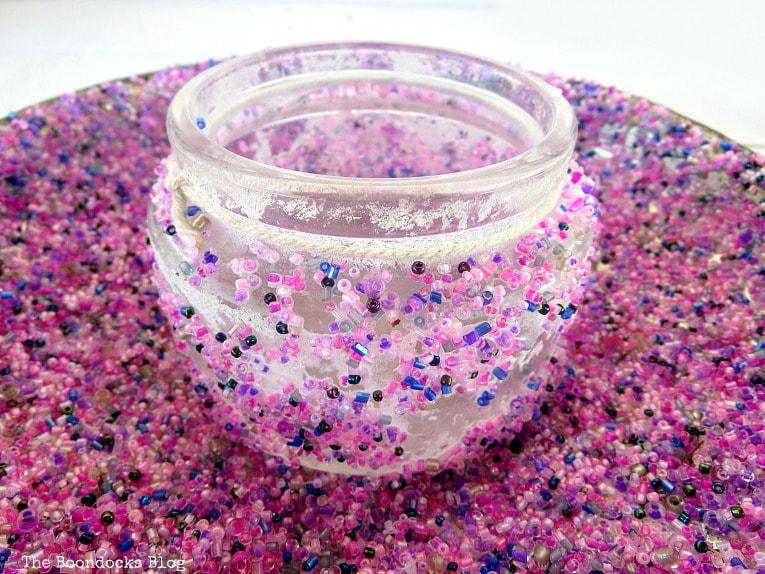
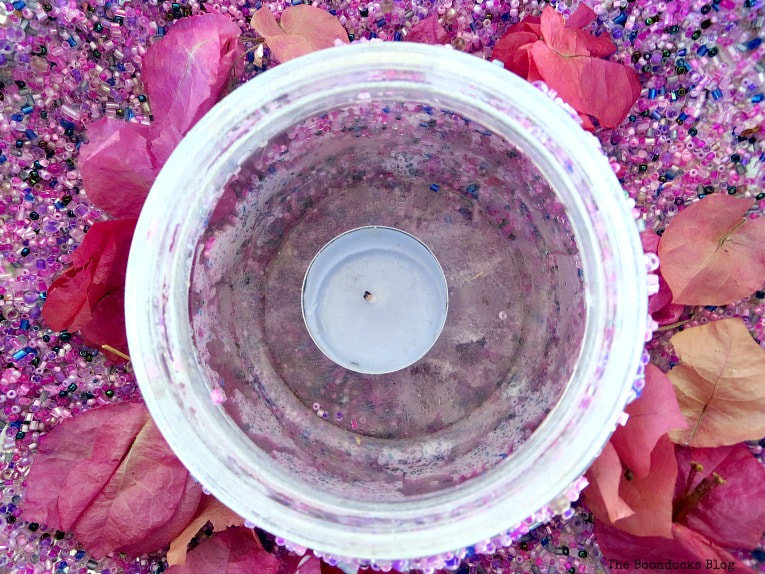
I added some dried flowers in the mix and added a tea light. You can never have enough tea lights!
I had started with a whole different vision for this vintage copper pots project, and this is what I ended up with. It’s not the greatest craft but at least it beats that pitiful excuse of a succulent garden.
Oh and in case you’re wondering the beads are holding up very well, even on a windy balcony.
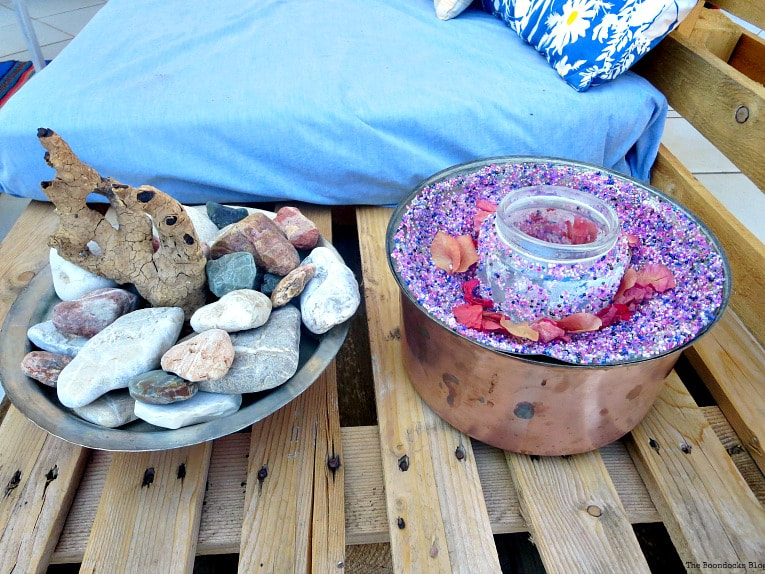
Here they are on the balcony. The bowl with the painted rocks and behind it the backgammon tray which was once a drawer.
And on the pallet couch the other three pieces. To the left is the “Abstract Art” piece. And to the right I have placed the lantern on top of the larger pot to give it some height. You see my husband took back his plants and put them in real planters.
My vision has been ruined but at least I got a few good photos out of the project.
What did I learn after this fiasco of a project?
To stay away from plants?
Or at least to prepare ahead of time so the succulents will be alive?
When in doubt go with blingy beads?
A pretty picture can make even the silliest stump look like art?
Or just to stay out of the basement for a while?
Which one is most on point?
And here ends my tale of how to upcycle vintage cooper pots the wrong way. Because sometimes things turn out the wrong way! But at least I’ve learned a few lessons.
And now for that most important question. Do any of you know why the lids are shaped like that?
AND THE MYSTERY HAS BEEN SOLVED! I belong to an Upcycle Sharin group on Facebook. Within minutes they responded that it was used as a serving dish. Apparently if I take out my “Abstract Art” I can actually serve food in it. So the small bowl shape on top is actually a pedestal. How cool is that!?

Make sure to hop on over and visit my blogging friends to see what they have come up with for this thrift store upcycle challenge.
- Across The Boulevard
- My Husband Has Too Many Hobbies
- Purple Hues and Me
- Sew Crafty Crochet
- Stone Cottage Adventures
More Vintage ideas:
hihihi!
I had fun reading it 🙂 .
And it is still nicer to have a project that is not a great succes than doing nothing at all 😉
Thanks for the encouragement! It can be disappointing when things don’t go your way, or in my case, when you don’t plan ahead, but it turned out all right in the end.
Everyone seems to have success with their diy projects –thanks for telling the truth. It’s refreshing and shows there is hope for me.
I am always trying to keep it real around here Barb. After all, I’m just like you a regular person with no special skills at all. It’s a wonder the powers that be let me run this blog! Lol!!
I swear, Mary, you have the best thrift items in your basement! The fact that you hauled those lovely bowls out and clean them up is good enough – but then things went kinda south for you, but you successfully pulled it off with dressing one up with beads. That’s an awesome idea!
As for the others, we all have diy failures! Sometimes things never turn out as we hoped they would. You are just brave enough to show us! And we love you for that!
Thank you Gail. I let nothing go to waste not even a bad project. haha!!
When in doubt…add bling!! Those copper pots are quite a find. Don’t feel too bad, succulents don’t like me either, lol!
I’m so glad to hear that I’m not alone. 😉
Oh well. That’s always what I say when I have a fail. Oh well. Probably it would have worked out better if you had used smaller rocks, but what do I know? I’ve never done it, or tried to grow succulents either. It’s my understanding you can easily kill them with over-watering. I didn’t know about the lemon trick. I’ll try that next time. Those are the coolest copper pots! I don’t know a thing about them though. Also I liked your blingy bead thing. So it wasn’t a total fail.
It wasn’t a total fail. At least I am using them in some capacity. Florence I am not going to rest till I find out about those lids. My husband was hypothesizing that they were like that so rocks could be put on top to hold the lid down since back in the day there were no fridges. Does that even make sense.
That does make sense, but now you’ve found out what they are! So special that they were passed down in your family too.
I love, love, love it that you will share your epic fails! Hey, the concept was great (and to be honest, I loved that cleaned up copper pot just the way it was!). I think your lessons learned were spot on and so beautifully presented. And you are absolutely right about how a good photo can change up just about anything!
Jeanie, the photos look better than the real thing. Lol! I have to agree, after I cleaned the pots with the lemon they looked so nice, I could have just used them as decor around the house.
Lemon works wonders with rust and anything really. I use it a lot and your copper pots looked so shiny now. I like the little candle centerpiece you made Mary, for outside or inside, candles are always great!
Thanks Katrin. I am so stubborn though, I really want to try and revive those succulents. But first I have to revive myself with all this heat.
Mary, your sense of humor is always delightful! I love that you kept going until you were pleased with the result. The beaded pot looks like a fun addition to your outdoor decor.
Beverly I never give up. Even if the project is a fail, I still like to share my thought process and every single mistake.
Just remember there are people like me out here who have these projects go the wrong way more often than not, and who can so relate and love to see when others have the same outcomes. You brought a smile to my face!!
I’m so happy I could do that Jackie. After all we like our projects but it is good to have a sense of humor about all this upcycling madness.
Mary! Your posts always make me smile! I just think of the success you would of had if your plants had been lush or a little more . . .well, alive! No idea on the lid shapes, but I love those lovely vintage copper pots! Pinned and shared.
Haha. Laurie, I suspect if my plants had been lush or alive, I would not have had such a fun post to write. 😉
Cliff hanger…I thought you were going to answer the question about the pot lids after you asked the question. Haven’t a clue myself but very curious. I did learn how to clean copper pots though – way better than the chemical version! You could have used that awesome photo just before the Pinterest graphic and none of us would have been the wiser. But your beaded lid tea light holder base & jar were a clever save!
Like I just told Laurie, if I had a green thumb this post would not have been as much fun as it turned out. I guess I enjoy the process even more than the end result Marie. I am still fussing over those lids. My husband said they might have been made that way to add rocks into so the lids would not open easily. It is a theory especially when we consider that in those days a lot of people did not have fridges.
First let me say I admire your creativity!
Second, I vote for #4 “A pretty picture can make even the silliest stump look like art”.
Third, The pots look to me like Moroccan Tajines. Although most of those are clay.
Moroccan and Algerian tajine’s are used to cook slow-cooked savory stews. The tagine’s conical shape makes a uniquely moist, hot cooking environment for the dish being cooked. The base is wide and shallow, and the tall lid fits snugly inside. As the food cooks, steam rises into the cone, condenses, and then trickles down the sides back into the dish.
It is odd that these are copper but they may be used by another style of cuisine for the same purpose and not be Moroccan. That is what they remind me of anyway…..I would love to know if anyone knows for sure!
The mystery has not been solved as of yet Jeannee. I may have to ask in one of those upcycling groups. I also saw a few on google made with clay.
I have absolutely no idea why the lids are shaped like that Mary, but I do know a thing or two about beautiful photos. And your river stump, nestled in amongst the rocks is paint worthy and so is the beaded lid with the bougainvillea flowers. That’s not a fail at all, that’s really cool.
P.S. Please don’t stay out of the basement, it’s the closest any of us will ever come to seeing Aladdin’s cave
It just goes to show that sometimes the actual work in progress or the way to the end product is more interesting than the actual finished craft. Am I making any sense? You know what I mean. And thank you for my abstract art. 😉
You do make me laugh Mary, your relentless enthusiasm & tenacity are awesome! You always make it work in the end.
And if nothing else I’ve learn how to clean copper, what a great tip.
That I did Julie. I also have a few shots I can use as wall art! 😉
Dearest Mary,
I love the beaded solution you came up with. As my green thumb isn’t very prominent either I know exactly how you feel… And as one most definitely cannot have enough tea lights ever it’s just perfect!
Have a lovely week,
Marjan
Teal lights to the rescue Marjan! And I was a total fool to neglect the succulents this year. It’s not like they require much care at all.
Mary, I am coming to raid your basement. Girl, just what all do you have in that basement. I have laughed at your post. ABSTRACT art! I am going to so remember that one. Yes girl, BLING makes everything sweet. I for one appreciate you being transparent. You know…not every project we tackle always turns out the way we want it too. But oh do I love when a plan takes place that works. Thanks for sharing. Hugs and blessings, Cindy
Thanks Cindy! I try my best but sometimes life gets in the way or in this case the lack of attention I gave to my poor succulents. But that’s okay because the bling saved the day! (I do believe I am rhyming there!)
I wanted to say Thank You!!! I have ideas in my head but getting them out is not always a success. Glad to see that not all of use get it correct the first time.
I know that my Achilles heel is gardening and I should have been more careful to prepare for this project instead of just assuming that the succulents would be fine. Serves me right for getting myself into trouble!
Don’t consider it a fail. Think of it as a creative journey. I like your save with the beads. And you can still make the planter after you take care of the succulents. 🙂
Debra those succulents are going to haunt me for the rest of the summer! I am so focused on getting the interior done that I have totally neglected all the plants. Not that they were ever very happy before. Haha!
Hello Mary,
I’m not good with succulents so I can’t help you there, sorry! Heat is starting to wipe out the flowers I did plant this year. Time to move them all to the other side of our “house.”
However, why not redo the copper pots like you did the cauldron you made over a while back?? I LOVED the green patina on that one! I bet you could flip the lids and use more wire and wrap them like the tea light jars you made ~ remember when people were taking lids for all kinds of things and turning them into birdfeeders/larger candle holders?? I wondered, too, why the lids were shaped that way. Maybe it’s just a style thing…
Happy decorating! Looks like you need a big shady umbrella outside to shade your sweet plants. 🙂 We are beginning to cook here (heading over 100 degrees this week and I’m in full sun in the pm now…). Should have stayed at the other site, oh well!
Barb 🙂
Oh Barb, stay out of the sun and stay cool. We are literally wilting this week. The only plants I keep are ones that can stand up to the heat. They need to be super low maintenance otherwise they go out the door! I love all of your ideas if only I had more time to make them. I am in the middle of working on the interior of the house right now, that is taking priority over everything else.
Those are some really neat looking pots, but I haven’t a clue why the lids are shaped like that. I have projects sitting aside that didn’t turn out how I wanted. At least you were able to save the day with yours by adding the colored beads, and the tea light. I bet it’s really pretty when lit with all the pretty colors shining.
I lit it for the first time tonight and it is so pretty Linda. I have to say I impressed myself! Haha!
I killed my succulents as well. I’m not even sure why I thought something that required little water would work in my house, because water is how I kill every one of my plants. I’m a over-nurturer I guess, lol. Thank you for sharing your “wrong” way, we all do it!
Trudy thanks for making me feel better. I guess there are more of us out there than I thought. I usually over nurture them too, but this time around I totally forgot about them. Plus we are in the middle of 100 degree weather these past weeks.
Any project that turns out not quite right, but doesn’t involve wood glue, hot glue, a gazillion nail gun brads or stripped screws is perfectly OK. 🙂 Hey, the pots turned out great!!
Haha! You are so right Nancy. At least there were no power tools involved. That would have been the end of me.
What pretty shaped pots. They are so unique. I would love to shop in your basement!! Thank you for the copper cleaning tips! -Marci @ Stone Cottage Adventures
At least I got the cleaning right Marci! 😉
I thought you might have ‘verdigrised’ it but no idea what I would do with it after that!
Pat I had added a bit of patina on my cauldron last year. It certainly adds a lot of beauty and character to anything old. Maybe I will do just that once I figure out what the lids are all about with their small bowls on top.
Mary, ooh those copper pots cleaned up nice huh?! Well I like how you had an idea and you went for it even if it didn’t turn out the way you would have hoped. Sometimes my greatest projects come from my most epic fails that have to be redone because they were so horribly bad or didn’t turn out the way I hoped. Anyway I love the bling you added to the lid and I have no idea why they are shaped like that but they are neat looking!
Keri those lids are keeping me up at night. I’m going to ask around and see if I can get to the bottom of this.
You are too funny, Mary! You get and A for effort and honestly, I like your ideas. Purposeful and pretty
Now if only we could do something about that memory laps and the neglected succulents. Thanks Larissa!
I loved reading your story, Mary. I did not know that you can clean copper with lemon. that is good to know.
At least I learned some valuable lessons from this fiasco Sherry!
Failing is part of the win, in the end. We all have to face different results than expected, but I wouldn’t call it a fiasco: the pictures are totally awesome! And the beads always save the woman! 🙂 Not to mention the fun 🙂
The beads really saved me here Gabi! 😉
Happy to see the “real side” of a DIY blogger! I have many (many) of these stories. I just need to be better about sharing them! Visiting from Grandma’s House party.
I think it is important to be real and show all our warts. It’s what brings us together as DIyers! 🙂
Ha-ha! I totally get it. Sometimes, a vision that you see in your mind just does not translate when you try to create it with real elements in your decor. I really like your “abstract art” piece with the rocks and the piece of driftwood. The colorful beads make a nice, contrasting statement, too.
Carol (“Mimi”) from Home with Mimi
It was worth the try Carol. At least some of them will stay on the balcony for the summer.
Mary, this was so fun. We all can’t have our projects turn out as masterpieces all the time. LOL I’ve been there. Many a pillowcase design has gone by the wayside or the garbage. They don’t all work out as we see it in our mind.
I am so impressed with how those pots cleaned up with lemon and salt. Really gorgeous!
I have no idea why the lids are shaped that way, hope you find out, I’m curious!
So it turns out the lids were used as serving dishes! Who would have expected that. Well now mine are full of beads so there goes that idea.
Wow! I had no idea about the lemon and salt trick. That’s amazing!
Right?? It was instantaneous!
Such pretty pots! I have arrived at the age where I am beginning to look at most everything as an interesting experiment! I love that you gave these pots a whirl as planters. Not to mention I learned how to clean copper!
Win, win.
Happy Wednesday!
Jemma
Before I started blogging I would not have given them a second look. But now everything is under my scrutiny! And everything can be made over or repurposed! Nothing is safe anymore.
Haha! I have 2 pots of dead succulents sitting on my deck, mocking me. I can’t grow them for anything. The copper pots are so pretty though. Maybe buy some faux plants. 😉
There is the magic word! “Faux” It has such a nice right to it!! 😉
My sweet friend even you say you failed with your pots they are very cute! Thank you so much for featuring my succulent little garden 🙂
The pots are cute but yours are cuter !!
I am so excited about the salt and lemon cleaner for the copper. I have a bunch of copper in the attic and I am going to clean them. Great post! Maria
Thanks Maria. I too was super excited when I saw how easily they cleaned up.
Mary, I just never know what I’ll find when I pop over, but I know I’ll be entertained.
I need to tuck that lemon trick away! Thanks for the tip.
And yes, we all have those fail moments. I have a whole catalog of ideas that worked so well in my brain, but then didn’t translate so well in real life. C’est la vie!
Hugs my friend.
Lynn I always aim to entertain. They should give me my own show on tv, no?
Ok, I am sorry that your project did not go as planned, but I have to say, you told your story in a very entertaining fashion. I giggled, the whole way through. And that lemon and salt trick? Wow…who knew. That was my DIY takeaway. Awesome. Off to pin it!!
If you can’t do the project the right way at least you can entertain them! 😉
I was fangirling over the lemon and salt trick!!
Perhaps the lids were used as a pot rest, to keep the hot pots off the counters or table tops. Flip the lid upside down and place the pot inside the lid…just a thought. Or maybe the little recessed area was used as a spoon roost. Good luck finding the answer.
I like the idea of using them as spoon rests I am always looking for somewhere to rest my spoons. It turns out that they are serving dishes. Back in the day that is what they were used for. And here I was looking at that small bowl shape but it is actually the pedestal for the dish shape.
You crack me up, Mary!!
What I learned is I’m not the only one who doesn’t have much luck with plants—it’s the maintenance that kills me…
XOXO
Jodie
http://www.jtouchofstyle.com
Haha! Jodie it is the water, no matter how much you add it is always the wrong amount!
Some people are born with a green thumb and some … aren’t. I’m not sure I would have been successful with the rock garden or the plants either. I do love how beautiful the copper became after you cleaned it with salt and lemon. I don’t actually own any copper, but if I did, that would be a great cleaning trick to have up my sleeve. 🙂
Many I didn’t know it was copper till I cleaned it. I actually had to ask my husband what he thought it was and then I went from there.
I love the beads! What a great save! (Although I didn’t think it was bad to begin with. 🙂 )
Thank you Amy that is very sweet of you to say. At least the photos came out good! 😉
I really like how well the lemon and salt cleaned the copper. Found you over at Snickerdoodles.
That is such a cool trick! I had no idea it worked so well till I tried it and here I was suffering with steel wool pads all these years.
Mary, you are too funny! I always enjoy reading your posts. I think by rescuing those copper pots from your basement and the way they cleaned up is amazing. That’s a makeover, right?? I grew up in the 70s, and we made so many chokers with very similar seed beads. We were little hippies under our Catholic school uniforms. Thanks for the memories! Take care, Cynthia
I remember Cynthia. I used to love lilac and lavender back then and had tons of those beads. At least now I was able to find a crazy use for them.
Mary, the copper pots are so cute and they cleaned up beautifully!! Love that lemon/salt cleaning tip. Thanks for sharing with SYC.
hugs,
Jann
I am so glad I discovered it Jann. The power of Google.
So that lid became a stand, so clever! It’s amusing to see how the lemon (with salt) shines the copper pot. Thanks for that brilliant idea!
That was quite a surprise. I thought you were supposed to use it with the small bowl shape facing up.
Your copper pots cleaned up so nicely, thanks for the lemon and salt trick. I think your too hard on yourself. I also have a brown thumb so my succulents are plastic or rubber lol. I would expect that heat is an issue for your plants whereas cold and late start is an issue for mine.
I like this idea of rubber succulents. I think the issue is me, not the plants they were fine with me neglecting them till this year. Now they are getting uppity!
I really enjoyed this post 🙂
Thanks for linking up to my weekly link party on Dagmar’s Home!
Thank you Dagmar it is always fun to join your party and see what you are up to.
I adore your tale of updating the pots in the wrong way – we have all been there but not all of us are brave enough to admit it
My motto is that perfection is overrated so I would be amiss if I didn’t show you all the reality!